The key to a successful small yard isn’t a visual ratio of plants to pavers, but the structural integrity of the hardscape designed to manage environmental forces.
- Properly engineered base layers are non-negotiable to prevent cracking and heaving caused by weather and soil shifts.
- Material choice and design must account for water flow, soil pressure, and climate challenges like freeze-thaw cycles.
Recommendation: Prioritize foundational work and material science over cosmetic finishes to ensure your entertainment space investment lasts for decades, not just a few seasons.
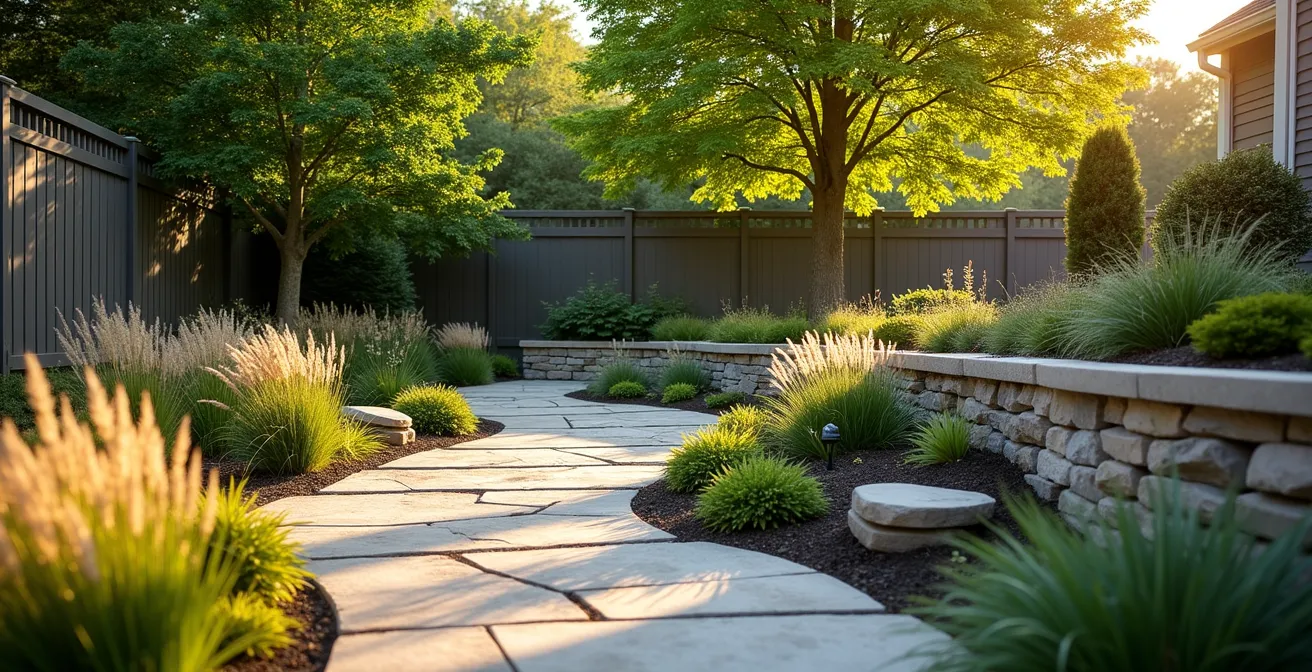
For homeowners with a small urban lot, the desire for a functional and beautiful outdoor space often leads to a confusing tug-of-war between hardscape (patios, walkways) and softscape (plants, lawn). Many design guides offer vague advice, suggesting simplistic aesthetic formulas like a 60/40 plant-to-patio ratio. This approach misses the fundamental point: in a compact environment, balance isn’t about appearance, it’s about performance. A poorly built patio will crack, a retaining wall will fail, and a waterlogged yard will be unusable for entertaining, no matter how beautiful the plants are.
The common mistakes—insufficient base preparation, wrong material choices for the climate, and ignoring water management—turn a dream backyard into a recurring maintenance nightmare. This is because the hardscape and softscape are not separate entities; they exist in a dynamic relationship where water, soil, and weight are in constant negotiation. Viewing them as mere decorative elements is a recipe for failure. The true challenge isn’t arranging shapes, but engineering a durable system.
But what if the key to a lasting balance wasn’t a design rule, but a structural contract? This guide reframes the conversation. We will approach your small yard from a construction specialist’s perspective, focusing on building a permanent, functional backbone that can withstand environmental pressures. Instead of chasing fleeting aesthetic trends, you will learn to make technical decisions about materials and construction methods that form the bedrock of a truly resilient and enjoyable outdoor living area.
This article will guide you through the critical engineering principles of hardscaping. We’ll cover everything from managing water with permeable surfaces to calculating the correct angle for a retaining wall, ensuring your structures are built not just for looks, but for life. By focusing on the durability of the hardscape first, you create a stable, worry-free foundation upon which any softscape design can thrive.
Summary: A Technical Guide to Balancing Hardscape and Softscape
- Why Permeable Pavers Are Essential for Flood-Prone Backyards?
- How to Calculate the Batter Angle for a DIY Retaining Wall?
- Stamped Concrete or Natural Stone: Which Survives Freeze-Thaw Cycles?
- The Base Layer Mistake That Cracks Your Walkway in One Winter
- When to Reseal Your Pavers to Prevent Stain Penetration?
- When to Re-Level Pavers: Signs Your Sand Bed Has Washed Away
- How to Design a Front Walkway That Invites Buyers In?
- How to Select Adapted Vegetation for Salt-Laden Coastal Winds?
Why Permeable Pavers Are Essential for Flood-Prone Backyards?
In a small urban yard, every square foot of non-absorbent surface—like a traditional concrete patio or asphalt driveway—exacerbates drainage problems. During heavy rain, this impermeable hardscape acts like a funnel, directing torrents of water toward your home’s foundation or overwhelming municipal storm drains. For properties in flood-prone areas, this isn’t just an inconvenience; it’s a significant risk. The solution lies not in reducing hardscape, but in re-engineering it to work with nature. Permeable pavers are the single most effective technology for this, transforming your patio or walkway from a water-shedding problem into a water-managing asset.
Unlike solid surfaces, permeable pavers are installed with small gaps between them, filled with a fine aggregate. This system allows rainwater to percolate directly through the surface into a specially prepared, multi-layered stone base below. This base acts as a natural reservoir, holding the water and allowing it to slowly absorb into the subsoil. This process dramatically reduces runoff volume and velocity. In fact, a 2024 comparative study confirmed the effectiveness of this approach, finding a 51.25% reduction in peak flow during storm events. This mitigates localized flooding, recharges groundwater, and reduces the hydrostatic pressure against your foundation walls.
While highly effective, a permeable system is not a “set it and forget it” solution. Its performance depends on keeping the joints free of fine sediment and organic debris that can clog the system. Regular maintenance is a core part of the structural contract.
- Monthly: Use a stiff broom to remove surface leaves, dirt, and debris. Never use a high-pressure washer, as it can dislodge the joint filler.
- Quarterly: For high-traffic areas, consider the “sacrificial grit” technique by lightly scattering new joint aggregate to keep spaces open.
- Semi-annually: Use a shop vacuum to carefully remove any accumulated sediment from the paver joints to restore porosity.
- Annually: Conduct a simple infiltration test. Pour a bucket of water on a section; it should disappear quickly. If it pools, deeper cleaning is needed.
How to Calculate the Batter Angle for a DIY Retaining Wall?
A retaining wall in a small yard is often a necessity for creating level, usable space for a patio or garden. However, a vertical wall is a structural rookie mistake. A wall built perfectly perpendicular to the ground is fighting a losing battle against the immense force of the soil and water behind it, known as lateral earth pressure. Over time, this pressure will cause the wall to bow, crack, or fail completely. The professional solution is to incorporate a “batter,” which is a deliberate backward lean or setback of the wall into the hillside. This angle is not arbitrary; it’s a calculated engineering principle that uses gravity to its advantage.
The batter angle redirects a portion of the lateral pressure downward into the wall’s footing, increasing its stability. The required angle depends directly on the type of soil you are retaining and the height of the wall. Heavy, expansive clay soils exert more pressure than loose, granular soils and therefore require a more significant batter. For a DIY project, failing to calculate this correctly is the most common reason for premature wall failure. The goal is to build a structure that will last for decades, not just a few seasons. Below is a guide based on standard engineering principles for common soil types.
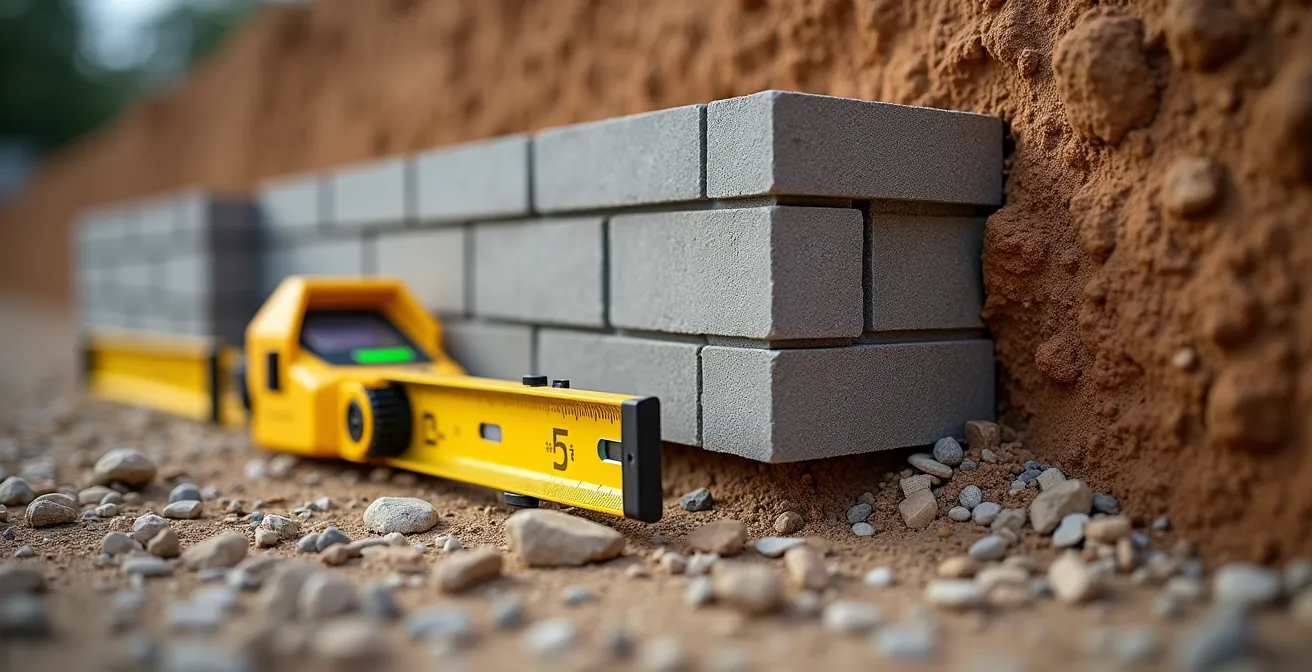
This illustration shows how the backward lean (batter) works with the mass of the blocks and the aggregate base to counteract the pressure from the soil behind the wall. The following table provides a technical reference for determining the necessary angle.
| Soil Type | Friction Angle | Recommended Batter | Maximum Wall Height (DIY) |
|---|---|---|---|
| Sandy/Granular | 32-36° | 1 inch per foot | 4 feet |
| Clay (Heavy) | <31° | 2-3 inches per foot | 3 feet |
| Mixed/Loam | 30-32° | 1.5 inches per foot | 3.5 feet |
| Rocky/Gravel | 36°+ | 1 inch per foot | 4 feet |
As this guide from retaining wall system engineers shows, these specifications are critical. For a 4-foot high wall in sandy soil, each course of blocks should be set back 1 inch from the one below it. This slight angle is the difference between a temporary landscape feature and a permanent structural improvement.
Stamped Concrete or Natural Stone: Which Survives Freeze-Thaw Cycles?
When selecting a surface material for a patio or walkway, especially in colder regions, aesthetics often take a backseat to durability. The most destructive force your hardscape will face is the freeze-thaw cycle. This occurs when water penetrates the surface material, freezes, expands by about 9%, and exerts immense internal pressure. When it thaws, the water contracts, only to repeat the cycle. This relentless process can cause spalling (flaking), cracking, and the complete degradation of a surface in just a few years. The choice between stamped concrete and natural stone is therefore a critical decision in material science.
Stamped concrete is a popular choice for its ability to mimic more expensive materials like slate or flagstone at a lower initial cost. However, its longevity is entirely dependent on the quality of the installation. For concrete to withstand freeze-thaw cycles, it must have a low water-to-cement ratio to reduce porosity and, most importantly, it must be properly air-entrained. This process involves adding microscopic air bubbles into the concrete mix, which act as tiny relief valves for the pressure exerted by freezing water. Without sufficient air entrainment (typically 4-7%), stamped concrete is highly susceptible to surface spalling, where the decorative top layer flakes off, ruining the appearance and integrity of the slab.
Natural stone, on the other hand, has its own set of considerations. Dense, low-absorption stones like granite, quartzite, or high-quality slate are naturally resistant to water penetration and thus perform exceptionally well in freeze-thaw conditions. Their geological formation under immense heat and pressure gives them a compressive strength that far exceeds standard concrete. However, more porous stones like certain types of sandstone or limestone can absorb significant amounts of water, making them just as vulnerable as poorly installed concrete. The key is selecting a stone rated for your specific climate zone. While the initial investment for dense natural stone is higher, its proven lifespan of decades, often centuries, makes it the superior long-term choice for performance and durability.
The Base Layer Mistake That Cracks Your Walkway in One Winter
The most beautiful pavers or the most expensive natural stone will fail within a single year if the foundation beneath them is faulty. The single greatest mistake in hardscape construction is underestimating the importance of the engineered base layer. This is not simply a layer of gravel; it is a structural component designed to distribute loads, provide a stable platform, and, most critically, manage water. A poorly prepared base is the direct cause of heaving, sinking, and cracking that plagues so many DIY and low-bid projects. The ground is not static; it freezes, thaws, and holds water, and the base is the only thing protecting your investment from these powerful forces.
The process begins with proper excavation, removing all organic topsoil down to stable, inorganic subsoil. The depth of the base is non-negotiable and depends on your climate and soil type; in freeze-thaw zones, a depth of 6-8 inches of compacted aggregate is standard for a walkway. The material is typically a crushed, angular stone that locks together when compacted, creating a strong, porous foundation. The fatal error is trying to save time or money by adding the base material all at once. It must be installed in “lifts”—thin layers of 2-3 inches at a time—with each lift being mechanically compacted until it reaches near-total density.
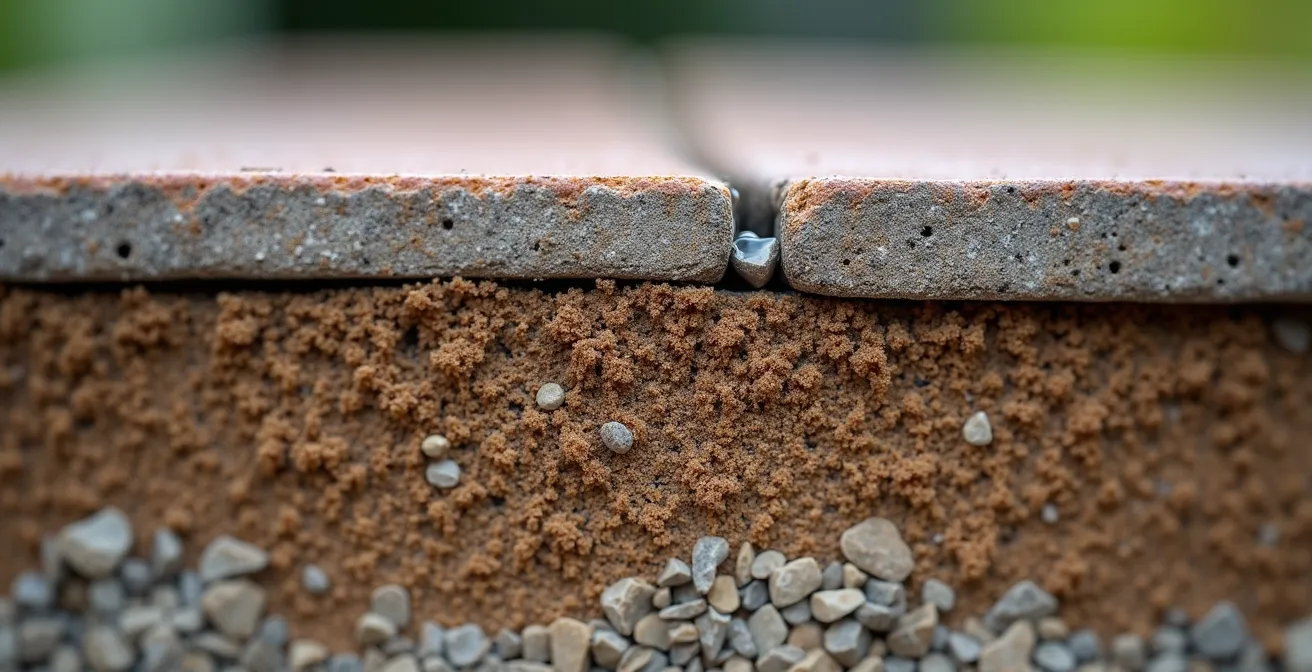
This cross-section illustrates the critical elements: a deep, compacted aggregate base that extends beyond the edges of the pavers. This “daylighting” of the base is crucial for drainage, preventing water from getting trapped along the edge of the walkway, which is a primary cause of heaving. The final surface is only as good as the unseen work below.
Action Plan: Professional Base Layer Compaction Standards
- Excavation: Dig out the area to a minimum of 6-8 inches below the final intended height of the pavers, removing all organic soil.
- Install Lifts: Add the crushed aggregate base material in layers, ensuring no single “lift” is more than 3 inches thick.
- Compact Each Lift: Using a mechanical plate compactor, compact each lift until you achieve at least 95% Standard Proctor Density.
- Test Compaction: A properly compacted base will feel solid underfoot. The plate compactor should “bounce” on the surface rather than sinking into it.
- Extend Base Edges: Ensure the compacted base extends a minimum of 6 inches beyond the final footprint of the walkway on all sides to promote drainage.
When to Reseal Your Pavers to Prevent Stain Penetration?
Once your hardscape is properly installed, the focus shifts from construction to preservation. Pavers, whether concrete or natural stone, are porous materials. Without protection, they will readily absorb stains from oil, grease from a grill, fallen leaves, or red wine from a spilled glass during an evening of entertaining. A high-quality sealer acts as a protective shield, penetrating the paver’s surface or forming a durable film over it to block these contaminants. The question is not *if* you should seal, but *when* and *how often* you need to reapply this protection to maintain the integrity and appearance of your investment.
The resealing schedule depends entirely on the type of sealer used. There are two primary categories: film-forming sealers and penetrating sealers. Film-formers, typically acrylic-based, create a visible surface layer that can provide a “wet look” or gloss finish. They offer excellent stain protection but are less durable, wearing down with foot traffic and UV exposure. These generally require reapplication every 2 to 3 years. Penetrating sealers, made from silanes or siloxanes, work differently. They soak into the paver and create a hydrophobic barrier within the material itself without changing its appearance. They are far more durable, lasting 5 to 10 years or more, but offer slightly less resistance to surface oil stains than a thick film-former.
The simplest way to know if your sealer is still effective is the “water drop test.” Sprinkle a few drops of water onto a clean, dry paver. If the water beads up like on a freshly waxed car, the sealer is still working. If the water darkens the paver and soaks in within 30 to 60 seconds, the protective barrier has failed, and it’s time to reseal. Applying a new coat is critical, but applying it incorrectly can create bigger problems, as leading industry experts warn.
Never apply a new coat of film-forming sealer over a yellowed, flaking old coat. This traps moisture and creates a cloudy, peeling mess.
– System Pavers Technical Team, Hardscaping Protection Guide 2024
Before any reapplication, the surface must be thoroughly cleaned and, in the case of a failing film-former, stripped of the old coat. Proper sealing is a proactive maintenance step that keeps your entertainment space looking pristine and prevents permanent damage.
When to Re-Level Pavers: Signs Your Sand Bed Has Washed Away
Even a well-built paver patio or walkway can develop issues over time. The most common problem is settling or sinking, creating an uneven surface that is both a tripping hazard and an eyesore. This is rarely an issue with the pavers themselves; it is almost always a sign of failure in the layer directly beneath them: the bedding sand. This thin, 1-inch layer of sand provides the final leveling course for the pavers and helps lock them in place. When pavers start to rock, dip, or become uneven, it’s a clear indication that this critical sand bed has been compromised, typically by being washed away by water.
The primary culprits are failed edge restraints or compromised joint sand. Edge restraints are the plastic, metal, or concrete borders that hold the entire paver system together. If they break or heave, they create a gap that allows the bedding sand to escape. Similarly, if the polymeric sand in the joints between pavers cracks or washes out, it creates a direct channel for rainwater to erode the sand bed from above. The first sign is often subtle—a slight rocking motion when you step on the edge of a paver. This indicates a void has formed underneath. Left unaddressed, the problem will worsen until the paver sinks noticeably.
Identifying and correcting this issue is a straightforward repair for a professional, as it directly targets the point of failure without requiring a full replacement. One expert describes the diagnostic process clearly:
We wanted to let you know that your guys did a very nice job identifying the early warning signs – the slight rocking motion when stepping on paver edges was the first clue. After lifting the affected pavers, we found the bedding sand had washed out completely from the center section, confirming the drainage issue. The screed and replace method worked perfectly to restore the level.
– Barrett Lawn Care, Landscaping Project Notes
The repair involves carefully lifting the affected pavers, replenishing the lost sand, and reinstalling them. It’s a precise process:
- Remove Pavers: Use paver extractors to gently lift the sunken or rocking pavers without damaging them.
- Clean Out Sand: Excavate the old, contaminated bedding sand from the void.
- Check Edging: Inspect and repair the adjacent edge restraint if it has failed. This is crucial to prevent a recurrence.
- Add New Sand: Add fresh, coarse bedding sand to a depth of 1 inch.
- Screed Level: Use a small board or screed rail to level the new sand perfectly with the existing sand bed.
- Replace Pavers: Set the pavers back in place and use a rubber mallet to tap them down to the correct height.
- Apply Polymeric Sand: Sweep new polymeric sand into the joints and activate it with a light mist of water to lock everything together.
How to Design a Front Walkway That Invites Buyers In?
While much of hardscape construction focuses on durability, design plays a crucial role when the goal is enhancing curb appeal and property value. A front walkway is more than just a path to the door; it’s the first physical interaction a guest or potential buyer has with your home. It sets the tone and can subconsciously influence their perception of the entire property. A narrow, cracked, and purely functional concrete path can feel cheap and unwelcoming. In contrast, a well-designed walkway feels generous, intentional, and luxurious, directly adding to the home’s perceived value.
From a construction standpoint, two design elements have an outsized impact: width and shape. A standard 3-foot walkway is functional for one person, but it feels cramped. Widening the path to 4.5 or 5 feet allows two people to walk comfortably side-by-side, creating a more gracious and welcoming experience. This small increase in material cost pays significant dividends; industry experts report that a generously wide walkway can directly contribute to a higher resale value. The message it sends is one of quality and thoughtful investment, not of cutting corners.
The shape of the walkway is equally important. A straight, direct path can feel abrupt and utilitarian. Gently curving paths, on the other hand, are perceived as more natural and engaging. They slow the journey to the door, encourage the visitor to take in the surrounding landscape, and create a sense of discovery. This isn’t just aesthetic theory; it has a measurable financial impact.
Case Study: The Financial Impact of Curved Walkways
A recent analysis of 50 residential properties by Rock Water Farm provided clear data on this phenomenon. The study found that homes featuring gently curved front walkways, particularly those with a generous 6×6 foot landing pad at the front door, sold on average 15% faster than comparable homes with straight, narrow paths. During property viewings, prospective buyers consistently described the curved paths as more “welcoming,” “luxurious,” and “inviting.” This demonstrates that thoughtful hardscape design is a direct investment in your property’s marketability.
Combining generous width with elegant curves transforms a simple utility into a high-impact design feature. It’s a strategic investment that elevates the entire front facade of the home, making a powerful first impression that lasts.
Key Takeaways
- The foundation is non-negotiable; a properly excavated and compacted base layer determines over 90% of a hardscape project’s long-term success.
- Water is the primary force to be managed, not fought. Use permeable surfaces and engineered drainage to work with nature and protect your structures.
- Material selection should be driven first by climate performance—like freeze-thaw durability or salt tolerance—before considering aesthetics.
How to Select Adapted Vegetation for Salt-Laden Coastal Winds?
The final piece of the hardscape-softscape balance is choosing plants that can thrive in the specific microclimate your structures and location create. Nowhere is this more critical than in coastal areas, where vegetation must contend with two relentless forces: persistent, salt-laden winds and sandy, quick-draining soil. Planting the wrong species here is a waste of time and money, as they will quickly become scorched, stunted, or killed by the salt spray. The key to a successful coastal garden is not to fight the environment, but to select plants that are genetically adapted to it and to use your hardscape elements as part of a layered defense strategy.
The most effective approach is to create a series of defensive zones, using both plants and structures. Low stone walls or solid fences act as the first line of windbreak, creating a pocket of calmer air behind them where less tolerant species can survive. The plants themselves should then be layered by their tolerance.
- Front Line (0-10 ft from the most exposed edge): This zone gets the full force of salt spray and wind. Only the toughest, most salt-tolerant plants like Bayberry (Myrica pensylvanica) and Rugosa Rose (Rosa rugosa) can survive here. They act as a living windbreak, absorbing the initial assault.
- Second Line (10-25 ft): Behind the protection of the front line plants and any hardscape walls, you can plant medium-tolerance species. This is the ideal spot for ornamental grasses, which are flexible in the wind, and other hardy shrubs.
- Protected Zone (25+ ft): In the most sheltered areas, typically closest to the house, you can create a microclimate suitable for more delicate ornamental flowers and shrubs like Lavender, which still offer good drought tolerance.
Soil amendment is also crucial. Sandy coastal soil drains too quickly and lacks nutrients. Amending the soil with at least 30% high-quality compost is essential for improving water retention and providing the necessary organic matter for plants to establish strong root systems. The following table provides a quick reference for selecting plants based on their resilience.
| Plant Type | Salt Tolerance | Drought Tolerance | Best Position |
|---|---|---|---|
| Bayberry | Excellent | High | Front line |
| Beach Rose (Rugosa) | Excellent | Moderate | Front line |
| Ornamental Grasses | Good | High | Second line |
| Lavender | Moderate | Excellent | Protected areas |
Now that the structural and environmental considerations are clear, the next step is to synthesize this knowledge into a cohesive plan. Begin by assessing your yard’s specific challenges—drainage, soil type, and climate—to engineer a hardscape foundation that provides a permanent, functional backbone for your new outdoor entertainment space.
Frequently Asked Questions About Hardscape vs Softscape: How to Balance Stone and Greenery in Small Yards?
How often should film-forming sealers be reapplied?
Film-forming acrylic sealers that provide a ‘wet look’ typically need reapplication every 2-3 years, depending on traffic and weather exposure.
What’s the lifespan of penetrating sealers?
Penetrating silane/siloxane sealers are invisible but last 5-10+ years, though they offer less surface stain protection than film-formers.
How do I perform the water drop test?
Place a few drops of water on a dry, clean paver. If water beads up, the sealant is working. If it soaks in within 30-60 seconds, it’s time to reseal.