The secret to a dramatic small garden isn’t adding more objects; it’s making a single, powerful compositional decision.
- A focal point’s success hinges on its visual weight and its relationship with the negative space around it, not its price tag.
- True impact comes from a four-season narrative—choosing an anchor based on its form and structure, which holds interest even under snow.
Recommendation: Stop looking for things to buy. Instead, start analyzing your space like a director and choose one element to command the scene.
For the minimalist gardener, the desire for a dramatic, anchoring element is a paradox. You crave a point of visual gravity, something to hold the eye and give the composition meaning. Yet, the conventional advice often leads directly to the one thing you dread: clutter. The internet is saturated with suggestions to add a birdbath, a specimen plant, or a piece of art. While well-intentioned, this approach treats the focal point as an accessory to be collected, a final decoration to be placed within the scene.
This method fundamentally misunderstands the challenge. The problem isn’t a lack of beautiful objects. The problem is a lack of visual hierarchy and compositional intent. Adding elements without a clear directorial vision results in a collection of disconnected items vying for attention, creating visual noise instead of a serene and powerful statement. The fear isn’t of the object itself, but of its potential to disrupt the delicate balance of a carefully curated small space.
But what if the solution wasn’t about adding another object, but about mastering the space you already have? What if the focal point isn’t something you *buy*, but a decision you *make*? This guide reframes the selection process. We will move beyond a catalog of items and into the principles of visual direction. You will learn to think in terms of visual weight, negative space, and temporal narrative. By the end, you will not just have ideas for a focal point; you will have the framework to make a single, bold choice that brings drama to your garden without sacrificing its minimalist soul.
Summary: A Director’s Guide to Choosing Focal Points Without Clutter
- Fountain or Birdbath: Which Focal Point Attracts More Wildlife?
- Japanese Maple or Dogwood: Which Tree Anchors a Winter Garden Best?
- Why a Small Statue Looks Ridiculous in a Large Open Lawn?
- Gas vs Wood Fire Pit: Which Focal Point Is Safer for Small Patios?
- How to Uplight a Tree to Create Drama Without Light Pollution?
- Why a Small Plant on the Floor Makes Your Ceiling Look Lower?
- How to Design a Solar Lighting Plan That Actually Illuminates Steps?
- How to Design for Year-Round Interest When Everything Is Covered in Snow?
Fountain or Birdbath: Which Focal Point Attracts More Wildlife?
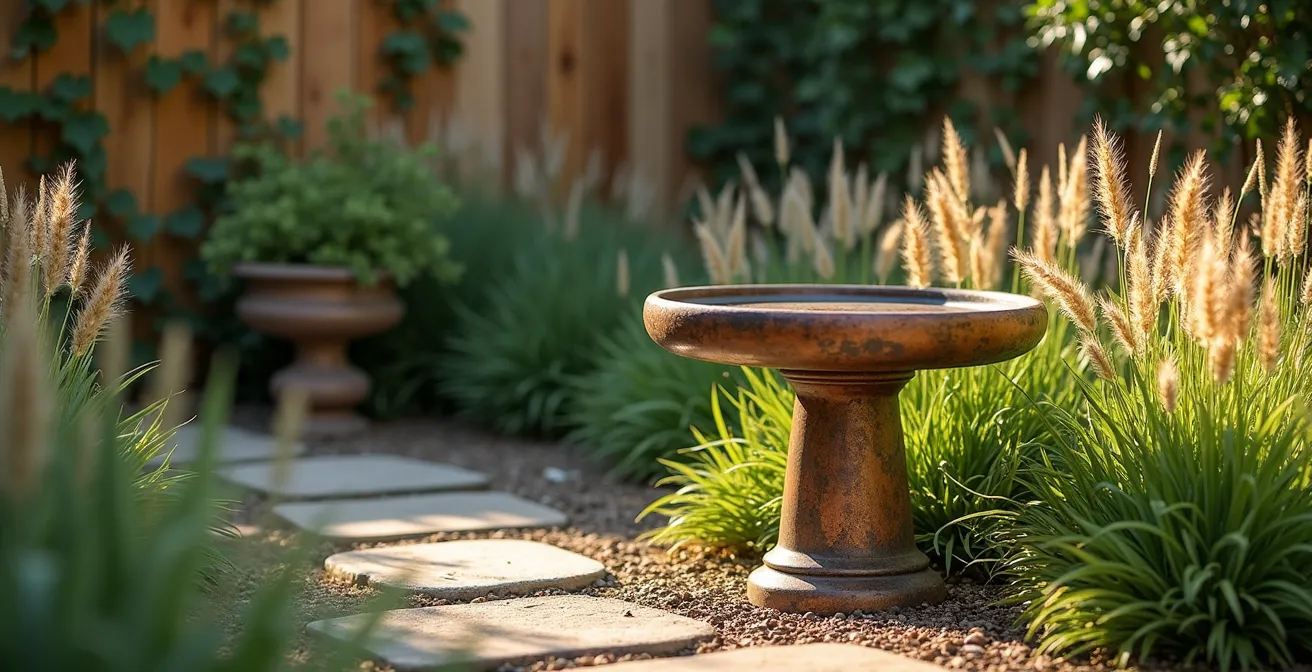
The choice between a fountain and a birdbath is not merely aesthetic; it is a declaration of purpose. Before considering form, you must decide what story you want your garden to tell. Are you creating a silent, sculptural space or a dynamic habitat buzzing with life? A birdbath is a direct invitation to avian visitors, offering a stage for their daily rituals. A fountain, with its gentle sounds, calls to a wider ecosystem of birds, beneficial insects, and even frogs, creating a multi-sensory experience. The sound of moving water acts as a beacon, making it a more powerful attractant for a diverse range of wildlife.
Consider the maintenance contract you are signing. A birdbath demands simple, frequent attention—a daily rinse and refill to keep it fresh and safe. A fountain requires a deeper, less frequent commitment: cleaning pumps, managing algae, and monitoring water levels. There is no right answer, only the one that aligns with your lifestyle and your primary goal for the space.
For the minimalist who desires both form and function, hybrid designs offer a compelling solution. The Basalt Bird Bath Fountain Kit, for instance, merges a shallow, polished basin ideal for birds with the gentle, enticing flow of a fountain. Its wide, stable form allows multiple creatures to visit, while the natural stone provides a powerful sculptural element. This isn’t just a water feature; it’s a curated ecological destination that doubles as a piece of living art, satisfying the need for both wildlife and a strong visual anchor.
Japanese Maple or Dogwood: Which Tree Anchors a Winter Garden Best?
A plant is not a static object; it is a performer with a four-act play. A true focal point must command the stage year-round, and its most crucial performance is often in winter. When flowers fade and leaves fall, the garden’s underlying structure—its very bones—is revealed. This is where the choice between a Japanese Maple (Acer palmatum) and a Dogwood (Cornus) becomes a critical directorial decision about your garden’s temporal narrative.
The Japanese Maple is a master of silhouette and texture. Its delicate, often contorted branches create an intricate tracery against a stark winter sky. When kissed by frost, it transforms into a breathtaking ice sculpture, each twig a crystalline line drawing. It offers quiet, architectural drama. The Dogwood, particularly the red-twig or yellow-twig varieties, is a master of color. It injects a bolt of vibrant energy into the muted winter palette, its colorful stems standing like bold brushstrokes against the snow. It is a statement of defiance against the season’s slumber.
This is an excellent example of how a focal point’s impact is defined by its inherent structure, especially in the starkness of winter. The filigree of frosted branches becomes the main event.

Your choice depends on the story you want to tell. Do you want the subtle, sculptural elegance of form, or the audacious, painterly declaration of color? Both trees are well-suited for smaller gardens and a range of climates, as Japanese Maples and Dogwoods thrive in USDA zones 5-9, ensuring their resilience. The decision, therefore, is purely artistic. You are not just planting a tree; you are casting the lead actor for your garden’s winter scene.
Why a Small Statue Looks Ridiculous in a Large Open Lawn?
The answer lies in a fundamental principle of composition: visual weight. An object’s power to draw the eye is determined not by its intrinsic beauty, but by its scale, mass, and contrast relative to its surroundings. A small statue in a vast, empty lawn is like a single, timid voice in a cathedral. It lacks the mass to command the space. The negative space around it doesn’t frame it; it swallows it whole. The eye scans, registers it as insignificant, and moves on, leaving the composition feeling unbalanced and unresolved.
In a small garden, this principle is even more critical. Here, every element is magnified. The goal is not to fill the space, but to charge it with intention. A focal point must have enough visual weight to anchor the scene without overwhelming it. This is a delicate balancing act of scale and proportion. Placing a focal point isn’t about finding the center; often, an off-center placement guided by the rule of thirds creates a more dynamic and engaging composition. It forces the eye to travel, creating a journey rather than a static portrait.
Understanding the relationship between your garden’s size and the appropriate scale of its anchor is non-negotiable. The following guidelines provide a director’s framework for making a selection that respects the composition.
This comparative table from a recent analysis clearly lays out the strategy for scaling your focal point to the space it must command. As a landscaping resource explains, the key is to match the element’s presence to the garden’s volume.
| Garden Size | Recommended Focal Point | Visual Impact Strategy |
|---|---|---|
| Small Spaces (under 500 sq ft) | A delicate water feature, a colorful container garden, or a small sculpture | Use vertical elements to draw eye upward |
| Medium Gardens (500-2000 sq ft) | Statement plants, medium fountains, pergolas | Create zones with multiple secondary focal points |
| Large Spaces (over 2000 sq ft) | A majestic tree, a grand fountain, or a sprawling flower garden | Use dramatic scale to anchor vast spaces |
Ultimately, a focal point’s role is to create a resting spot for the eye and clarify the space. It must be interesting enough to guide the viewer further into the landscape, creating a sense of wonder. It’s an element of surprise that organizes the perceived chaos of nature into a deliberate design.
Gas vs Wood Fire Pit: Which Focal Point Is Safer for Small Patios?
When the focal point’s purpose is functional—providing warmth and a gathering place—safety becomes the primary design constraint, especially in the tight quarters of a small patio. The romantic appeal of a crackling wood fire must be weighed against the hard realities of sparks, smoke, and clearance requirements. For most small, enclosed spaces, the debate ends before it begins: a gas fire pit is unequivocally the safer, more responsible choice.
A wood fire pit is a living, breathing element that requires a minimum of 10 feet of clearance from any structure, fence, or combustible material. Its smoke can become a nuisance for you and your neighbors, and flying embers pose a constant risk. A gas fire pit, by contrast, offers controlled, predictable flame at the flick of a switch. It requires significantly less clearance (typically 3-4 feet), produces no smoke or sparks, and can be turned off instantly. It provides the ambiance of fire without the liability.
As DIY expert Sherin Woods notes, the allure is undeniable: “A stone fire pit in the corner of the garden is going to be both a focal point and a good sitting place to hang out!” This statement, highlighted in a guide on Balcony Garden Web, captures the social power of a fire feature. The director’s job is to achieve this effect without compromising safety. Before any purchase or installation, a rigorous safety audit is not just recommended; it is mandatory.
Action Plan: Your Fire Feature Safety Audit
- Measure Clearance Zones: Confirm you have a minimum of 10 feet from structures for a wood-burning pit, or 3-4 feet for a gas unit. Measure twice.
- Verify Local Regulations: Check your city’s fire codes and any Homeowner Association (HOA) rules. Some areas have outright bans on wood-burning pits.
- Assess Your Surface: Ensure the installation area is a non-combustible surface like concrete, stone pavers, or a specialized fire pit pad. Never place it on a wooden deck or grass.
- Look Up: Check for overhanging tree branches, patio umbrellas, awnings, or pergolas. Your vertical clearance is as important as your horizontal clearance.
- Plan for Emergencies: Position your fire pit where a fire extinguisher or garden hose is within easy reach. Hope for the best, prepare for the worst.
How to Uplight a Tree to Create Drama Without Light Pollution?
Lighting is not an afterthought; it is a sculptural tool. After dark, you have the power to reshape your garden, to dissolve the background into velvet black and carve your focal point out of the darkness. However, the amateur mistake is to “flood” an area with light. The director’s technique is to “sculpt” with it. Uplighting a tree is a classic method, but done crudely, it creates a glaring column of light that pollutes the night sky and obliterates any sense of mystery.
The sophisticated approach is to mimic nature. Techniques like “moonlighting” involve placing a shielded, downward-facing fixture high in the tree’s branches. This creates a soft, dappled light on the ground below, recreating the effect of moonlight filtering through leaves. It illuminates the space with an ethereal quality while leaving the light source itself hidden. This is drama through subtlety, not brute force. It respects the darkness, which is just as important as the light.
This image perfectly captures the ‘moonlighting’ technique. The light originates from within the tree, casting natural, organic shadows and creating a sense of mystery and depth without any upward glare.
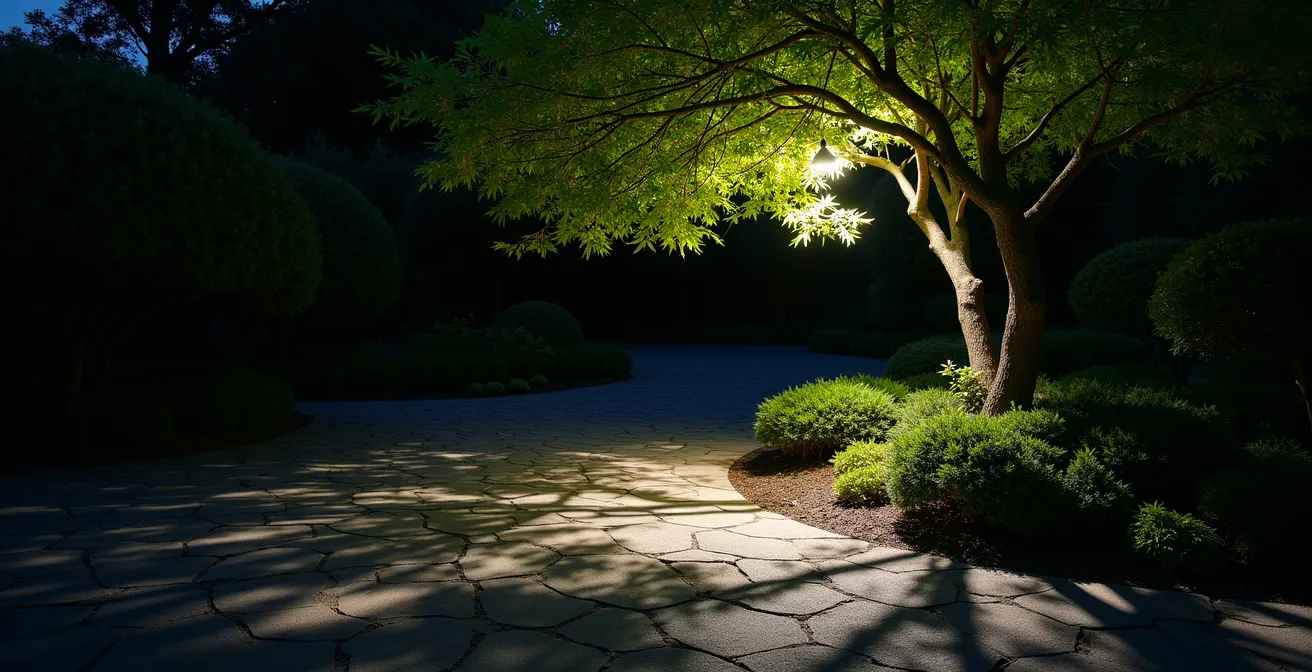
Achieving this effect requires precision and the right equipment. The goal is to reveal form and texture, not to blast the subject. You must control the beam’s angle, color temperature, and direction to eliminate upward light spill. This is not just about aesthetics; it’s about responsible stewardship of the night environment. By choosing Dark Sky compliant fixtures, you ensure your private drama doesn’t become a public nuisance. True mastery is creating a stunning visual effect that only you and your guests can see.
Why a Small Plant on the Floor Makes Your Ceiling Look Lower?
Your brain is hard-wired to create order out of chaos by establishing a visual hierarchy. When you place a small plant on the floor of a garden or patio, you are giving the eye a low point of anchor. This action unintentionally draws the viewer’s gaze downward, compressing the perceived vertical space and making the ‘ceiling’—be it the sky or a pergola—feel lower and more oppressive. You have directed the eye to the floor, and the rest of the scene flattens as a result.
The solution is to control the vertical dimension with the same intention you control the horizontal. By elevating a focal point, you command the eye to look up. This simple act creates an immediate sense of spaciousness and height. A decorative pillar, a tall urn, or a climbing vine on a trellis forces the composition upward, drawing the sky into the garden’s frame. This is a core tenet of the “Rule of Three Levels” in design: creating interest at ground, eye, and overhead levels to build a cohesive, three-dimensional scene with depth and a clear visual journey.
The impact of placement is not subjective; it is a predictable perceptual effect. A focal point’s power is multiplied when it is positioned to command attention at a comfortable and impactful height.
| Placement Level | Visual Effect | Best Use Case |
|---|---|---|
| Ground Level Only | Draws eye down, can make space feel compressed | Large gardens needing ground coverage |
| Eye Level (3-5 ft) | Creates comfortable viewing, establishes human scale | Seating areas, pathways |
| Vertical (above 6 ft) | When you raise it up high, it’s hard to ignore. Elements wouldn’t have the same impact down among the rest of the border plants, but easily command attention atop a decorative pillar | Small gardens needing height |
| Three-Level Integration | Creates cohesive scene with journey and depth | All garden sizes for maximum impact |
Do not let your focal point get lost among the other performers. Give it a stage. Elevating a beautiful pot or a small sculpture on a plinth transforms it from just another object into a celebrated centerpiece. You are telling the viewer, “Look here. This matters.”
How to Design a Solar Lighting Plan That Actually Illuminates Steps?
Safety lighting does not have to be ugly. While its primary purpose is function—preventing a fall—the design of a step lighting plan can and should be integrated into the garden’s overall composition. The common failure of solar lighting is a lack of planning, resulting in dim, unreliable light that creates more ambiguity than safety. A successful plan is a matter of calculation, placement, and layering, not just sticking a few solar stakes in the ground.
First, do the math. Safe navigation requires 12-100 lumens per step. Calculate your needs and choose fixtures that meet this standard. Second, placement is everything. The most elegant and effective technique is to install lights on the vertical riser of the step, not the tread. This casts light down onto the step below, creating a “floating” effect that is both beautiful and highly functional, clearly defining each edge without causing glare. Spacing them every other step often provides sufficient coverage without over-lighting the area.
Finally, think like a lighting designer. Layer different types of light. Use functional downlights for the treads and consider adding subtle accent lights to highlight the texture of the risers or nearby plantings. Thanks to modern solar LED lights that provide up to 90% energy savings compared to traditional systems, a sophisticated, multi-layered design is both achievable and efficient. If your steps are in a shady area, choose a system with a detached solar panel that can be placed in full sun, ensuring your lights have the power to perform their duty every single night.
Key Takeaways
- The success of a focal point depends on its visual weight and its dialogue with negative space, not the object’s inherent value.
- A true anchor tells a story through all four seasons, relying on enduring structure and form that shines even when foliage is gone.
- Use light as a deliberate, sculptural tool to reshape your garden after dark, creating drama and defining space without adding physical mass.
How to Design for Year-Round Interest When Everything Is Covered in Snow?
The final test of a focal point is its performance on a bare stage. When the riot of summer color is a distant memory and the garden is reduced to its essential forms under a blanket of snow, does your anchor still hold? If your focal point relied solely on the color of a flower or the leaf of a plant, the answer is likely no. A truly masterful focal point is built on permanent structure and enduring form.
This is where non-plant elements demonstrate their supreme value. A well-placed sculpture, a stark architectural trellis, a weathered stone bench, or a permanent structure like a gazebo serves as an unwavering anchor in the landscape. These elements are not dependent on the seasons. Their silhouette, texture, and mass provide visual weight and a sense of place regardless of the weather. A gazebo, for instance, becomes a natural destination, its roofline a piece of architecture against the sky, its form a promise of shelter and gathering, even in the cold.
This philosophy is perfectly articulated by the experts at Scenic Roots Garden Center, who advise: “Ideally, a focal point will remain attractive and eye-catching throughout the year, even with seasonal changes in nearby plants and light levels. Opt for a focal point that can be enjoyed year-round for the best results.” This counsel, from their guide on creating garden focal points, underscores the ultimate goal: choosing an element whose inherent character transcends the ephemeral beauty of a single season.
Look at your garden in the dead of winter. What you see are its bones. Your focal point must be the strongest bone in that skeleton, the one that gives the entire composition its strength and definition. This is the final, most crucial decision of the visual director.
You are the director of your garden’s story. Stop collecting props and start composing the scene. By mastering the principles of visual weight, negative space, and four-season narrative, you can make a single, decisive choice that brings breathtaking drama to your small space without the chaos of clutter. Begin today by analyzing your garden not for what you can add, but for where you can create a powerful, intentional moment.