A retaining wall’s visible distress is often just a symptom of a systemic failure in your landscape’s water management, not an isolated problem with the wall itself.
- The primary cause of failure is uncontrolled hydrostatic pressure from saturated soil, which can exert thousands of pounds of force.
- Inspecting adjacent structures like pavers, decks, and plantings provides critical clues about the root cause of the pressure.
Recommendation: Adopt a forensic mindset to diagnose the entire property as an interconnected system. Documenting these systemic issues is the critical first step before engaging a certified structural engineer for a formal evaluation.
The storm has passed, but a sense of unease lingers. You look out at your yard and notice the retaining wall that defines your patio seems to be leaning more than it was yesterday. A new crack has appeared, and water is pooling at its base. The common advice is to look for these visual signs, and if you see them, “call a professional.” While that is the ultimate correct step for remediation, it leaves you, the property owner, in a state of uninformed anxiety. You are left wondering: how serious is this? What are the professionals even looking for? This approach treats the wall as an isolated object, but from a forensic engineering perspective, that is a critical mistake.
The integrity of a retaining wall is a direct reflection of the entire landscape’s hydrological and structural health. A failing wall is rarely the problem; it is the most visible symptom of a much larger issue. The true key to assessing the risk is to stop looking *only* at the wall and start reading your entire property like an investigator at a scene. This guide will shift your perspective from that of a worried homeowner to a preliminary forensic analyst. We will not just list symptoms; we will delve into the physics of failure, exploring the chain reactions that begin with water and end with structural collapse. You will learn to identify the root causes of pressure, understand how interconnected elements like decks and trees play a role, and gain the knowledge to have a truly informed conversation with an engineer.
This article provides a systematic framework for your inspection. Each section builds upon the last, helping you to connect the dots between seemingly unrelated issues and understand the full scope of the structural forces at play on your property. By the end, you will be equipped to perform a comprehensive, preliminary diagnostic of your hardscape investment.
Summary: A Forensic Engineer’s Guide to Retaining Wall Integrity After Heavy Rain
- Why Water Pooling Near Your Foundation Threatens Structural Integrity?
- Cabling or Removal: Which Is Best for a Split Tree Trunk?
- The Ledger Board Mistake That Causes Decks to Collapse
- Tree Roots vs Pipes: How to Prevent Sewer Line Damage Naturally?
- When to Re-Level Pavers: Signs Your Sand Bed Has Washed Away
- How to Calculate the Batter Angle for a DIY Retaining Wall?
- The Planting Error Near Walls That Scares Off Home Inspectors
- How Exterior Landscaping Increases Property Value by Up to 15%?
Why Water Pooling Near Your Foundation Threatens Structural Integrity?
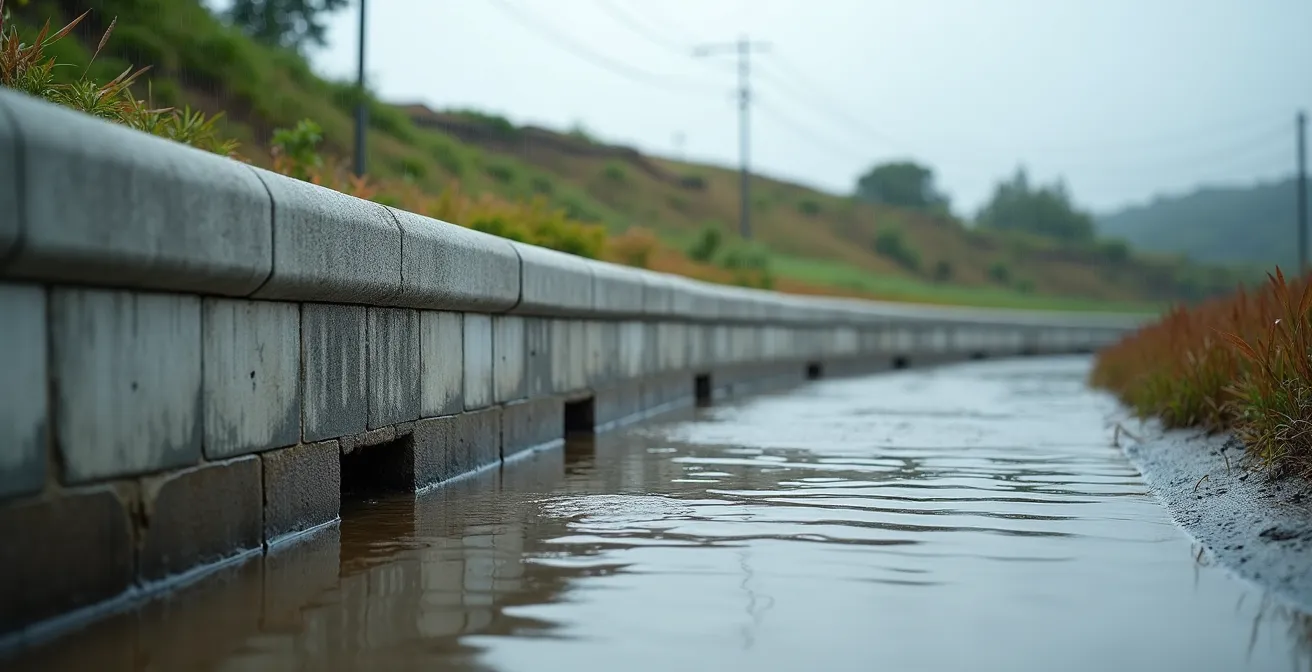
The single most destructive force acting on any retaining wall or foundation is water. When soil becomes saturated, it’s not just the weight of the water that’s the problem; it’s the development of hydrostatic pressure. This is the force exerted by a fluid at rest. For every foot of water depth, it exerts 62.4 pounds of pressure per square foot. A 4-foot-tall wall with fully saturated soil behind it can be withstanding nearly 250 pounds of pressure per square foot at its base. This force is relentless, seeking out any weakness in the structure. It’s a silent, powerful force that can push over even walls that appear solid.
The threat is compounded by soil type. Clay-rich soils, common in many regions, are expansive. When saturated, these soils don’t just hold water; they swell dramatically. Engineering studies confirm that expansive soils can increase in volume by 20% to 30% or more. This expansion exerts immense, localized pressure that can easily exceed a wall’s design limits, leading to bulging, cracking, and eventual failure. This is why a simple visual inspection is insufficient; you must understand the pressure-generating potential of the soil itself. The water pooling you see is a red flag indicating that the soil behind your wall is likely at or near full saturation—and maximum pressure.
This pressure initiates a destructive chain reaction that compromises your entire property. It’s not a single event but a progressive failure. The process starts invisibly but escalates quickly, moving from a simple water issue to a major structural and health hazard.
- Step 1: Water accumulation behind foundation or retaining walls creates intense hydrostatic pressure.
- Step 2: This pressure forces water through the smallest cracks and gaps in concrete or blockwork.
- Step 3: The resulting moisture creates ideal conditions for mold growth, often within just 24-48 hours.
- Step 4: Indoor air quality deteriorates as mold spores circulate through the home’s HVAC system.
- Step 5: Critical structural materials, such as wooden sill plates and joists, begin to rot and lose their strength.
- Step 6: The foundation itself may begin to settle as the supporting soil loses its load-bearing capacity due to oversaturation.
Cabling or Removal: Which Is Best for a Split Tree Trunk?
A mature tree with a deep split in its trunk presents a dilemma analogous to a failing retaining wall: do you attempt a repair or opt for complete removal? The decision is not merely aesthetic but a complex calculation of cost, risk, and liability. From a forensic perspective, a split trunk is a point of critical structural failure. High winds or the weight of ice and snow can cause the weakened sections to fail catastrophically, endangering people and property. The options—cabling, removal, or doing nothing—each carry a distinct risk profile that must be carefully weighed.
The species of the tree is a primary factor in this risk assessment. A comprehensive analysis of split trees found that weak-wooded species like Bradford Pear and Silver Maple have significantly higher failure rates post-split compared to strong-wooded species like Oak. For example, weak-wooded species with splits affecting over 30% of the trunk’s diameter failed within two years in 75% of observed cases. In contrast, Oaks with similar damage showed only a 25% failure rate. Therefore, an arborist may recommend immediate removal for a high-risk species, whereas cabling might be a viable option to extend the life of a valuable hardwood by 10-15 years, albeit with residual risk.
Making an informed decision requires a structured analysis of the financial and safety implications. The following framework, adapted from professional risk assessment models, provides a clear comparison of the available options.
| Decision Factor | Tree Cabling | Tree Removal | Do Nothing |
|---|---|---|---|
| Initial Cost | $500-$2,000 | $1,000-$5,000 | $0 |
| Residual Risk | 20-40% failure rate | 0% tree risk | 60-90% failure probability |
| Potential Liability | Moderate ($5,000-$20,000) | None | High ($10,000-$100,000+) |
| Property Value Impact | Preserves mature tree value | Loss of $5,000-$15,000 in value | Risk disclosure required |
| Maintenance Required | Annual inspection ($200/yr) | Stump grinding, replanting | None until failure |
Ultimately, this decision matrix highlights that “doing nothing” is often the highest-risk, highest-liability option. Just as with a failing wall, ignoring the problem doesn’t make it disappear; it simply defers the consequence, which is often far more costly. A professional arborist’s assessment is non-negotiable for a definitive plan.
The Ledger Board Mistake That Causes Decks to Collapse
The structural ecosystem of your property extends to attachments. A deck, seemingly independent, is often tied directly to your home’s foundation system via a critical component: the ledger board. This single piece of lumber is responsible for transferring a significant portion of the deck’s load to the house structure. A staggering number of deck collapses are not due to failing posts or joists, but to the improper installation and subsequent water damage of the ledger board. This is a failure point that is directly linked to the same enemy as retaining wall failure: uncontrolled water intrusion.
The primary mistake is the omission or incorrect installation of metal flashing. Flashing is a thin piece of impervious material (usually galvanized steel or aluminum) that prevents water from getting behind the ledger board. Without it, rainwater runs down the siding and becomes trapped between the ledger and the house’s band joist. This creates a pocket of persistent moisture, leading to rot in both the ledger and the home’s structural frame. The fasteners—lag bolts or screws—lose their grip in the softened, rotting wood. The connection weakens over time until, often under the load of a party or heavy snow, it fails suddenly and catastrophically.
Understanding this critical connection point is essential for any property owner. The detail below illustrates how proper flashing is designed to direct water over and away from the ledger board, keeping the connection dry and secure.
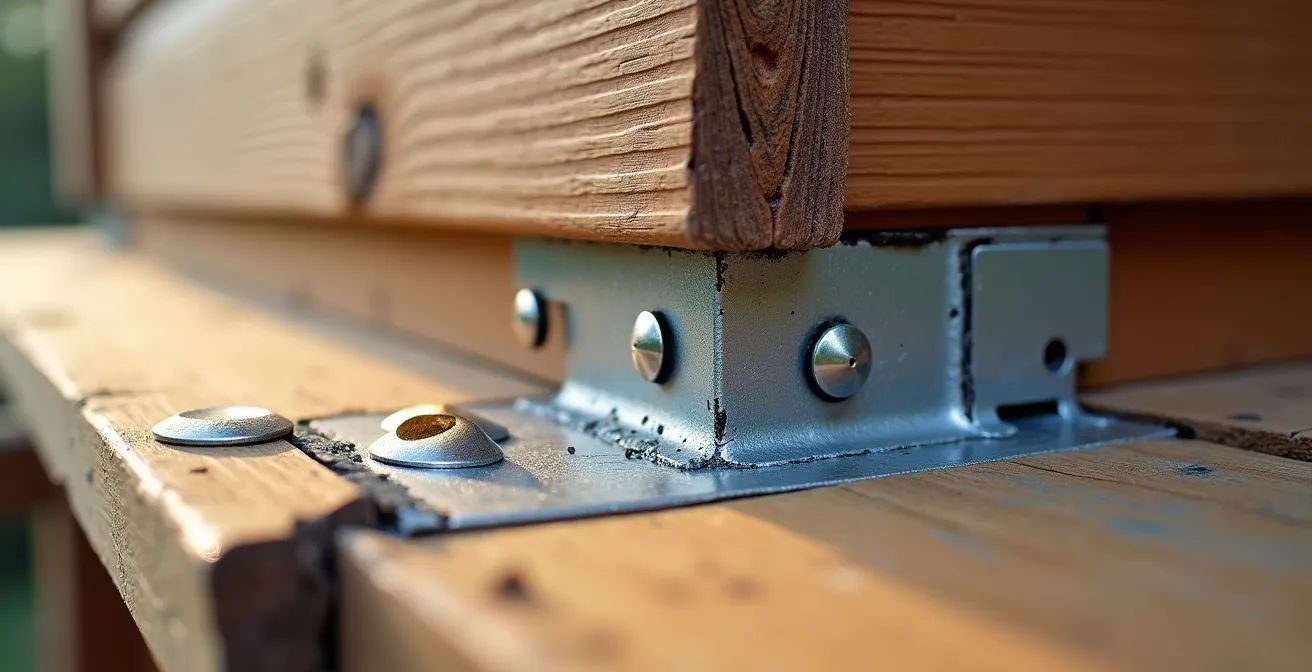
As the image demonstrates, the Z-shaped flashing tucks under the siding, goes over the top of the ledger board, and then extends down its face. This simple but vital detail ensures a dry, long-lasting structural connection. Inspecting this area is a key part of your forensic property assessment. Any signs of water staining on the siding below the deck, or a “spongy” feel to the ledger board, are immediate red flags demanding professional attention.
Critical Ledger Board Inspection Checklist
- Check for proper Z-flashing installation above the ledger board, ensuring it is tucked under the siding.
- Verify a minimum 2-inch air gap is maintained between the bottom of the deck joists and the ground to prevent moisture wicking.
- Test the ledger board’s firmness by probing with a screwdriver; any sponginess or soft spots indicate rot.
- Inspect for proper lag bolt spacing, which should typically be no more than 16 inches on center.
- Look for dark water stains on the foundation or siding directly below the deck’s connection to the house.
Tree Roots vs Pipes: How to Prevent Sewer Line Damage Naturally?
The unseen underground network of your property is another critical part of its structural system. Tree roots, driven by a relentless search for water and nutrients, pose a significant threat to sewer lines and drainage pipes. This is especially true for older homes with pipes made of clay or cast iron, which have numerous joints that are vulnerable to root intrusion. A single, hair-like root can penetrate a tiny crack in a pipe joint. Once inside, it proliferates in the nutrient-rich environment, eventually blocking the pipe completely or even splitting it apart. The resulting leak can saturate the surrounding soil, creating the very hydrostatic pressure that threatens foundations and retaining walls.
The conventional wisdom is simply to avoid planting trees near pipes, but a more nuanced, forensic approach involves understanding root behavior and using it to your advantage. One of the most effective, yet lesser-known, natural prevention methods is strategic decoy watering. A municipal water district study demonstrated this brilliantly: by implementing dedicated deep-watering zones about 15 feet away from main sewer lines, root intrusion incidents dropped by a remarkable 65% over three years. The technique involves using drip systems to deliver water to depths of 18-24 inches, encouraging roots to grow downward toward this reliable water source, rather than horizontally toward pipes.
This proactive strategy is far superior to reactive measures like chemical treatments or expensive pipe repairs. The choice of tree and its placement relative to different pipe materials is also a critical preventative measure. Not all trees have the same invasive potential, and not all pipes have the same vulnerability.
| Pipe Material | 5-10ft from line | 10-20ft from line | 20ft+ from line |
|---|---|---|---|
| Clay Pipes | Avoid all trees | Small shrubs only | Taproot species (Pine, Oak) |
| PVC Pipes | Grasses only | Small ornamentals | Most tree species safe |
| Cast Iron | Small shrubs | Medium trees (Dogwood) | Any tree species |
| Concrete | Groundcover only | Fibrous root trees | All species acceptable |
This matrix illustrates that a “one-size-fits-all” rule for planting is inadequate. A forensic assessment of your landscape must include identifying your pipe material and choosing vegetation accordingly. Preventing soil saturation caused by damaged pipes is a core component of protecting your property’s larger structural integrity.
When to Re-Level Pavers: Signs Your Sand Bed Has Washed Away
A sinking or uneven paver patio is more than a tripping hazard; it’s a clear indicator that the ground beneath is unstable, often due to water-related issues. Pavers are installed on a compacted base of aggregate and a thin layer of sand. This sand bed is what allows for precise leveling and locks the pavers together. When this sand washes away, the pavers lose their support and begin to wobble, sink, or separate. This is a crucial forensic clue, as the water that is destabilizing your patio is very likely the same water that is exerting hydrostatic pressure on your nearby retaining wall or foundation.
The root cause is almost always poor drainage. Water should be directed away from paver surfaces. If it’s allowed to pool on top or flow underneath, it will erode the sand bed. The joints between pavers are typically filled with polymeric sand, which hardens to form a flexible but solid barrier against water and weeds. As this joint sand ages and cracks, it creates a direct channel for water to penetrate and wash out the leveling sand below. This is why forensic analysis shows that studies show that over 90% of all hardscape failures, including retaining walls and pavers, are directly attributable to water damage.
You can perform several simple diagnostic tests to determine the stability of your paver installation and the condition of the underlying sand bed. These “field tests” require no special equipment and can reveal the extent of the problem:
- The Wobble Test: Step firmly on the corner of several different pavers. If any of them move or “wobble,” the sand bed beneath has been compromised.
- The Credit Card Test: The joints between pavers should be consistently narrow. If you can fit two stacked credit cards into a joint, it’s a sign that the jointing sand has washed out, allowing water to penetrate the base.
- The Level Check: Place a long, 4-foot level across the surface. Gaps under the level indicate settlement and low spots where water will pool, accelerating erosion.
- The Perimeter Check: Inspect the plastic or concrete edge restraint around the perimeter of the patio. If it is heaving up or separating from the pavers, the entire base is failing.
Identifying these signs early allows for a targeted repair (re-leveling a small section and replacing joint sand) rather than a full-scale replacement. More importantly, it serves as a critical warning that your property’s water management system is failing.
How to Calculate the Batter Angle for a DIY Retaining Wall?
A professional, durable retaining wall is rarely perfectly vertical. It is designed with a deliberate backward lean into the earth it is holding back. This intentional incline is known as batter or setback. Batter uses the force of gravity to its advantage; the weight of the wall blocks themselves helps to counteract the immense hydrostatic and soil pressure pushing from behind. Calculating the correct batter angle is not an aesthetic choice—it’s a critical structural engineering calculation. An insufficient batter can lead to a wall that leans forward and eventually fails, while an excessive batter can be inefficient and costly.
The required batter is not a single number; it’s a variable that depends on several factors, most importantly the height of the wall, the type of soil being retained, and any additional weight (known as a surcharge) on the ground above the wall, such as a driveway, patio, or sloped hill. For DIY projects, a common rule of thumb is a minimum setback of 1 inch for every 1 foot of wall height. However, a more rigorous, engineering-based approach adjusts this ratio based on site-specific conditions. For example, heavy, water-retentive clay soil exerts more pressure than sandy, well-draining soil, and therefore requires a greater batter angle to ensure stability.
The following chart provides a simplified engineering guideline for adjusting batter based on soil type and surcharge conditions. The ratio (e.g., 1:12) means 1 unit of horizontal setback for every 12 units of vertical rise.
| Soil Type | No Surcharge | Slope Above | Driveway Load |
|---|---|---|---|
| Sandy Soil | 1:12 (minimum) | 1:10 | 1:8 |
| Clay Soil | 1:10 | 1:8 | 1:6 |
| Mixed/Loam | 1:11 | 1:9 | 1:7 |
| Expansive Clay | 1:8 | 1:6 | 1:5 |
Achieving a consistent batter during construction is crucial. A professional technique involves creating a simple plywood template cut to the exact angle. By placing this template against each course of blocks as they are laid and checking with a level, a builder can ensure the wall maintains its precise structural lean from base to top. This simple quality control method can reduce wall failures significantly compared to simply “eyeballing” the lean. Understanding batter is key to differentiating between a safe, intentional lean and the dangerous, unintentional bulging that signals imminent failure.
The Planting Error Near Walls That Scares Off Home Inspectors
In a forensic landscape assessment, the area where plantings meet the foundation—often called foundation beds—is a hotspot for critical errors. Home inspectors are trained to spot these mistakes immediately, as they can lead to severe moisture problems, pest infestations, and structural decay. The most common and damaging error is piling mulch or soil directly against the home’s siding or foundation. While it may seem harmless, this practice creates a “mulch volcano” that acts like a sponge, trapping moisture and holding it against the house.
This trapped moisture prevents the foundation from drying out, accelerates the deterioration of concrete and mortar, and, most critically, rots the wooden sill plate—the very first piece of the home’s wooden frame that rests on top of the concrete foundation. Furthermore, this moist, hidden environment provides a perfect, sheltered highway for termites, carpenter ants, and other wood-destroying insects to enter the home undetected. The American Society of Home Inspectors (ASHI) explicitly warns against this practice. As their guidelines articulate, this is a multi-faceted threat that no inspector will overlook.
Mulch piled against a home’s foundation traps moisture, provides a hidden highway for termites and carpenter ants, and actively rots the home’s sill plate—a triple threat that inspectors spot immediately.
– Home Inspection Industry Standards, American Society of Home Inspectors Guidelines
To avoid these red flags, a strict set of rules must be followed for any planting near a foundation or retaining wall. These practices are not merely cosmetic; they are essential for maintaining the long-term structural health of your home. Any deviation is a sign of poor landscape management that will be noted in any professional inspection report.
- Never pile mulch or soil against siding or foundation; a minimum 6-inch gap of clear space must be maintained.
- Grade all planting beds to slope away from the house at a minimum of 2% (a quarter-inch drop per foot) to ensure positive drainage.
- Keep all shrubs and vegetation at least 18 inches away from foundation walls to allow for air circulation and drying.
- Avoid planting aggressive, clinging vines like English Ivy on masonry, as their tendrils can damage mortar joints and trap moisture.
- Never allow gutter downspouts to discharge directly into a foundation planting bed; extend them to release water at least 4-6 feet away from the foundation.
Key Takeaways
- Water is the primary enemy: Uncontrolled hydrostatic pressure is the root cause of over 90% of hardscape failures.
- It’s an interconnected system: The health of a retaining wall is inseparable from the performance of adjacent pavers, decks, and landscape drainage.
- Think like a forensic analyst: Look beyond the obvious symptoms (cracks, leaning) to diagnose the underlying systemic failures in water management.
How Exterior Landscaping Increases Property Value by Up to 15%?
While this guide has focused on the forensic diagnosis of structural risks, the ultimate goal is to transform liabilities into assets. A well-designed, structurally sound landscape does more than just prevent costly failures; it provides a significant return on investment by increasing your property’s value. The key is to understand where to invest. A strategic approach to landscaping isn’t about adding the most expensive features, but about creating a cohesive, functional, and attractive system that enhances curb appeal and demonstrates meticulous maintenance.
The highest return on investment (ROI) in landscaping consistently comes from foundational improvements. Correcting the very issues discussed in this guide—poor drainage, grading problems, and unstable hardscapes—can yield an ROI of 150-200%. Buyers and appraisers recognize that a property with robust water management is a secure, low-risk investment. In contrast, high-cost vanity projects like elaborate water features or specialty gardens often have a much lower ROI, sometimes below 75%, as they are subject to personal taste and can be perceived as maintenance burdens.
Beyond direct ROI, strategic landscaping offers tangible benefits. For instance, according to energy analyses, properly placed deciduous trees can reduce cooling costs by 30% in the summer by shading the home, while allowing winter sun to pass through, reducing heating costs. A healthy, mature landscape with well-maintained trees, a perfect lawn, and functional hardscapes signals a well-cared-for property, which directly translates to higher perceived value. An investment in a new drainage system or a properly engineered retaining wall may not be as glamorous as a new outdoor kitchen, but it provides a far greater contribution to your home’s long-term market value and structural security.
Use this forensic framework to conduct your preliminary assessment. Documenting these systemic issues with photos and notes is the critical first step before engaging a certified structural engineer or qualified landscape contractor for a formal evaluation and remediation plan.