Growing a significant amount of food on a balcony for under $100 is entirely possible by treating it as a strategic micro-farm, not a decorative hobby.
- Focus on high-yield, high-cost grocery items like herbs and leafy greens to maximize your return on investment.
- Use fabric grow bags and vertical systems to dramatically increase plant health and biomass in a limited footprint.
Recommendation: Allocate the majority of your budget to quality organic potting mix and high-yield seeds, not expensive pots or numerous transplants.
The dream of harvesting fresh, organic food from your own home often feels out of reach for city dwellers. Faced with limited space and a tight budget, the idea of a productive balcony garden can seem like a quaint fantasy rather than a practical reality. Most advice revolves around generic tips: get enough sun, buy some pots, and hope for the best. This approach often leads to a few sad-looking herbs and the conclusion that you simply don’t have a “green thumb.”
But what if the problem isn’t your skill, but your strategy? The conventional wisdom about container gardening is often inefficient and expensive, prioritizing aesthetics over productivity. The key to a bountiful, budget-friendly balcony harvest isn’t about buying more gear or having mystical gardening talent. It’s about adopting a results-oriented system focused on maximizing your return on investment for every dollar spent and every square inch of space used.
This guide will shift your perspective. We will treat your $100 budget not as a limitation, but as a strategic fund to build an efficient food production system. You will learn to make calculated decisions on containers, crops, soil, and planting schedules to ensure your small space yields an abundant and continuous harvest, directly reducing your grocery bill. We will explore the science behind container choice, the economics of crop selection, and the simple, zero-cost strategies that protect your investment from pests and ensure a thriving ecosystem.
text
This article breaks down the complete system for turning your balcony into a productive micro-farm. Follow these steps to understand how each component contributes to a high-yield, low-cost garden.
Summary: Your Balcony Micro-Farming Blueprint
- Why Grow Bags Produce More Vegetables Than Plastic Pots?
- How to Choose Crops That Save You the Most Money at the Grocery Store?
- Seeds or Nursery Transplants: Which Is Better for Short Summers?
- The Soil Sourcing Mistake That Makes Urban Crops Unsafe to Eat
- When to Replant Lettuce to Ensure a Continuous Harvest All Summer?
- Pots or Vertical Systems: Which Maximizes Biomass on a Tiny Balcony?
- Why Early Spring Crocus Is Critical for Emerging Queen Bees?
- Which Companion Planting Strategies Eliminate Aphids Naturally?
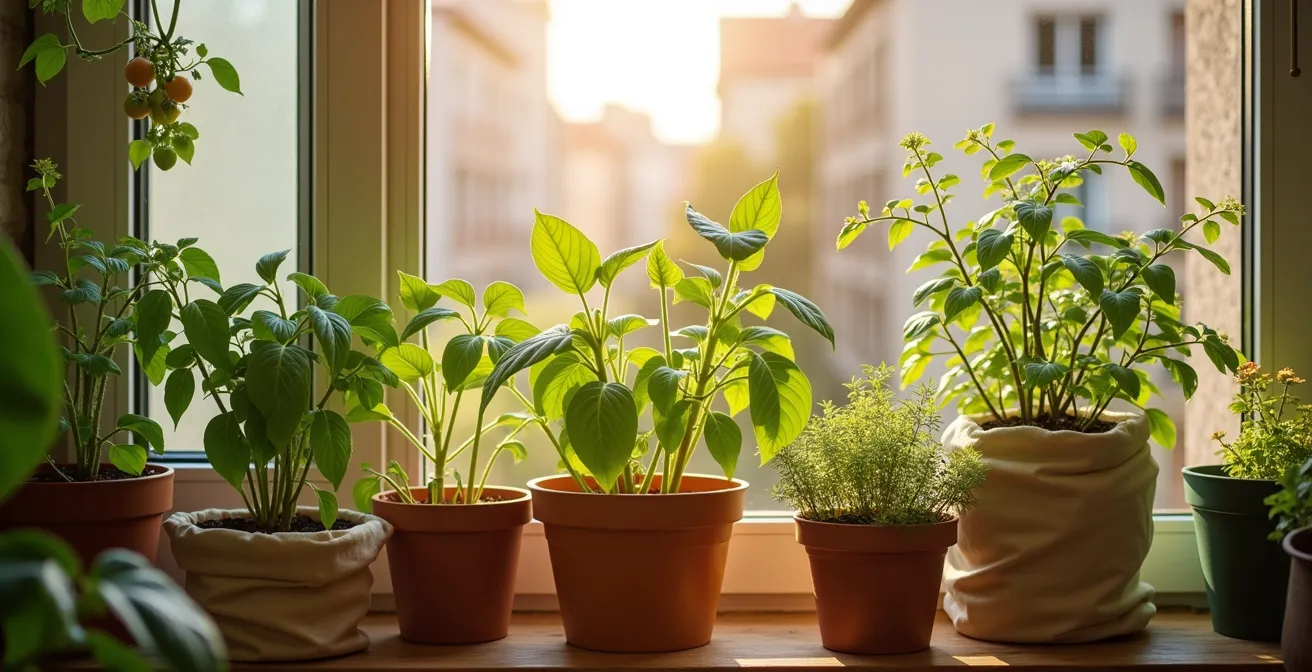
Why Grow Bags Produce More Vegetables Than Plastic Pots?
The single most impactful decision for balcony yield isn’t what you grow, but what you grow it in. Traditional plastic or terracotta pots are a familiar choice, but they create a major inefficiency: root circling. When roots hit the hard, non-porous wall of a pot, they are forced to circle, eventually creating a dense, tangled mass. This “root-bound” condition restricts the plant’s ability to absorb water and nutrients, effectively capping its growth potential and yield.
Fabric grow bags solve this problem through a process called air pruning. When a root tip reaches the porous fabric wall, it is exposed to air, which naturally stops its growth and signals the plant to produce new, fibrous feeder roots elsewhere in the soil. This creates a much denser, more efficient root system—with up to 30-40% more root mass—capable of absorbing far more resources. The breathable fabric also prevents waterlogging, a common cause of root rot in plastic pots.
Furthermore, fabric bags regulate temperature far more effectively. On a hot, sunny balcony, a dark plastic pot can heat up dramatically, cooking the delicate root system. However, research indicates that breathable grow bags maintain a root zone temperature up to 20°F cooler through evaporative cooling. This temperature stability reduces plant stress and promotes vigorous, healthy growth, directly translating to more vegetables on your plate. Being lightweight and portable also allows you to easily move plants to chase the sun, optimizing their daily light exposure.
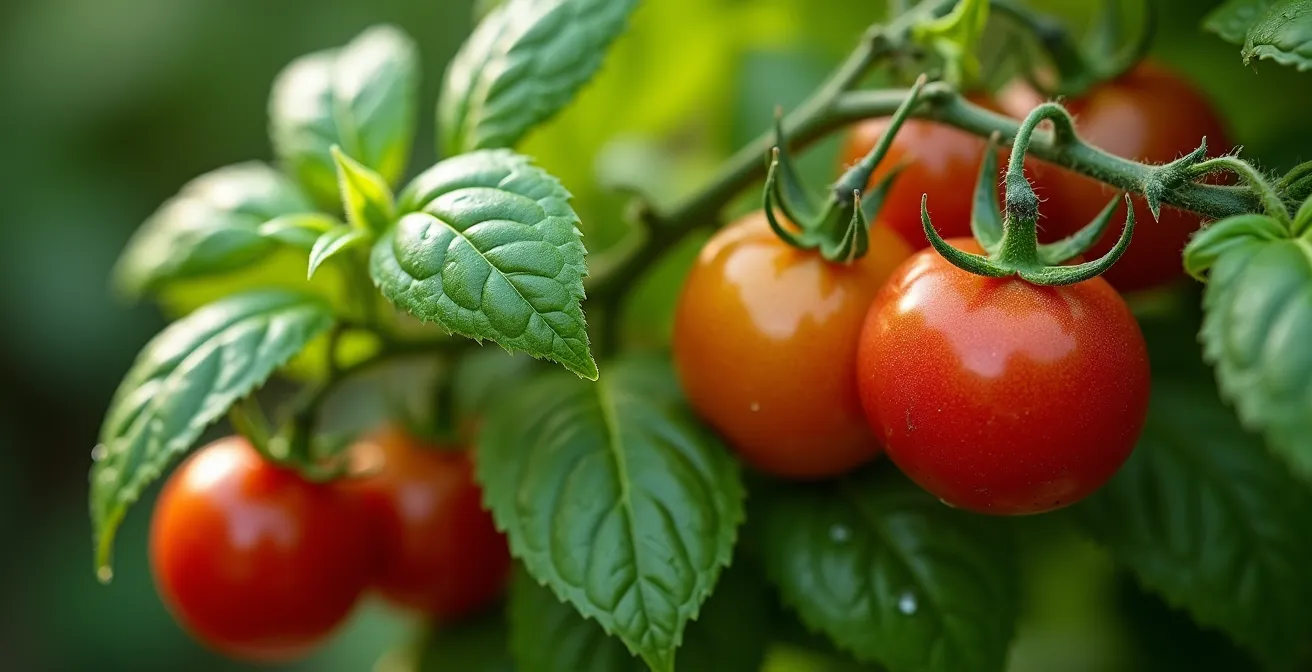
How to Choose Crops That Save You the Most Money at the Grocery Store?
With a limited budget and space, every plant must earn its keep. The goal is not just to grow food, but to grow food that has a high replacement value at the grocery store. Growing something that is cheap and abundant year-round, like onions or carrots, provides a poor return on your investment of space and time. Instead, focus on a strategy of “Grocery ROI” by prioritizing crops that are expensive to buy fresh, have a long harvest window, or are used in small quantities frequently.
Fresh herbs are the undisputed champion in this category. A single packet of basil seeds costing a few dollars can produce a season’s worth of fresh leaves, saving you from buying those expensive plastic clamshells at the store. Leafy greens like loose-leaf lettuce, kale, and spinach are also top contenders. Using a “cut-and-come-again” harvesting method, where you only take the outer leaves, allows a single plant to produce for weeks or even months.
The financial impact of this strategy is significant. While studies show that home gardens can save approximately $600 annually, your targeted choices can amplify these savings even in a small space. Consider this real-world application:
Case Study: Maximum ROI with High-Value Herbs
Fresh herbs are among the most expensive grocery items per ounce. A single basil plant costing $3-4 can produce the equivalent of $30-40 worth of store-bought fresh basil over a season. One gardener reported saving over $19 per grocery trip by growing lettuce, kale, and parsley on their balcony, proving that smart crop selection delivers tangible financial benefits.
Other high-ROI choices include cherry tomatoes, bush beans, and peppers. By focusing on these high-value crops, your small balcony garden transforms from a simple hobby into a real, money-saving asset.
Seeds or Nursery Transplants: Which Is Better for Short Summers?
Once you’ve chosen your high-ROI crops, the next decision is how to acquire them: starting from seed or buying young plants (transplants) from a nursery. For a gardener on a sub-$100 budget, this is a critical economic choice. Seeds offer an incredible cost advantage. A single packet of seeds for $3 can contain dozens or even hundreds of potential plants, while a single transplant can cost $3-5.
However, transplants offer a significant head start. For crops with long growing seasons, like tomatoes or peppers, buying a transplant can be the difference between getting a harvest and not, especially in regions with short summers. A transplant is essentially 6-8 weeks of growing time that you are buying. This convenience comes at a premium and with a severely limited selection compared to the vast world of varieties available in seed catalogs.
For a truly frugal and productive balcony, a hybrid approach is the most strategic. Allocate the bulk of your plant budget to seeds for crops that grow quickly and are best sown directly, such as lettuce, radishes, beans, and most herbs. Then, invest the remainder in a few carefully selected transplants for your “long-season” anchor crops. This balances cost-efficiency with the practical need for a head start. As The Frenchie Gardener, Patrick Vernuccio, advises on budget allocation for a small space, a smart ratio makes all the difference.
For a sub-$100 setup, allocate 80% of the plant budget to high-yield seeds and 20% to 1-2 carefully selected transplants
– Patrick Vernuccio, The Frenchie Gardener’s Balcony Gardening Guide
This balanced strategy respects both your budget and your climate’s time constraints, setting you up for the most productive season possible.
The Soil Sourcing Mistake That Makes Urban Crops Unsafe to Eat
Your soil is the single most important investment in your balcony garden. It is not the place to cut corners. A common mistake made by frugal gardeners is to source “free” soil from parks, backyards, or construction sites. This is a dangerous practice in an urban environment. Urban soils can be contaminated with heavy metals like lead and arsenic from old paint, industrial pollution, and vehicle exhaust. These contaminants are readily absorbed by vegetable crops and pose a serious health risk when consumed.
The only safe approach for container gardening is to use a purchased, certified organic potting mix. Unlike garden soil, potting mix is a soilless medium specifically engineered for containers. It’s lightweight to reduce balcony load, drains well to prevent root rot, and is sterile, meaning it’s free from pests, diseases, and urban contaminants. For an even more cost-effective and customized approach, you can mix your own using three simple components: one part coconut coir (for water retention), one part perlite or vermiculite (for aeration), and one part high-quality organic compost (for nutrients).
Safety also extends to your containers. While recycling is admirable, not all plastics are created equal. Using a container that previously held chemicals or is made from non-food-grade plastic can leach harmful substances into your soil. For safety, safety experts recommend that you only use containers made from plastics coded 2, 4, or 5 on the bottom, as these are considered food-safe.
Action Plan: Safe Soil and Container Sourcing
- Verify container safety: Only use new grow bags or recycled containers with plastic codes 2, 4, or 5. Avoid any container that held non-food products.
- Select your base: Purchase a bag of certified organic potting mix as your primary medium. Avoid all topsoil or garden soil products for containers.
- Assess your compost source: For nutrient amendment, use commercially bagged organic compost or worm castings. Do not use soil from unknown city locations.
- Mix for performance: If creating your own mix, combine one-third coconut coir, one-third perlite, and one-third compost for an ideal balance of drainage and nutrition.
- Plan for feeding: Understand that container nutrients are finite. Plan to supplement with a liquid organic fertilizer or top-dress with compost mid-season.
When to Replant Lettuce to Ensure a Continuous Harvest All Summer?
A truly productive garden doesn’t just produce one big harvest; it provides a steady, continuous supply of food. This is achieved through a technique called succession planting. Instead of planting all your crops at once, you sow new seeds at regular intervals. This staggers your harvest, ensuring that as one plant finishes producing, another is just beginning. This is especially effective for fast-growing crops like lettuce, radishes, and spinach.
For a crop like loose-leaf lettuce, a simple and highly effective strategy is to sow a small batch of new seeds every 2 to 3 weeks. This creates a perpetual cycle of planting, growing, and harvesting. While your mature plants are being harvested using the “cut-and-come-again” method, your next generation of seedlings is developing, and a new set of seeds is just germinating. This method turns your balcony into a living pantry, eliminating the need to buy salad greens for the entire season.
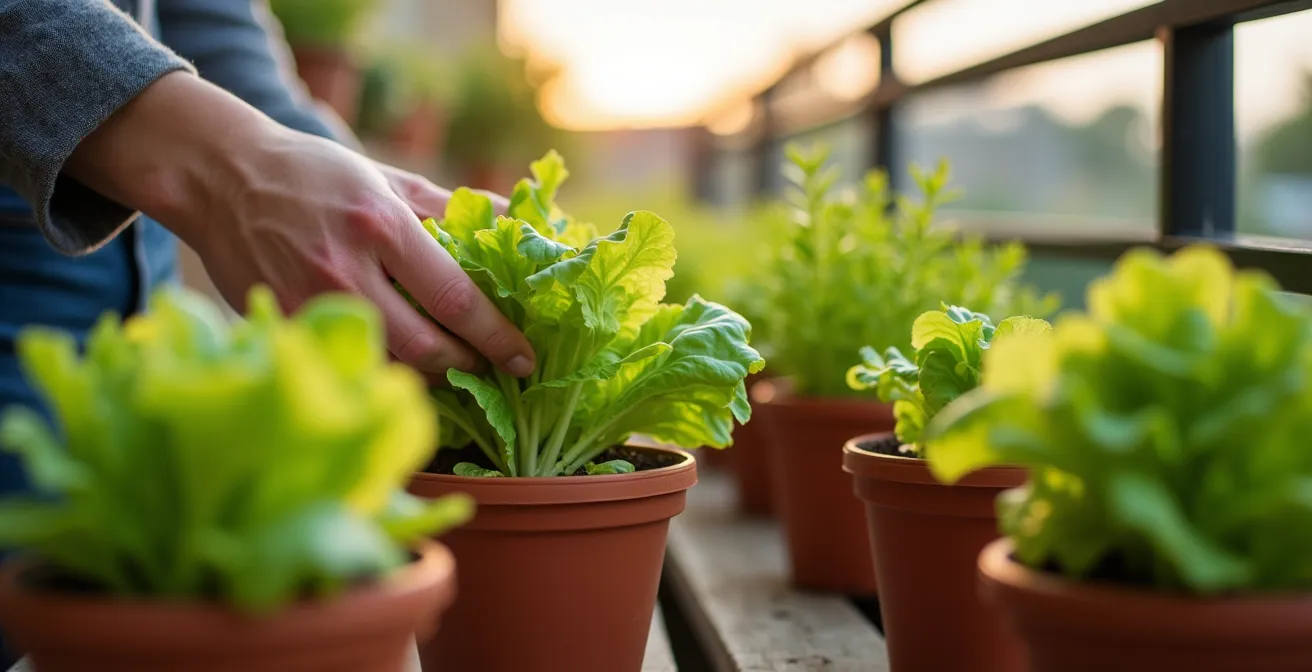
This systematic approach is far more efficient than planting a large single crop that matures all at once, much of which may go to waste. A practical way to implement this is with a simple container rotation system.
Case Study: The 3-Container Rotation System
A balcony gardener implemented a 3-pot rotation system: Container 1 holds mature lettuce ready for harvest, Container 2 has 3-week-old seedlings, and Container 3 gets newly sown seeds. Every 3 weeks, the cycle rotates, providing a continuous harvest from early summer to the first frost. Using the cut-and-come-again technique on the mature plants yields an additional 4-5 harvests per plant before the container is replanted with new seeds.
By adopting this simple, rhythmic planting schedule, you maximize the productivity of your space and ensure a constant supply of fresh greens, maximizing your return on your initial seed investment.
Pots or Vertical Systems: Which Maximizes Biomass on a Tiny Balcony?
The most significant constraint on a balcony is horizontal space. Once you’ve filled the floor with containers, it seems like you’ve hit your limit. However, the most underutilized real estate in any balcony garden is the vertical space. To truly maximize biomass production—the total weight of edible food you can grow—you must think in three dimensions. While a few large pots are a good start, integrating vertical systems can double or even triple your growing capacity within the same footprint.
Vertical systems come in many forms, from simple, budget-friendly DIY projects to more elaborate pre-made kits. For vining crops like cucumbers, pole beans, or indeterminate tomatoes, a simple string trellis or net attached to the balcony railing or wall can guide plants upward, using zero additional floor space. DIY gutter gardens mounted on a wall are perfect for shallow-rooted crops like lettuce, spinach, and strawberries. Even a simple tiered plant stand can dramatically increase your plant count in a small corner.
Comparing the efficiency is stark. Five large pots might take up 10 square feet of precious floor space to house five plants. In contrast, a wall-mounted gutter system uses zero floor space and can hold 10-15 smaller plants. A trellis uses only the footprint of its single container but opens up a vast area of vertical growing space. The key is to choose the right system for your target crops and budget.
This table illustrates how different systems compare in terms of cost and spatial efficiency, helping you decide where to invest your budget for maximum plant capacity.
| System Type | Cost | Sq Ft Used | Plants Capacity |
|---|---|---|---|
| 5-gallon pots (5) | $50 | 10 sq ft | 5 plants |
| String trellis system | $10 | 2 sq ft | 3-4 vining plants |
| DIY gutter garden | $20 | Wall space only | 10-15 small plants |
| Tiered staging | $30 | 4 sq ft | 12-15 plants |
By strategically combining floor containers with vertical elements, you can create a dense, layered canopy of production that makes the most of every available inch of sun and space.
Why Early Spring Crocus Is Critical for Emerging Queen Bees?
A successful garden is more than just soil and plants; it’s a functioning ecosystem. A key, and often overlooked, component of this system is pollinators. While many leafy greens and root vegetables don’t require pollination, your fruiting crops—like tomatoes, peppers, cucumbers, and strawberries—absolutely depend on it. On a high-rise balcony, you can’t assume bees will just show up. You need to actively attract them and, more importantly, support them.
The most critical time for local bee populations is early spring. This is when queen bees emerge from hibernation, starving and in desperate need of nectar and pollen to gain strength and start laying eggs for their new colony. By providing an early food source, you are not just feeding a single bee; you are helping to establish a strong, healthy colony in your immediate vicinity. This colony will then be around to pollinate your vegetable blossoms later in the season.
Crocus, hyacinths, and other early-blooming bulbs are the perfect solution. They are cheap, require minimal space, and can be planted in the fall in the same containers as your summer vegetables. This “bulb lasagna” technique layers different types of bulbs that bloom at different times, providing a continuous food source for pollinators from late winter through spring. This small, one-time investment in a few bulbs pays huge dividends in fruit production later on. As pollination expert Dr. Sarah Jay notes, supporting the queen has a direct impact on your own harvest.
A well-fed queen bee establishes a stronger local colony, which directly translates to better pollination and higher yields for fruiting crops later in the season
– Dr. Sarah Jay, Pollinator Research Institute Annual Report
By thinking of your balcony not just as a place for your plants, but also as a vital service station for local pollinators, you build a more resilient and productive garden ecosystem.
Key Takeaways
- System over skill: A successful budget garden relies on a smart system of choices, not innate talent.
- ROI is everything: Prioritize crops and techniques that deliver the highest financial and edible return on your investment.
- Build an ecosystem: A productive garden works with nature by ensuring safe soil, attracting pollinators, and using natural pest control.
Which Companion Planting Strategies Eliminate Aphids Naturally?
Once your garden is growing, the next challenge is protecting your investment from pests. On a balcony, aphids can quickly become a major problem, sucking the life out of your plants and ruining your harvest. The conventional solution is to reach for a chemical spray, but this introduces toxins into your food and ecosystem and represents an added cost. A far more effective, and completely free, strategy is companion planting.
Companion planting is the practice of placing specific plants next to each other to achieve a mutually beneficial result. For pest control, this works in three primary ways. First, some plants act as repellents. Strong-smelling herbs like rosemary, mint, and chives can confuse aphids and other pests, making it harder for them to find your prized tomato plants. Planting them around the edges of your containers creates a protective aromatic barrier.
Second, some plants serve as “trap crops.” Nasturtiums are a famous example. Aphids find them irresistible and will flock to the nasturtiums, leaving your more valuable vegetable crops alone. You can then simply remove and dispose of the infested nasturtium leaves, taking the aphid colony with them. As a bonus, nasturtium flowers and leaves are edible and make a great peppery addition to salads. Finally, certain flowers, like marigolds and sweet alyssum, attract beneficial insects like ladybugs and lacewings, which are voracious predators of aphids. By planting these flowers among your vegetables, you are essentially recruiting a free, 24/7 security force for your garden. This integrated, multi-pronged defense is a cornerstone of organic, no-cost pest management.
Frequently Asked Questions on Budget Balcony Gardening
What’s the cheapest vertical system for vining crops?
A simple string trellis costs under $10 and can support 3-4 cucumber or bean plants in a single large pot, maximizing vertical space.
How do I ensure lower tier plants get enough light?
Use tiered staging with 6-12 inch height differences and rotate plants weekly to ensure even light exposure.
Can I use wall space without drilling?
Yes, use railing planters, hanging systems, or lean-to trellises that don’t require permanent installation.
By implementing these strategic, system-based choices, you transform your balcony from a simple outdoor space into a resilient, productive, and cost-effective micro-farm. The initial $100 investment, when allocated wisely to high-performance containers, safe soil, and high-ROI seeds, will pay for itself many times over in fresh, organic produce and significantly reduced grocery bills.