The unexplained death of a sensitive plant is rarely a failure of your green thumb, but a failure to perceive your home’s invisible environment. This guide reframes plant care as a practice in home physics. By learning to observe and measure the distinct microclimates created by windows, vents, and even plant groupings, you can move beyond generic advice and create a precise map of where each specific plant will not just survive, but truly thrive.
You follow the care tag instructions meticulously. You water on schedule, provide the recommended light, and yet, the Calathea that thrived in the living room withers within weeks of being moved to the bedroom. It’s a frustratingly common experience for plant owners: a once-vibrant plant inexplicably fails in a new location that seems, on the surface, identical to the old one. The common advice—check for drafts, increase humidity, avoid heaters—is often too vague to be actionable. These tips address the symptoms but fail to diagnose the root cause, which lies in the unseen environmental dynamics of your home.
The solution is not to become a better gardener, but a more astute home analyst. Your house is not a uniform environment; it is a complex system of invisible forces. It’s a landscape of temperature gradients, convective loops, and pockets of humidity shaped by architecture and daily life. A plant doesn’t experience “the room”; it experiences the precise coordinates where it sits. The key is to stop guessing and start measuring. What if the real reason your plant is failing isn’t a lack of care, but its placement within a hostile, invisible microclimate you never knew existed?
This guide will equip you with the observational framework of a home physics analyst. We will move beyond platitudes to explore the quantifiable forces at play. You will learn how to map the thermal stratification near your windows, understand the physics of a self-sustaining humidity zone, and identify the subtle but deadly airflow from your HVAC system. By the end, you will have a new lens through which to see your home—a detailed environmental map that dictates exactly where your most sensitive plants can flourish.
To navigate this analysis, this article breaks down the key environmental factors that create distinct microclimates within your home. The following sections will guide you through identifying and managing these zones for optimal plant health.
Summary: Mapping Your Home’s Hidden Environmental Zones
- Why Is the Temperature Near Your Window 5 Degrees Lower Than the Room?
- How to Group Plants to Create a Self-Sustaining Humid Zone?
- Bathroom or Kitchen: Which Room Is Actually Better for Ferns?
- The Vent Placement Error That Desiccates Foliage in 24 Hours
- When to Shift Plants Away From Radiators to Prevent Heat Stress?
- Why Your Urban Garden Is a Zone Warmer Than the Countryside?
- Deciduous Trees on the South Side: How Much Do They Lower AC Costs?
- How to Read Regional Hardiness Zones to Avoid Winter Plant Loss?
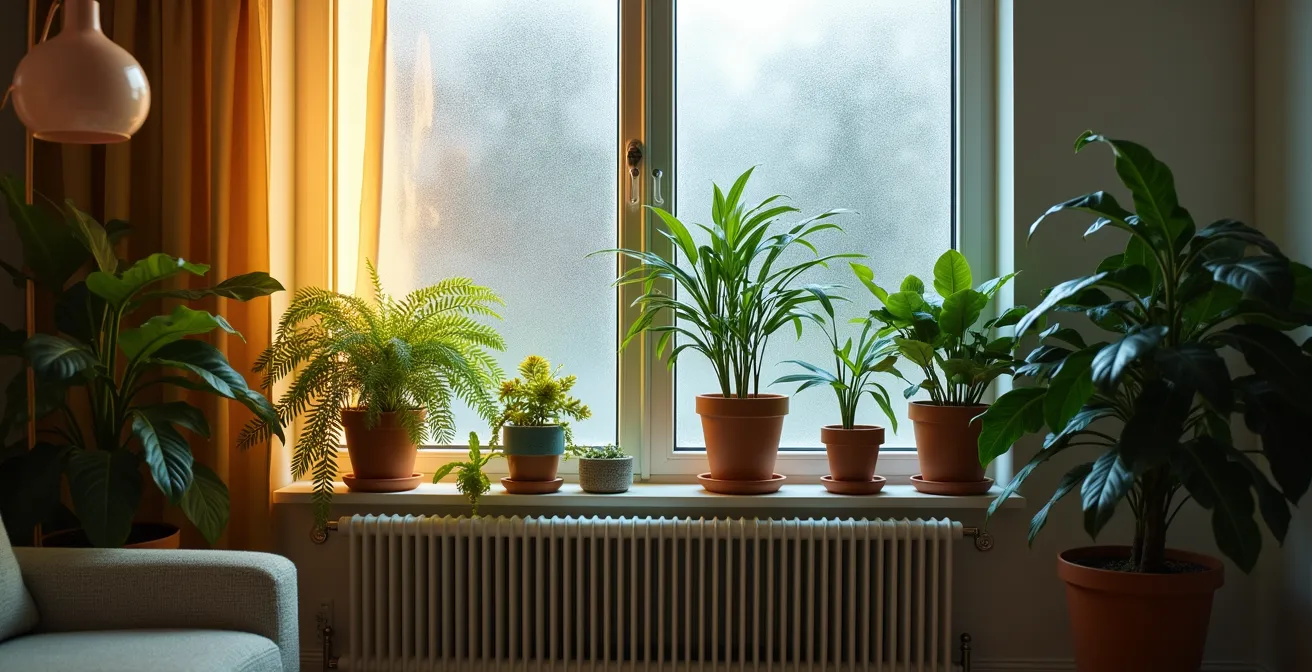
Why Is the Temperature Near Your Window 5 Degrees Lower Than the Room?
A room’s thermostat provides an average, but it masks the dramatic thermal stratification that occurs near windows. Glass is a poor insulator. In winter, the interior surface of a window becomes significantly colder than the surrounding walls. This cold surface cools the air directly beside it. Because cold air is denser, it sinks to the floor, pulling warmer air from the ceiling towards the window to be cooled in its place. This creates a continuous, invisible waterfall of cold air known as a convective loop. For a sensitive tropical plant placed on a windowsill, this is the equivalent of living in a constant, chilly draft, even if the window is perfectly sealed.
The temperature difference is not trivial. It’s common for the air on a windowsill to be 5-10°F (3-6°C) colder than the center of the room. This effect is significant enough to be measured even in controlled environments. For example, a 2024 study of modern office buildings found significant microclimatic variations near windows despite standardized construction and heating systems. The temperature drop is most pronounced at floor level near the window, creating a pocket of cold that can shock the root systems of warmth-loving plants.
To quantify this effect in your own home, place a digital thermometer on the windowsill and another in the center of the room. Record the minimum temperatures over a 24-hour period on a cold night. The discrepancy reveals the intensity of the microclimate. A plant that requires a stable 65°F (18°C) may be experiencing temperatures dipping into the 50s, triggering cold stress, leaf drop, and eventual decline. Understanding this dynamic is the first step in mapping your home’s safe zones.
How to Group Plants to Create a Self-Sustaining Humid Zone?
Just as windows create cold, dry zones, plants themselves can engineer their own favorable microclimates. Through the process of transpiration, plants release water vapor into the air from their leaves. A solitary plant’s transpiration quickly dissipates into the larger room. However, when multiple plants are grouped together, their collective transpiration is captured and concentrated in the air between and below their leaves, creating a pocket of elevated humidity. This is the principle of the transpiration canopy.
This is not a negligible effect. Grouping plants can create a self-sustaining humid zone that benefits all members of the cluster. According to horticultural research, this simple act of clustering can be highly effective; research confirms that when you group plants together, they can collectively raise the ambient humidity in their immediate area by 10-15%. This is often enough to satisfy the needs of many tropical plants like Calatheas, Marantas, and ferns, which typically prefer humidity levels between 40% and 60%—a level difficult to maintain in a centrally heated home.
This strategy allows for more efficient resource use. When humidity-loving plants are clustered, a single humidifier can serve the entire group more effectively, as the moist air is trapped within the canopy instead of dispersing. This also reduces the frequency of manual misting. By creating a small-scale ecosystem, the plants work together to regulate their environment, reducing the maintenance burden on the owner and creating a more stable, resilient growing environment.
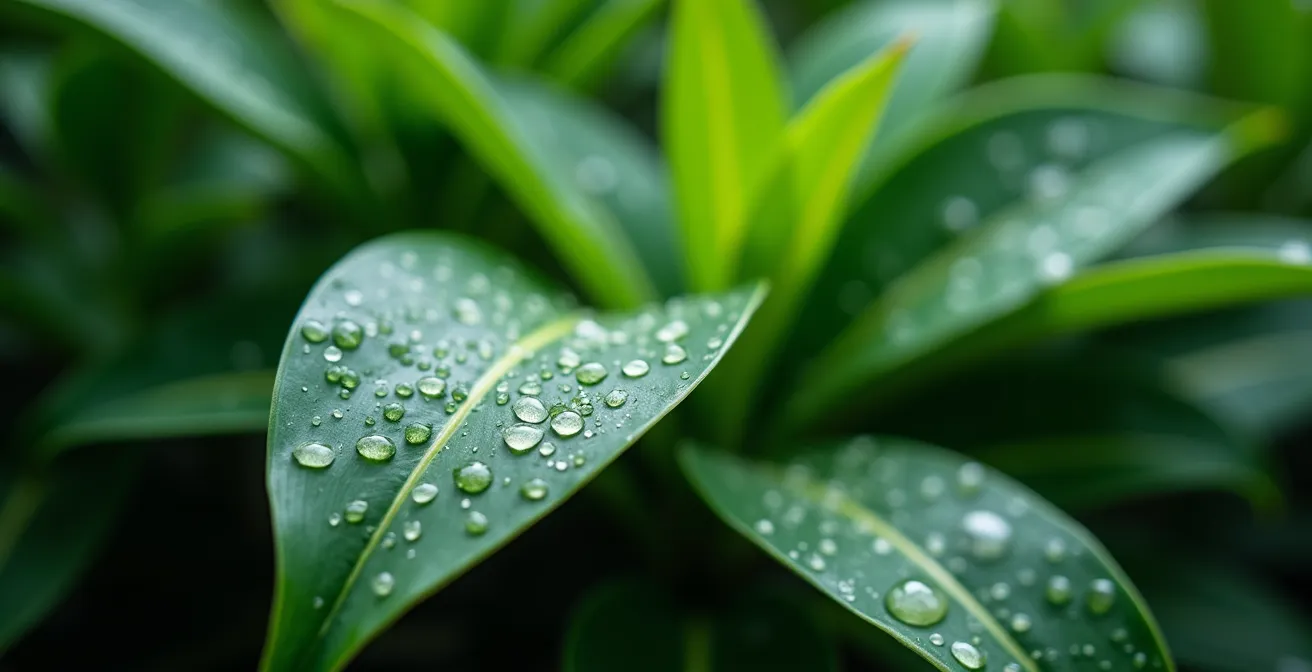
The visual evidence of a transpiration canopy, as seen in the fine mist that can gather on leaves, demonstrates the powerful collective effect of grouping plants. This cooperation is key to helping them thrive indoors.
Bathroom or Kitchen: Which Room Is Actually Better for Ferns?
The common wisdom to place humidity-loving plants like ferns in the bathroom is sound, but it’s not the only option. An analytical comparison between the bathroom and the kitchen reveals that each offers a distinct type of humid microclimate, with different advantages and disadvantages. The choice depends on the specific needs of the plant and the usage patterns of the home.
The bathroom is a zone of high-intensity, periodic humidity. A hot shower can spike the relative humidity to 80-90% or higher, but this peak is temporary. Once the fan is on and the room airs out, the humidity can drop back to the home’s baseline. This cycle of intense humidity followed by a drier period can be ideal for many ferns and epiphytes that are adapted to cycles of rain and drying. However, light is often the limiting factor in bathrooms, with many lacking a window or having only a small, frosted one.
As experts from the Tractor Supply Co. note in their indoor plant care guide:
Places in the home that typically have higher humidity levels are the bathroom, due to baths and showers, and the kitchen, due to dishwashing and some types of cooking.
– Tractor Supply Co., Indoor Plant Care Guide
The kitchen, in contrast, often provides more consistent, moderate humidity. Activities like boiling water, running the dishwasher, or simmering sauces release a steadier, less intense stream of moisture into the air throughout the day. Kitchens also typically have larger windows, providing better light than the average bathroom. The main drawback is temperature fluctuation and potential airborne contaminants. A plant placed too close to a stove can be stressed by blasts of heat, while grease and oil particles can coat leaves, inhibiting photosynthesis. Therefore, the ideal kitchen spot is one that benefits from ambient humidity but is away from the direct line of fire of the stove and sink.
The Vent Placement Error That Desiccates Foliage in 24 Hours
One of the most common and devastating microclimate errors is placing a plant in the direct path of an HVAC vent. This is not a gentle draft; it is a forced stream of dry, moving air that causes rapid airflow desiccation. The constant movement of air across the leaves dramatically accelerates the rate of transpiration, pulling moisture from the foliage faster than the roots can replace it. This is especially damaging during winter, when heating systems are running frequently.
The air produced by central heating is exceptionally dry. While engineers recommend maintaining indoor relative humidity between 30% and 60%, this is difficult to achieve in cold climates. A study by Penn State Extension highlights the problem, noting that during the winter heating season, levels can easily fall below 30%. For a plant, being hit by a stream of this air is like being left in a desert wind. The result is crispy brown leaf edges, curling, and rapid leaf drop, often within a day or two.
The danger zones are not always obvious, as airflow patterns can be complex. You cannot simply avoid placing a plant directly under a vent. Air can be deflected by walls and furniture, creating high-velocity streams several feet away. The only way to be certain is to map these invisible currents.
Action Plan: The Ribbon Test for Mapping Airflow
- Tape 6-inch light ribbons or strips of tissue paper at various heights near all supply and return air vents in a room.
- Turn on your HVAC system (heating or cooling) and observe the movement patterns of the ribbons during a full cycle. Notice where the movement is constant and vigorous.
- Create a ‘no-plant zone’ map on a simple floor plan, marking areas within 3 feet of any path where ribbons show consistent, active movement.
- Repeat this test seasonally. The airflow dynamics for heating (often from floor vents) can be drastically different from cooling (often from ceiling vents).
When to Shift Plants Away From Radiators to Prevent Heat Stress?
Radiators and baseboard heaters create another extreme microclimate, this one defined by intense radiant heat and severely low humidity. Unlike forced-air vents that project air, radiators work by creating a powerful convective loop of their own: they super-heat the air directly around them, which then rises rapidly. This creates a plume of hot, dry air that can scorch leaves and desiccate soil with alarming speed. A plant placed too close to a radiator is subjected to acute heat stress, which disrupts its metabolic functions.
The “danger zone” around a heat source is a gradient. The air directly above a radiator can be 20-30°F (11-17°C) hotter than the ambient room temperature. This creates a microclimate that is hotter and drier than almost any other spot in the house. Even a plant placed several feet away can be affected as the hot air circulates. Signs of heat stress are stark: wilting even when the soil is moist, yellowing or browning leaves (especially those closest to the heat source), and stunted growth as the plant enters survival mode.
To avoid this, you must establish a measured buffer zone. The goal is to find the point where the radiator’s influence drops off to a safe level. A simple touch test is a start—if a surface feels hot, it’s too hot for a plant. For a more analytical approach, use a soil thermometer. Place a pot with soil (no plant needed) at varying distances from the radiator (e.g., 1 foot, 2 feet, 3 feet) while it’s actively heating. Measure the soil temperature after an hour. If the temperature exceeds 85°F (29°C), it is too hot for the roots of most common houseplants. This defines your minimum safe distance. As a general rule, a minimum of three feet is a safe starting point for most radiators.
Why Your Urban Garden Is a Zone Warmer Than the Countryside?
The concept of microclimates extends beyond the walls of your home to your immediate surroundings, especially in cities. An urban balcony or backyard garden operates in a fundamentally different climate than a rural or suburban one due to the Urban Heat Island (UHI) effect. Cities are vast constructions of materials with high thermal mass, like concrete, asphalt, and brick. These materials absorb and store solar radiation during the day and then slowly release it at night.
This process makes urban centers significantly warmer than surrounding rural areas. The difference is measurable and consistent. Studies estimate that heat islands increase daytime temperatures in urban areas by about 1°F to 7°F, but the effect is even more pronounced at night, with temperatures remaining 2°F to 5°F warmer. This is because vegetated rural areas cool down quickly after sunset, while the city’s concrete “battery” continues to radiate heat. In some cases, highly developed areas can experience mid-afternoon temperatures 15°F to 20°F higher than nearby parks or vegetated land.

For an urban gardener, this has profound implications. The warmer environment means you might be able to successfully overwinter plants that are rated for a warmer hardiness zone. A south-facing brick wall can act as a giant radiator, creating a protected microclimate suitable for tender perennials. However, it also means that plants are subjected to greater heat and water stress in the summer. The reflected heat from concrete and glass can easily scorch leaves, and containers can heat up to root-damaging temperatures. Urban gardening requires selecting tougher plants and implementing strategies like using larger pots (for better insulation) and more frequent watering to combat the intense thermal environment.
Deciduous Trees on the South Side: How Much Do They Lower AC Costs?
Just as urban infrastructure creates heat, strategic planting can create cooling. The most effective passive cooling strategy for a home is the placement of deciduous trees on its south and west-facing sides. These trees function as natural, dynamic insulators. In the summer, their dense canopy of leaves blocks direct solar radiation, preventing it from heating the walls and windows of the house. This shading alone can significantly reduce indoor temperatures and, consequently, air conditioning costs.
Beyond shade, large trees provide substantial cooling through evapotranspiration. This is the same process plants use to create humid microclimates, but on a massive scale. As a tree pulls water from the ground and releases it as vapor through its leaves, it actively cools the surrounding air. The effect is powerful; a large, healthy tree can transpire up to 100 gallons of water per day, providing a cooling effect equivalent to running several room-sized air conditioners for 20 hours.
The genius of using deciduous trees (like oaks or maples) lies in their seasonal adaptation. In the winter, they drop their leaves, allowing the low-angled winter sun to pass through their bare branches and passively warm the home. Evergreen trees, in contrast, provide year-round shade, which is beneficial in hot climates but can block valuable solar gain and increase heating costs in colder regions. The following table illustrates the strategic advantage of deciduous trees for four-season climates.
| Feature | Deciduous Trees | Evergreen Trees |
|---|---|---|
| Summer Shade | Dense canopy blocks sun | Constant shade year-round |
| Winter Sun Access | Bare branches allow warming sun | Blocks beneficial winter sun |
| Cooling via Transpiration | High in growing season | Moderate year-round |
| AC Cost Reduction | Up to 35% in summer | 20-25% but increases heating costs |
This data, synthesized from analyses like those from the UCAR Center for Science Education, shows that planting the right tree in the right place is not just a landscaping choice; it is a sophisticated climate-control decision with measurable financial and environmental benefits.
Key takeaways
- Your home is not a uniform environment; it’s a collection of distinct microclimates defined by temperature, humidity, and airflow.
- Success with sensitive plants depends on mapping these invisible zones using observation and simple tools, not just following generic care advice.
- Factors like windows, HVAC vents, plant groupings, and even the materials of your building create specific conditions that can either support or destroy a plant.
How to Read Regional Hardiness Zones to Avoid Winter Plant Loss?
The final layer of analysis is understanding your regional climate baseline. The USDA Plant Hardiness Zone Map is the standard tool for this, providing gardeners with a critical piece of data: the average annual minimum winter temperature for their area. Knowing your zone (e.g., “Zone 7a”) tells you which perennial plants are statistically likely to survive the winter outdoors. However, a true home analyst knows that this regional zone is only the starting point. Your specific property contains its own set of microclimates that can effectively shift your “local” hardiness zone.
All the principles we’ve discussed—thermal mass, airflow, and solar exposure—apply to the outdoor environment on a larger scale. A south-facing brick wall that absorbs sun all day and radiates heat all night creates a microclimate that might be a half-zone warmer (e.g., behaving like Zone 7b in a Zone 7a area). This protected spot could be the perfect place to overwinter a marginally hardy rosemary. Conversely, a low-lying area at the bottom of a slope where cold, dense air collects on still nights can be a half-zone colder, creating a frost pocket where even zone-appropriate plants might perish.
Wind corridors, such as the space between a house and a garage, can amplify cold stress and desiccation, making that area effectively colder than its zone suggests. By observing and mapping these features—slopes, thermal mass from structures and pavement, and wind patterns—you can create a personalized hardiness map of your own yard. This allows for much more precise and successful plant placement, enabling you to push the boundaries of your official zone in protected spots while taking extra precautions in exposed ones. Your regional zone is the macro-climate; your job is to identify the micro-zones within it.
Start today by choosing one area of your home—a single window, a collection of plants, or a corner of your yard—and begin the process of observation. Use a thermometer, use the ribbon test, and use your analytical eye. By shifting your perspective from a plant owner to a home environmental analyst, you transform plant care from a game of chance into a science of place.