The frustration with unsightly utility bins and AC units isn’t an aesthetic problem—it’s a spatial planning failure. Instead of just concealing these items with a hedge or flimsy screen, the solution lies in designing an ergonomic garden layout. By treating utilities as functional zones and planning circulation, cultivation, and recreation around them, you can create a garden that is not only beautiful but seamlessly efficient, transforming eyesores into integrated, multi-purpose assets.
That bulky air conditioning unit humming by your patio and the collection of recycling bins by the back door are a constant source of frustration for many homeowners. They disrupt the view, break the natural harmony of the garden, and feel like immovable obstacles to a beautiful outdoor space. The common advice is to hide them. People plant hedges, erect simple wooden fences, or even attempt to paint their utility meters, hoping to make them disappear. But these are often just cosmetic fixes that fail to address the root of the problem.
These solutions frequently create new issues: a poorly placed screen can make a patio feel cramped, a dense hedge can block essential airflow to an AC unit, and a path that ignores your natural walking route from the kitchen to the compost bin results in a muddy track across the lawn. The problem isn’t the utility box itself, but its lack of integration into the garden’s overall flow and function. It’s treated as an afterthought to be concealed, rather than a fixed point to be designed around.
But what if the key wasn’t just to hide these elements, but to integrate them? This guide reframes the challenge from one of simple camouflage to one of smart spatial planning. We will explore how to think like a functional space planner, transforming these necessary evils into the cornerstones of a clever and ergonomic garden layout. By strategically planning your patio space, tracking natural light, designing adaptable zones, and defining circulation paths, you can make your entire garden work better, look bigger, and feel more cohesive.
This article provides a structured approach to solving these common garden layout problems. By following these principles, you will learn how to design a garden where functional elements are so well integrated that they become invisible by design, not by concealment.
Summary: A Strategic Guide to Integrated Garden Design
- Why Your Patio Is Too Small for Your Table and Chairs?
- How to Track Shadows to Place Your Vegetable Patch Correctly?
- Sandbox or Lawn: Which Play Zone Adapts Better as Kids Grow?
- The Pathway Mistake That Causes Muddy Shortcuts Across the Lawn
- Kitchen Proximity: Why Growing Herbs Far From the Door Leads to Waste?
- How to Plant Green Screens to Block Noise From Busy Streets?
- How to Choose Crops That Save You the Most Money at the Grocery Store?
- Curved or Straight: Which Circulation Path Makes Small Gardens Feel Bigger?
Why Your Patio Is Too Small for Your Table and Chairs?
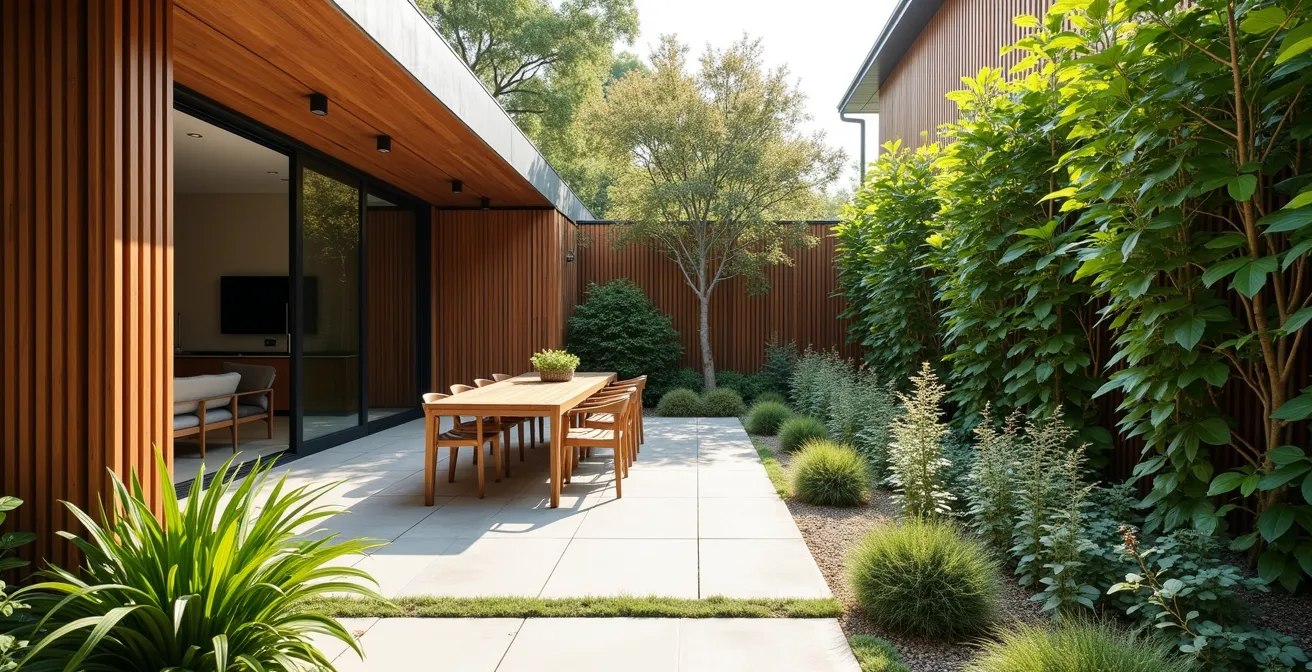
The most common planning mistake is underestimating the space required not for the furniture itself, but for the movement around it. A patio feels cramped when you can’t comfortably pull out a chair or walk behind someone who is seated. This isn’t just an inconvenience; it’s a fundamental failure of ergonomic design. The solution is to plan for “negative space” or circulation paths from the very beginning. Thinking of your patio as a room, you need to account for walkways and activity zones, not just the furniture’s footprint.
Effective spatial planning treats the area around furniture as an active part of the design. Rather than pushing a table and chairs against a wall to maximize “open” space, you create a more functional and perceived larger area by ensuring every part of the patio is accessible. For example, screens intended to hide an AC unit must be placed far enough away from seating areas to avoid creating a sense of confinement. Design experts recommend leaving at least 3½ feet (1.1 meters) minimum around furniture for comfortable main passageways.
This principle of planning for movement is the first step in integrating utility areas. By defining clear, generous circulation paths, the placement of a utility screen becomes a deliberate act of “walling” off a zone rather than a clumsy attempt at hiding an object. The space works because the flow is prioritized. Before you place a single paver or piece of furniture, you must consider how you will move through the space.
Action Plan: Auditing Your Patio’s Functional Space
- Assess Furniture Footprint: Measure your table and chairs, adding a minimum of 36-48 inches around tables to account for chair pull-out and movement.
- Calculate Negative Space: Map out your main circulation paths. These walkways between furniture groups or from a door to the stairs should be at least 30-36 inches wide.
- Verify Screen Placement: Check that any privacy or utility screens are positioned at least 3 feet away from the edge of your primary seating area to maintain an open feel.
- Test Chair Clearance: Ensure there is a minimum of 24 inches of clear space behind each dining chair so it can be pulled out without hitting a wall, railing, or screen.
- Plan for Integration: Based on your audit, reposition furniture and screens to create logical, comfortable pathways that connect the house, seating areas, and garden access points seamlessly.
How to Track Shadows to Place Your Vegetable Patch Correctly?
A frequent error in garden planning is placing elements based only on convenience, ignoring the single most powerful environmental factor: the sun. A vegetable patch that fails or a seating area that’s always in the blazing heat is often the result of not understanding how shadows move across your property throughout the day and year. This is especially critical when you’re installing screens or structures to hide utilities, as these solid objects will cast significant shadows.
Instead of seeing these shadows as a problem, a smart planner sees them as an asset. By tracking the sun’s path, you can map out “microclimates” in your garden. The area behind a tall utility screen might be in deep shade for half the day, making it a perfect spot for shade-loving crops like lettuce, spinach, and kale, which would otherwise bolt in full sun. This transforms a “dead” space into a productive functional zone. The process is simple: on a sunny day, place markers in your garden at 9 a.m., noon, and 3 p.m. to trace the edges of shadows cast by your house, trees, and any proposed screens.
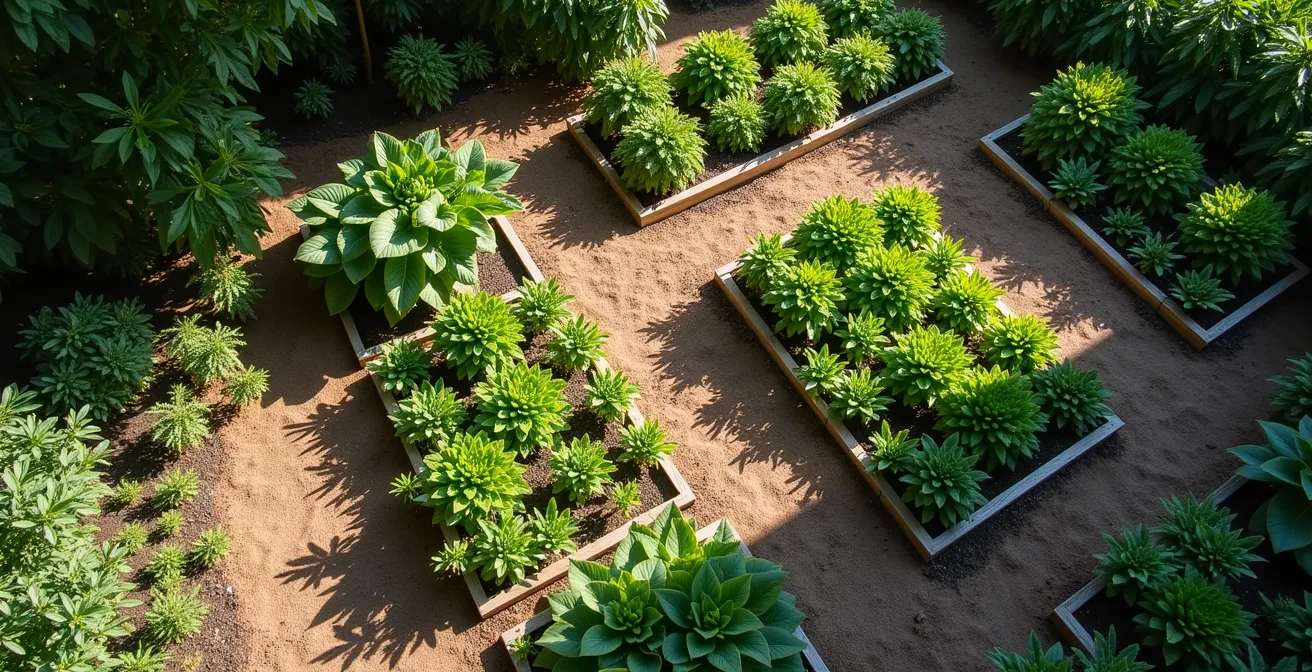
This shadow map becomes a strategic blueprint for your entire garden layout. It tells you where to place sun-loving tomatoes and where to tuck in the delicate herbs. It dictates the best location for a morning coffee spot versus an afternoon reading nook. This technique allows for a highly integrated and productive design, as demonstrated by one landscape firm’s approach.
Case Study: Boston Courtyard Shadow Optimization
In a small Boston courtyard, Matthew Cunningham Landscape Design faced the challenge of screening an AC unit while maximizing garden space. By meticulously mapping the shadows cast by the proposed screen, they were able to create a dedicated, cool-zone for growing lettuce and spinach. More cleverly, they used the screen’s structure itself as a trellis for vertical growing, planting climbing beans that thrived in the full sun the screen received, turning a simple barrier into a multi-layered food production system.
Sandbox or Lawn: Which Play Zone Adapts Better as Kids Grow?
A garden is not a static picture; it’s a living space that must evolve with your family’s needs. A common planning pitfall is installing permanent, single-use features like a fixed sandbox or a dedicated swing set area. While perfect for toddlers, these zones often become neglected and awkward within a few years. The more strategic approach is to design adaptable play zones that can be easily repurposed as children’s interests change, from early-years play to teenage hangouts and eventually to adult use.
A simple lawn area offers flexibility for sports and running but can be high-maintenance and lacks structure for younger children. A well-designed modular sandbox, on the other hand, presents a superior long-term investment. By building the sandbox with a sturdy, removable frame, you create a contained space that can be transformed. Once the sand is no longer needed, the area can become a designated spot for a trampoline, a sunken fire pit, or be converted into a raised garden bed for vegetables. This long-term thinking maximizes the utility of every square foot of your garden over decades, not just a few years.
A properly edged and prepared modular area can evolve from sandbox to trampoline spot to raised bed, maximizing your investment across 15+ years.
– June Scott, June Scott Design Landscape Portfolio
This foresight is key to a truly functional layout. The following comparison highlights how different options perform over the lifecycle of a family garden.
| Feature | Sandbox with Modular Frame | Lawn Area | Hybrid Solution |
|---|---|---|---|
| Initial Cost | $300-500 | $200-400 | $500-700 |
| Ages 0-5 Utility | Excellent | Good | Excellent |
| Ages 6-12 Adaptability | Converts to raised bed | Sports activities | Both options |
| Teen/Adult Use | Fire pit conversion | Entertainment space | Multiple zones |
| Maintenance | Sand replacement yearly | Weekly mowing | Moderate both |
| Screen Integration | Can attach play panels | Open for activities | Best flexibility |
The Pathway Mistake That Causes Muddy Shortcuts Across the Lawn
Have you ever noticed a worn patch of grass cutting across your lawn, creating an unofficial and often muddy shortcut? These are called “desire lines,” and they are the clearest indication of a flaw in your garden’s circulation plan. People, like water, follow the path of least resistance. When a paved path is indirect or illogical, we create our own more efficient routes. This is especially true for functional trips: from the back door to the utility bins, from the kitchen to the compost, or from the driveway to the side gate.
Ignoring these desire lines is a critical planning mistake. Instead of fighting them, a clever planner observes and formalizes them. The most direct way to identify these natural routes is to watch how your family uses the space. For a more precise method, you can lightly dust high-traffic areas with flour or sand on a dry week and observe where the footprints concentrate. This reveals the true circulatory system of your garden, showing you exactly where permanent pathways are needed.

Once you’ve mapped these routes, the solution is to design paths that honor them. This might mean creating a straight, 4-foot wide “utility corridor” connecting all service points, hidden behind a green screen. Or it could be a gently curving stepping-stone path that follows the natural arc someone takes to get to a favorite seating area. By paving these desire lines, you eliminate muddy shortcuts and make the entire garden more functional and intentional. The layout feels right because it aligns with human behavior.
Kitchen Proximity: Why Growing Herbs Far From the Door Leads to Waste?
Many aspiring kitchen gardeners make a simple but critical error: they plant their herbs in a sunny spot at the far end of the garden. While the plants may thrive, they often go unused. The effort of walking across the lawn in the rain or with shoes on just to snip some chives for a salad is often too much. This is a classic ergonomic failure. The placement of your herb garden directly impacts its utility, and distance is the primary enemy of convenience.
To maximize use, think in terms of an “Ergonomic Triangle” connecting three key points: the kitchen door, your primary herb-growing area, and your compost bin. By keeping these three elements in close, easy-to-navigate proximity, you create a highly efficient work zone. Herbs should ideally be planted in pots on the patio, in a raised bed just outside the door, or integrated directly into the screening structure for your utility bins. When fresh ingredients are just a few steps away, you are far more likely to use them daily. Behavioral studies show that herbs planted more than 30 feet from the kitchen door reduces usage by 70%.
This principle of proximity turns a decorative herb patch into a functional extension of your kitchen. The screen hiding your compost bin is no longer just a barrier; it’s a productive vertical wall for climbing mint or rosemary, located exactly where it’s most useful. This integration is the essence of smart spatial planning.
Case Study: The Michigan Editor’s Garden Prep Triangle
Home and design editor Michelle Adams perfected this concept by creating a ‘Garden Prep Triangle’ in her Michigan backyard. She positioned her herb collection within 8 feet of her kitchen door. This herb zone was integrated with attractive screens that hid both her AC unit and a compost area. By creating this compact, functional triangle, her daily herb use skyrocketed, going from an occasional weekly harvest to a constant part of her daily cooking routine.
How to Plant Green Screens to Block Noise From Busy Streets?
A green screen is one of the most effective ways to hide utilities and block unwanted views, but its function can extend far beyond aesthetics. With strategic plant choices, a screen can also become a powerful barrier against noise pollution from a busy street. The common mistake is to plant a single, thin row of arborvitae, which provides a visual block but does little to absorb or deflect sound waves. A truly effective acoustic screen is built in layers, much like soundproofing a room.
A multi-layered approach uses different types of plants to tackle different sound frequencies. The strategy involves: a dense base layer of evergreens for year-round mass; a middle layer of broadleaf evergreens like rhododendron to block high-frequency noise; a texture layer of rough-barked trees to scatter sound waves; and a final absorption layer of soft ornamental grasses. For even greater effect, this planting can be done on a raised earth berm, which amplifies the screen’s height without waiting years for plants to grow. It is also critical to ensure proper airflow for machinery; a screen should be planted at least 3-5 feet away from an AC unit to allow for ventilation and service access. In fact, according to the U.S. Department of Energy, strategic green screens can provide a 10% improvement in AC efficiency when shaded from direct sun.
This creates a deep, complex barrier that is far more effective at creating a tranquil garden environment than any single hedge. The structure that hides your bins becomes the backbone of a sophisticated, multi-functional landscape feature that adds beauty, privacy, and peace.
Your Checklist for a Four-Season Acoustic Screen
- Base Layer: Plant a dense row of evergreens (like Arborvitae or Juniper) 3-4 feet from your property line to create a solid, year-round visual foundation.
- Middle Layer: Add broadleaf evergreens (such as Holly, Laurel, or Rhododendron) in front of the base layer. Their large leaves are excellent at blocking high-frequency noise.
- Texture Layer: Integrate trees with rough, irregular bark (like Oaks or Pines). This texture helps to scatter and diffuse sound waves rather than just blocking them.
- Absorption Layer: Plant a band of soft ornamental grasses or low, mounding shrubs at the very front to absorb any remaining sound energy.
- Amplify and Mask: Consider building a 2-3 foot high earth berm at the base to increase the screen’s effective height, and integrate a small water feature to mask residual noise with pleasant sounds.
How to Choose Crops That Save You the Most Money at the Grocery Store?
Once you’ve decided to use a screen or trellis to hide a utility unit, you’ve created a new opportunity: vertical gardening space. The mistake is to plant something purely ornamental when you could be using that valuable, sunny real estate to grow food. But not all crops are created equal. To maximize your return on investment, you should choose high-value, high-yield climbing plants that are expensive to buy but easy to grow. This transforms your screening structure from a simple cost into a productive, money-saving asset.
Crops like pole beans, sugar snap peas, cherry tomatoes, and cucumbers are perfect candidates. They naturally want to climb, are highly productive in small spaces, and their fresh-from-the-garden taste is far superior to store-bought versions. A handful of cherry tomato plants grown vertically on a trellis can yield pounds of fruit, saving a significant amount on your grocery bill over the summer. The key is to analyze the “return per square foot.” Instead of just hiding an AC unit, you are creating a small, high-intensity farm.

The financial benefit can be substantial, often paying for the cost of the screening materials in a single season. This approach perfectly embodies the principle of integration, where a solution to one problem (hiding utilities) creates value in another area (food production).
Case Study: Vertical Garden ROI on a Utility Screen
Platt Hill Nursery documented a customer who did exactly this. They built an attractive wooden screen around their AC unit and fitted it with a trellis. By planting high-value climbing vegetables, they successfully grew over $300 worth of produce in the first year alone. The utility screen, which was a necessary expense, achieved a full return on investment within its first growing season and continues to be a productive part of their garden.
| Crop | Yield per Vertical Sq Ft | Grocery Store Value/Year | Screen Suitability |
|---|---|---|---|
| Pole Beans | 2-3 lbs | $12-18 | Excellent |
| Cherry Tomatoes | 4-5 lbs | $20-25 | Excellent |
| Cucumbers | 3-4 lbs | $15-20 | Very Good |
| Sugar Snap Peas | 2 lbs | $16-20 | Excellent |
| Passion Fruit | 10-15 fruits | $30-45 | Good (warm climates) |
Key Takeaways
- Plan for Flow, Not Just Furniture: A functional garden prioritizes circulation paths and “negative space” around objects, making it feel larger and more usable.
- Treat Utilities as Anchors: Design your garden’s functional zones (play, cultivation, relaxation) around fixed utilities instead of trying to pretend they don’t exist.
- Observe and Formalize Desire Lines: The most logical pathways are the ones you already use. Pave these natural routes to create a garden that works with your behavior, not against it.
Curved or Straight: Which Circulation Path Makes Small Gardens Feel Bigger?
The final layer of strategic garden planning involves manipulating perception. The shape of your pathways can dramatically alter how large or small your garden feels. A straight path creates a clear, direct line of sight, which can be effective for drawing the eye to a specific focal point. However, in a small space, it can also reveal the entire garden at once, emphasizing its limited size. A curved path, by contrast, creates a sense of mystery and journey.
By curving a path around a utility screen or a large shrub, you partially obscure the view ahead. The garden unfolds in stages, making it seem larger and more complex than it actually is. This technique is not about deception; it’s about controlling the visual narrative. You are guiding the visitor’s eye and creating an experience. You can even combine approaches: a main straight axis for functional routes (like the utility corridor) paired with meandering secondary paths for exploration.
A clever trick for straight paths is to use forced perspective. By slightly tapering the width of the path—for example, from 4 feet wide near the house to 3 feet wide at the far end—you create an optical illusion that the distance is greater than it is. This makes the garden feel deeper and more expansive. Ultimately, the choice between curved and straight depends on your goal: efficiency and focus, or mystery and perceived space.
The key to a beautiful garden with utilities is to direct the eye to a framed view – our eyes are drawn down the path while screens become backgrounds to vegetation.
– Great Lakes Landscape Design, Houzz Professional Garden Design Portfolio
By moving beyond simple concealment and embracing integrated spatial planning, you can solve the problem of ugly utilities for good. The goal is a garden where every element has a purpose, every path is logical, and every view is considered. Start planning your garden’s layout today to create a space that is both beautiful and brilliantly functional.