The common advice to simply “plant flowers” is failing our urban pollinators; a truly effective strategy requires ecological engineering, not just gardening.
- Success depends on providing a complete ecosystem: sequenced food sources, safe water, and proper nesting sites.
- Maximizing impact in small spaces means understanding bee biology, from their vision to their anatomy.
Recommendation: Stop decorating and start engineering. Treat your balcony as a micro-habitat, focusing on the specific needs of local bee species for food, water, and shelter throughout their entire life cycle.
The sight of a bee buzzing from flower to flower is a welcome sign of life in the concrete jungle. For city residents wanting to help, the go-to advice is often simple: plant more flowers. We fill our pots with colorful annuals and feel we’ve done our part. But as pollinator populations continue to face immense pressure, it’s clear this well-intentioned but simplistic approach isn’t enough. We see our neighbors putting out bee hotels for a few cavity-nesting species or planting flowers that, while pretty, offer little real nutrition.
The frustrating truth is that random acts of planting are not moving the needle. A truly impactful urban pollinator garden isn’t just a collection of pretty blooms; it’s a piece of high-performance ecological engineering. The key isn’t just *what* you plant, but *why* and *how* you build an entire life-support system in a tiny footprint. This means thinking less like a decorator and more like a habitat architect, considering the precise needs of pollinators from their first flight in the frigid days of early spring to the way their eyes perceive color.
This guide moves beyond the platitudes. We will deconstruct the essential components of a thriving urban pollinator habitat, focusing on the overlooked details that make the biggest difference. We’ll explore how to sequence resources for the entire season, create safe infrastructure for drinking and nesting, and select plants based on the specific biology of the bees you want to attract. It’s time to transform your balcony from a simple flower display into a buzzing, life-sustaining sanctuary.
This article provides a complete blueprint for creating a high-impact pollinator habitat in any small urban space. The following sections break down the critical strategies, from providing the first meal of the season to understanding the nuanced choice between native species and their cultivated relatives.
Summary: A Blueprint for an Urban Pollinator Ecosystem
- Why Early Spring Crocus Is Critical for Emerging Queen Bees?
- How to Build a Bee Watering Station That Doesn’t Drown Them?
- The Mulch Mistake That Blocks Ground-Nesting Bees
- How to Protect Your Pollinator Garden From Neighboring Sprays?
- Blue vs Red: Which Flower Colors Do Bees Actually See?
- Pots or Vertical Systems: Which Maximizes Biomass on a Tiny Balcony?
- How to Select Native Flowers That Feed Specific Local Bees?
- Native Wildflowers or Cultivars: Which Melliferous Species Produce More Nectar?
Why Early Spring Crocus Is Critical for Emerging Queen Bees?
For a queen bumblebee emerging from hibernation, the world is a cold, barren landscape. She has survived the winter alone and is now in a desperate race against time. To start a new colony, she needs to find vast quantities of high-quality nectar for energy and pollen for protein, long before most other flowers have even considered blooming. This early spring “hunger gap” is one of the most significant bottlenecks for pollinator survival in urban areas. This is where the humble crocus becomes a powerful tool of ecological engineering.
Crocuses are not just a cheerful sign of spring; they are a perfectly timed, high-density fuel source. Blooming in February or March, their flowers provide the critical first meal for queens when little else is available. Unlike many other early bloomers, crocuses offer both nectar and pollen. Pollinator gardening experts note that a single crocus bulb can produce up to 12 stems, creating a concentrated patch of resources that a weak, newly emerged queen can efficiently forage without expending precious energy flying far and wide. Planting a dense patch of crocuses is a direct intervention to ensure the founding generation of bumblebees survives.
To maximize this effect in a container, you need to think in terms of “resource sequencing.” The goal is a continuous wave of blooms from the very first thaw until the last days of autumn. A highly effective method for achieving this on a balcony is the “bulb lasagna” technique, which layers different types of bulbs in a single deep pot to create a staggered, months-long floral display.
Action Plan: The Bulb Lasagna Method for Non-Stop Blooms
- Drainage First: Place a 2-inch layer of gravel or broken terracotta at the bottom of a deep container to ensure proper drainage and prevent bulb rot.
- Base Layer: Add 4-6 inches of high-quality potting soil. This will be the foundation for your deepest bulbs.
- Late Bloomers: Plant your late-blooming bulbs, such as Muscari (Grape Hyacinth), at this deepest level. They will grow up through the others and flower last.
- Second Tier: Add 2 inches of soil, then plant your mid-season bloomers. Chionodoxa (Glory-of-the-Snow) is an excellent choice for this layer.
- The Critical Top Layer: Add another 2 inches of soil and plant your early-blooming crocuses. This positions them to emerge first and feed those crucial early queens.
- Final Topping: Cover with a final inch of soil and a light layer of mulch, like leaf mold.
- Activate and Wait: Water the container thoroughly and place it in a sunny location. The staggered depths will manage the bloom sequence for you.
By implementing this strategy, you are not just planting flowers; you are creating a timed nutritional delivery system specifically designed to support the most vulnerable stage of a bee’s life cycle. This single pot becomes a critical piece of infrastructure for local pollinator populations.
How to Build a Bee Watering Station That Doesn’t Drown Them?
After finding food, the next critical need for a foraging bee is water. Bees use water for several purposes: to cool the hive on hot days, to dilute honey for feeding larvae, and simply to drink. However, in an urban environment, safe water sources are deceptively scarce. A puddle on the pavement can be contaminated with chemicals, and a deep birdbath is a death trap. For a tiny insect, a steep-sided bowl of water is like an ocean with no shoreline—exhaustion and drowning are common fates.
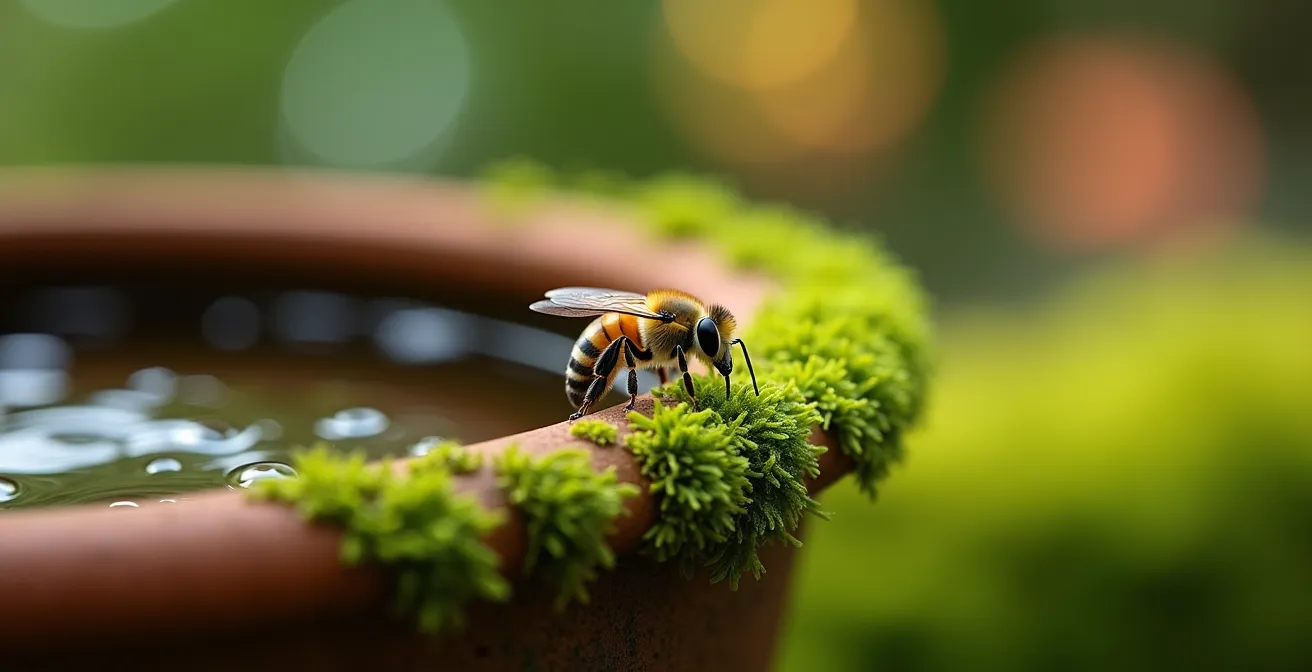
The standard advice to “put out a dish of water” is therefore dangerously incomplete. The key to a safe bee watering station is providing a shallow source with abundant “landing pads.” Bees cannot swim; they must be able to stand securely on a non-submerged surface while they drink. This can be easily achieved by filling a shallow dish or plant saucer with materials like pebbles, marbles, sea glass, or even moss. The water level should never rise above these landing platforms, creating a mosaic of tiny, safe pools.
This simple setup works, but it requires constant refilling, especially on hot summer days. For a more resilient, low-maintenance solution, we can look to an approach recommended by habitat experts.
Case Study: The Self-Filling Bee Waterer
To solve the problem of constant refilling, the U.S. Fish & Wildlife Service demonstrates an ingenious DIY system in their urban pollinator guides. The design uses an inverted water bottle (like a wine bottle or glass soda bottle) placed neck-down into a shallow, pebble-filled dish. As the bees drink and the water level in the dish drops, a small amount of water is automatically released from the bottle via gravity and pressure, maintaining a constant, safe water level. This creates a self-regulating oasis that ensures pollinators have a reliable and safe water source, even when you’re away for the weekend.
The image below shows a close-up of a bee safely drinking from a station that uses moss and terracotta—natural materials that provide excellent grip and retain moisture, making them ideal landing surfaces.
Creating this piece of infrastructure is a small effort with a huge impact. You are not only providing a vital resource but also actively preventing accidental deaths. It transforms a potential hazard into a reliable sanctuary, making your balcony a much safer and more attractive hub for local pollinators.
The Mulch Mistake That Blocks Ground-Nesting Bees
When we think of bee homes, the image that usually comes to mind is a buzzing hive or a wooden “bee hotel” with drilled holes. While these are important for honeybees and some solitary bees, they represent a tiny fraction of the bee population. The shocking truth is that a huge majority of native bees are far more discreet. According to the Xerces Society, an invertebrate conservation organization, a staggering 70% of native bee species nest underground. These are solitary mothers who excavate small tunnels in bare, undisturbed soil to lay their eggs.
Herein lies the great mulch mistake. In our quest for tidy, weed-free gardens, we religiously apply thick layers of wood chips, bark, or landscape fabric. While beneficial for plants, this practice is catastrophic for ground-nesting bees. A two- or three-inch layer of mulch is an impenetrable barrier, effectively putting up a “No Vacancy” sign across your entire garden. These bees need direct access to the soil surface to dig their nests. By covering every square inch of ground, we are inadvertently destroying the primary nesting habitat for the bulk of our native bee species.
For the urban gardener with limited ground, this might seem like a moot point. But it’s not. You can create prime real estate for ground-nesting bees right on your balcony. The solution is to provide dedicated patches of the right kind of substrate. This involves leaving an area of a large container or a designated pot completely bare. The soil should be a sandy mix, as heavy, compacted clay is difficult to excavate. Simply leaving the top 2-3 inches of a deep pot unplanted and un-mulched can provide the perfect nesting site. Position it in a sunny, south-facing spot to keep the soil warm and dry. If you see small, pencil-width holes appear in the soil, you’ll know you’ve successfully created a home for these vital, gentle pollinators.
This approach requires a mental shift from a purely aesthetic view of gardening to one of substrate management. It’s about consciously designing patches of “messy” but functional habitat. A pot of bare soil might not look as pretty as a pot of flowers, but for 70% of bees, it’s home.
How to Protect Your Pollinator Garden From Neighboring Sprays?
You’ve meticulously created a safe haven for pollinators—pesticide-free, full of native plants, and buzzing with life. Then, a breeze carries a fine mist of insecticide or herbicide from a neighbor’s yard or a municipal spray truck. This chemical drift can undo all your hard work in an instant, killing both adult bees and their developing larvae. In a dense urban environment, where balconies are close and property lines are imaginary in the air, protecting your garden from these invisible threats is a major challenge.
While open communication with neighbors is the ideal first step, it’s not always possible or effective. The most practical defense is to build a living, physical barrier. This involves strategic planting of “buffer” plants—tall, dense species positioned along the edges of your balcony or yard that can physically intercept and absorb airborne spray particles. Think of it as creating a green wall that acts as a shield for the more sensitive foraging areas within your garden.
Urban gardening experts have demonstrated that these living screens are surprisingly effective. Tall, robust potted plants like Joe Pye weed, native grasses, or even a trellis with a dense vine can create a multi-layered protective barrier. These plants not only reduce chemical drift but also provide additional habitat and food sources themselves, turning a defensive measure into a functional part of your ecosystem. The key is to select plants that are hardy, grow tall and dense, and can be easily managed in containers.
The following table provides a comparison of excellent buffer plant options suitable for container gardening, highlighting their defensive capabilities and their value to pollinators.
| Plant Type | Height | Drift Protection | Pollinator Value |
|---|---|---|---|
| Joe Pye Weed | 4-7 feet | Excellent | High nectar producer |
| Native Honeysuckle Vine | 10-20 feet | Very Good | Hummingbird magnet |
| Tall Ornamental Grasses | 3-6 feet | Good | Nesting material |
| Dense Shrub Roses | 3-5 feet | Good | Pollen source |
By implementing a living barrier, you take proactive control over your micro-habitat’s integrity. It’s a powerful strategy that defends your pollinators from external threats while simultaneously increasing the overall biomass and floral resources of your garden.
Blue vs Red: Which Flower Colors Do Bees Actually See?
When designing a garden, we humans are drawn to a vibrant mix of colors—a splash of red here, a burst of orange there. We assume that what looks beautiful to us will also be attractive to bees. But this assumption is based on a fundamental misunderstanding of bee biology. Bees do not see the world as we do. Their sensory ecology is tuned to a different part of the light spectrum, making some colors far more visible and attractive than others.
Bees are trichromatic, like humans, but their three primary colors are ultraviolet (UV), blue, and green. They are largely blind to the color red, which appears to them as a dark, uninteresting void. Conversely, colors in the blue, purple, and violet range are exceptionally vibrant to them. Many flowers in this color range have evolved “nectar guides”—UV patterns on their petals, invisible to us, that act like landing lights, guiding bees directly to the pollen and nectar.
This has profound implications for garden design. A garden filled with a “confetti” mix of colors can actually be visually confusing for a bee. A more effective strategy is color blocking, or “monochromatic planting.” As urban pollinator expert Anne Balogh notes:
Bees are better at finding large, solid blocks of color (‘monochromatic planting’) than a ‘confetti’ mix of different colors.
– Anne Balogh, Urban Pollinator Gardens Design Guide
This means grouping plants of the same color together in large drifts or clusters. A three-foot-square block of purple salvia is far more effective at attracting bees from a distance than a dozen different colored flowers mixed together. When planning your balcony garden, prioritize flowers in the blue, purple, violet, and yellow range. Use white flowers as a high-contrast transition between color blocks. While you might love red geraniums, understand that from a bee’s perspective, they are a black hole in an otherwise vibrant landscape. By catering to their vision, not ours, we make our gardens exponentially more efficient foraging grounds.
Pots or Vertical Systems: Which Maximizes Biomass on a Tiny Balcony?
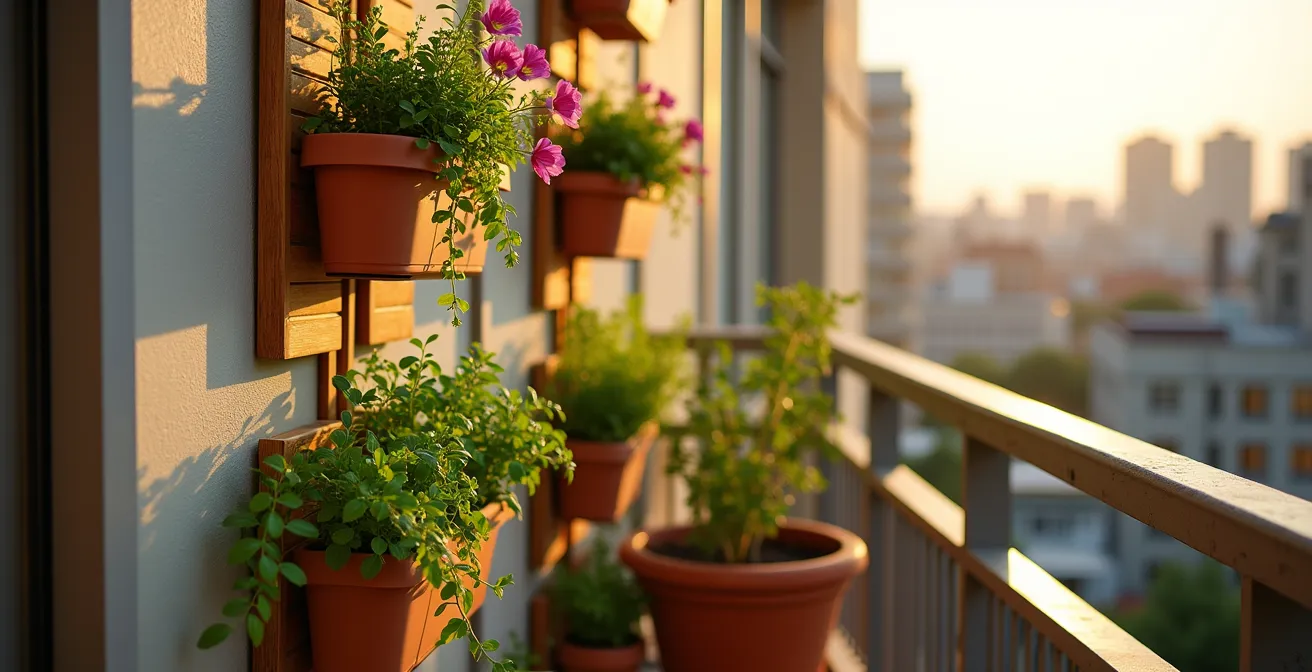
The fundamental constraint of urban gardening is space. A tiny balcony or windowsill seems to offer limited potential for creating a meaningful habitat. However, by thinking in three dimensions, we can dramatically increase the “biomass”—the total mass of living plant material—and thus the amount of available forage for pollinators. The choice between traditional pots and vertical growing systems is therefore a critical strategic decision.
Traditional round pots are simple and effective, but they are inefficient in their use of space. They only utilize horizontal square footage, and the photosynthetic surface is limited to the top of the plant. To truly maximize a small footprint, you must go vertical. Vertical systems, such as tiered planters, wall-mounted pocket planters, and trellises, allow you to stack plants, creating multiple layers of foliage and flowers in the same horizontal area. This not only increases the number of plants but also maximizes their exposure to sunlight, the primary driver of photosynthesis and nectar production.
A trellis system supporting a native vine like honeysuckle, for instance, creates a massive “green wall” of flowers and leaves, capturing far more solar energy than a single pot could. Tiered systems allow you to cultivate different species at different heights, creating a diverse canopy. While these systems can require more frequent watering, as smaller pockets of soil dry out faster, the payoff in terms of pollinator resources is immense.
The choice of system depends on your specific goals and the types of plants you wish to grow. The following table breaks down the pros and cons of different systems for a small balcony.
| System Type | Photosynthetic Surface | Water Needs | Best Plants | Maintenance |
|---|---|---|---|---|
| Traditional Pots | Limited to top surface | Moderate | Deep-rooted perennials | Weekly watering |
| Pocket Planters | Multiple levels | High (dry quickly) | Succulents, herbs | Daily in summer |
| Tiered Systems | Good vertical exposure | Moderate | Coneflowers, asters | 2-3x weekly |
| Trellis Systems | Maximum sunlight capture | Low-moderate | Native vines | Weekly |
By embracing verticality, you can transform a 10-square-foot balcony into a 30- or 40-square-foot foraging area. This is the key to creating a high-impact habitat despite severe spatial limitations.
How to Select Native Flowers That Feed Specific Local Bees?
The advice to “plant natives” is everywhere, and for good reason. Native plants co-evolved with local pollinators, making them the most appropriate food source. But this advice is often too general to be truly effective. The term “native” can cover a vast geographical area, and not all native plants are created equal. To create a truly high-performance habitat, we must move from general native planting to a more precise strategy: matching specific plants to the specific bees in our local area.
This is a concept known as functional morphology—the study of how an organism’s physical form is adapted to its function. In pollination, this refers to the relationship between a flower’s shape and a bee’s tongue length. Long-tongued bumblebees are built to access nectar from deep, tubular flowers like penstemon or honeysuckle. Short-tongued sweat bees, however, cannot reach the nectar in these flowers and thrive on open, shallow blossoms like asters or sunflowers. Planting only one type of flower shape will feed only one type of bee, leaving others hungry.
Case Study: The Perfect Fit of Functional Morphology
Research highlights the critical importance of matching flower anatomy to bee anatomy. A 2020 study in the journal *Insects* demonstrated that pollination success rates skyrocket when a bee’s tongue length is a match for a flower’s corolla depth. For example, by planting tubular native columbine alongside open-faced native sunflowers, a gardener can create a “functional buffet” that caters to both long-tongued and short-tongued bees, dramatically increasing the diversity of pollinators they support. It’s about creating an ecosystem of specialized relationships, not just a generic food source.
So how does a city dweller identify the right hyper-local native plants? Fortunately, powerful digital tools exist. The first step is to visit the National Wildlife Federation’s Native Plant Finder online. By simply entering your zip code, you get a database of plants native to your specific county, ranked by the number of pollinator species they support. The second step is to cross-reference this list with container-friendly traits like shallow roots and compact growth. Finally, select a variety of plants with different flower shapes and staggered bloom times to create a diverse and resilient food source that serves the widest possible range of local bees all season long.
Key Takeaways
- Effective urban pollinator support requires an engineered ecosystem, not just decorative flowers.
- Meeting bees’ core needs—sequenced food, safe water, and correct nesting substrate—is more impactful than planting random blooms.
- Designing for a bee’s biology, from its vision to its tongue length, dramatically increases a small garden’s efficiency.
Native Wildflowers or Cultivars: Which Melliferous Species Produce More Nectar?
The final, and perhaps most debated, question in pollinator gardening is the choice between true native wildflowers and their cultivated varieties, often called “cultivars” or “nativars.” On one side, purists argue that only straight native species offer the precise nutritional chemistry that local pollinators have evolved to expect. On the other, the horticultural industry offers a dazzling array of nativars—cultivars of native plants selected for desirable traits like new colors, larger blooms, or more compact growth.
The assumption is often that these modified versions are inferior for pollinators. In many cases, this is true. Cultivars bred for “double petals,” for instance, often have so many extra petals that bees cannot physically access the nectar and pollen. Others have been bred for colors that are less visible to bees or have inadvertently lost their nectar-producing capabilities. However, the answer is not a simple “natives good, cultivars bad.” The reality is far more nuanced.
Pioneering research from institutions like the Mt. Cuba Center is testing nativars against their straight-species parents to measure their actual appeal to pollinators. Their findings show a spectrum of results. Some nativars are, indeed, “duds” that attract few to no visitors. But surprisingly, some are even *more* attractive to pollinators than the original native species. This suggests that certain genetic tweaks can, by chance or by design, increase nectar production or make floral resources more accessible.
This is best summarized by the research team at the Mt. Cuba Center, who have conducted extensive trials on this very topic.
Some nativars like Phlox ‘Jeana’ have been tested and found to be pollinator superstars, while others are duds.
– Mt. Cuba Center Research Team, Study on Nativar Performance for Pollinators
What does this mean for the urban gardener? It means that informed choices are paramount. While prioritizing straight native species is the safest bet, don’t automatically dismiss all nativars. Do your research. Look for data from trials like those at the Mt. Cuba Center. Choose nativars that retain the original flower shape and avoid “double-flowered” varieties. A well-chosen nativar can be a powerful addition to a pollinator garden, especially in a container where its compact habit might be a significant advantage. The goal is to build the most effective, melliferous (nectar-producing) habitat possible, using the best plants available, whether they be true natives or proven pollinator-friendly nativars.
Now that you have the complete blueprint for engineering a pollinator ecosystem, the next step is to begin sourcing your materials and planning your balcony’s layout. Start today by identifying the right native plants for your zip code and designing your first bulb lasagna.