Many gardeners believe matching a plant’s tag to their USDA Hardiness Zone is a guarantee of survival. This is a costly misconception. True perennial survival isn’t determined by a national map, but by understanding and manipulating the unique thermal landscape of your own yard. This guide moves beyond the zone number to focus on the actionable factors—microclimates, soil temperature, and proper dormancy management—that actually decide whether your plants live or die.
Each spring, gardeners face a familiar, frustrating ritual: assessing the winter’s damage. That expensive Japanese Maple is now a collection of brittle sticks. The prized roses failed to return. The common culprit is often blamed on an unusually harsh winter, but the reality is more complex and, fortunately, more controllable. The problem isn’t just the weather; it’s how we interpret the primary tool meant to guide our choices: the Plant Hardiness Zone Map.
Most gardening advice begins and ends with “know your zone.” This single number, representing the average annual extreme minimum winter temperature, is treated as an infallible rule. Yet, gardeners continue to lose plants rated for their zone, or even colder. This happens because the map is a broad-stroke generalization. It cannot account for the specific thermal dynamics of your property—the “thermal banking” from a south-facing brick wall, the wind tunnel between your house and garage, or the frost pocket in a low-lying corner.
But what if the key wasn’t to rigidly adhere to the map, but to learn how to read the landscape *within* the map? This is the perspective of a climate-zoning consultant. The true skill lies not in finding your zone, but in identifying and even creating micro-zones on your property. It’s about understanding that the official zone is a baseline, not a boundary. Your garden’s survival depends less on that number and more on your surgical ability to place the right plant in the right micro-location and manage its transition through the seasons.
This article will deconstruct the hardiness zone concept from the ground up. We will analyze the real-world factors the map ignores, provide concrete strategies to “push” your zone’s limits safely, and diagnose the common mistakes that kill plants not in the dead of winter, but during the deceptive warmth of spring. Prepare to move from a gardener who hopes for the best to a strategist who plans for survival.
To navigate these complexities, this guide is structured to build your expertise step by step. Below is a summary of the key areas we will explore to transform your understanding of your garden’s climate and ensure your plants thrive for years to come.
Summary: A Consultant’s Framework for Plant Survival
- Why Your Urban Garden Is a Zone Warmer Than the Countryside?
- How to Overwinter Zone 7 Plants in a Zone 6 Garden?
- Own-Root vs Grafted Roses: Which Survives a Hard Freeze Better?
- The Spring Warm-Up Mistake That Kills Dormant Buds
- When to Plant Summer Bulbs Based on Your Last Frost Date?
- Why Does Your Plant Look Dead When It Is Just Sleeping?
- Native Oak or Exotic Maple: Which Survives Better in Changing Climates?
- How to Manage Winter Dormancy for Potted Plants Without a Greenhouse?
Why Your Urban Garden Is a Zone Warmer Than the Countryside?
The number on the USDA map is a regional average, but your garden doesn’t exist in an average. It exists in a microclimate, a localized atmospheric zone where the climate differs from the surrounding area. The most significant and often misunderstood microclimate is the “urban heat island.” Cities and suburbs are fundamentally warmer than their rural counterparts due to a concentration of heat-retaining surfaces like asphalt, brick, and concrete. This effect is not trivial; it can effectively shift your garden into a half-zone, or even a full zone, warmer than the official designation.
This stored thermal energy radiates throughout the night, buffering plants against the sharpest temperature drops. A garden bed against a south-facing brick wall might experience winter temperatures consistently 5-10°F warmer than an exposed lawn just 50 feet away. This creates an opportunity for “zone-pushing”—growing plants that are technically too tender for your region. However, it’s also a risk. The same heat island effect can cause plants to break dormancy too early, exposing new growth to a late, lethal frost. Understanding this dynamic requires moving beyond the map and actively surveying your own property’s thermal landscape.
To truly leverage this effect, you must become a cartographer of your own yard. Identifying these pockets of warmth and cold is the first step in making strategic planting decisions that defy the broad regional classification and dramatically increase plant survival rates. The following checklist outlines how to conduct a basic thermal audit of your garden.
Action Plan: Mapping Your Garden’s Microclimates
- Place multiple digital thermometers at different locations: near brick walls, pavement, low-lying areas, and open lawns.
- Record temperatures at dawn (coldest) and dusk (warmest) for two weeks to identify consistent heat zones and frost pockets.
- Map south-facing walls and other structures that create warmer pockets suitable for more tender plants.
- Identify wind tunnel areas between buildings or fences that create significant wind-chill effects and accelerate drying.
- Test soil temperature separately from air temperature using a soil thermometer, as this is the primary trigger for root activity.
- Document elevation differences, as cold, dense air settles in the lowest-lying areas, creating dangerous frost pockets.
How to Overwinter Zone 7 Plants in a Zone 6 Garden?
The art of growing plants outside their designated hardiness zone is known as “zone-pushing.” It’s a calculated risk that transforms gardening from simple planting to a strategic endeavor. Success hinges not on hope, but on actively mitigating the primary threat: extreme winter cold penetrating the root zone and killing the plant’s crown. While the urban heat island effect provides a passive buffer, active protection is required for more significant zone jumps, such as keeping a Zone 7 Camellia alive in a Zone 6 climate.
The most effective strategy is a multi-layered insulation system applied after the ground has frozen. The goal is not to keep the plant “warm,” but to keep it consistently frozen, preventing the damaging freeze-thaw cycles that heave plants from the ground and desiccate roots. This system mimics the natural insulation provided by a thick blanket of snow. This reality is reflected in recent map updates, where some regions have warmed enough to support new species. For instance, an analysis of the 2023 map update shows that Philadelphia has solidly warmed to Zone 7b, allowing local gardeners to successfully grow plants like crepe myrtles that were previously considered too tender.
The image below illustrates the concept of a multi-layer mulch system. This isn’t just a casual layer of wood chips; it’s an engineered barrier designed to stabilize soil temperature.
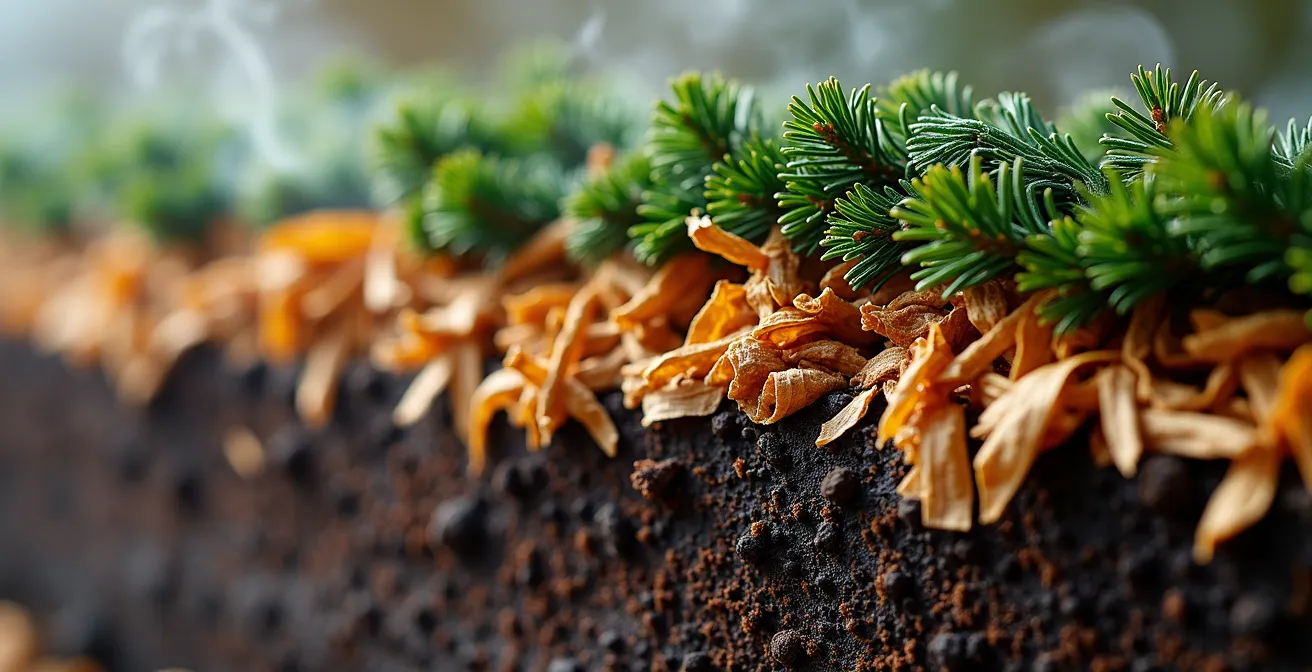
As you can see, the system relies on different materials for different functions. A base layer of compost provides a nutrient-rich buffer, followed by a thick, airy layer of shredded leaves or straw to trap air, and finally topped with evergreen boughs to prevent the lighter material from blowing away and to catch snow. Mastering this technique is the key to expanding your planting palette beyond what your zone dictates.
Own-Root vs Grafted Roses: Which Survives a Hard Freeze Better?
For high-value plants like hybrid tea roses, the question of survival goes deeper than location and mulch. It extends to the very structure of the plant itself: whether it is growing on its own roots or is grafted onto a different rootstock. A grafted plant consists of two genetically distinct parts: the desirable top portion (the scion) and a vigorous, hardy root system (the rootstock). The connection point, a noticeable knob near the base, is called the graft union. This union is the plant’s Achilles’ heel in a cold climate.
If a hard freeze kills the plant back to the ground, what regrows depends entirely on this structure. On a grafted rose, if the dieback occurs below the graft union, the hardy rootstock will send up shoots, but they will be from the rootstock variety—often a wild, less desirable rose. The prized cultivar you paid for is gone forever. An own-root rose, however, is genetically uniform from root to tip. Even if it dies back completely to the ground, any regrowth from the roots will be true to the original variety. For this reason, own-root plants offer a crucial insurance policy in climates with severe winters.
For gardeners committed to growing tender grafted roses outside their hardiness range, extreme measures are necessary. The goal is to protect the graft union at all costs. While mounding soil over the union is standard practice, the most dedicated northern gardeners employ a more drastic, yet highly effective, method known as trenching.
Case Study: The Minnesota Tip (Trenching Method)
A time-tested technique used by gardeners in extreme cold climates is trenching, or the “Minnesota Tip.” For half-hardy plants like grafted roses, this is often the only way to ensure survival. As documented by institutions like the Brooklyn Botanic Garden for challenging environments, the process involves digging a trench deep enough to lay the entire plant down on its side. The dormant plant is carefully tipped into the trench, pot and all if containerized, and then covered with soil and a thick layer of mulch. This uses the stable temperature of the earth itself as the ultimate insulator, protecting the entire plant structure, including the vital graft union, from lethal air temperatures.
The Spring Warm-Up Mistake That Kills Dormant Buds
Ironically, one of the most dangerous times for a perennial is not the depth of winter, but the first deceptive warm spell of late winter or early spring. A few sunny days can warm the air and the plant’s dark-colored stems, signaling it to break dormancy and push out tender new growth. When the inevitable late frost arrives, this vulnerable new growth is destroyed. This process, called de-hardening, can severely weaken or even kill a plant. The common mistake is assuming the plant is responding to the warm air. It is not.
The primary signal for a plant to break dormancy safely is not air temperature, but soil temperature. The root system is the plant’s anchor to reality. Until the soil warms consistently, the roots will not send the resources needed for a full flush of growth. This is a critical survival mechanism. Critically, research shows that plants track soil temperature for dormancy signals, largely ignoring misleading factors like temporary warm air or wind chill. A gardener who removes winter protection too early, exposing the soil to the sun, is essentially tricking their own plants into a deadly false spring.
The correct approach is a gradual, patient removal of winter mulch, guided by a soil thermometer, not the weather forecast. You should begin to pull back mulch only when the soil temperature consistently holds above 40°F (4°C). Even then, the process should take weeks. Uncover plants during the day but recover them at night. Reduce the mulch layer by half for a week before reducing it further. This slow acclimation allows the plant to “wake up” in sync with the true arrival of spring, keeping its new growth safe until the threat of the last frost has truly passed. This patience is what separates an experienced gardener from a hopeful one.
When to Plant Summer Bulbs Based on Your Last Frost Date?
The concept of soil temperature as the primary driver of plant activity is most critical when dealing with summer-flowering bulbs. Tender bulbs like Dahlias, Caladiums, and Cannas have absolutely no frost tolerance. Planting them based on a calendar date or the last frost date alone is a recipe for failure. If the soil is too cold, these fleshy tubers and rhizomes will simply sit in the damp earth and rot long before they have a chance to sprout. Each type of bulb has a specific minimum soil temperature required to initiate growth.
A soil thermometer is a non-negotiable tool for this task. It removes all guesswork and ensures you are planting into a hospitable environment. By waiting for the soil to reach the correct temperature, you guarantee that the bulb will begin root and shoot development immediately, out-pacing the threat of fungal diseases. The illustration below captures the essential moment of this decision-making process.
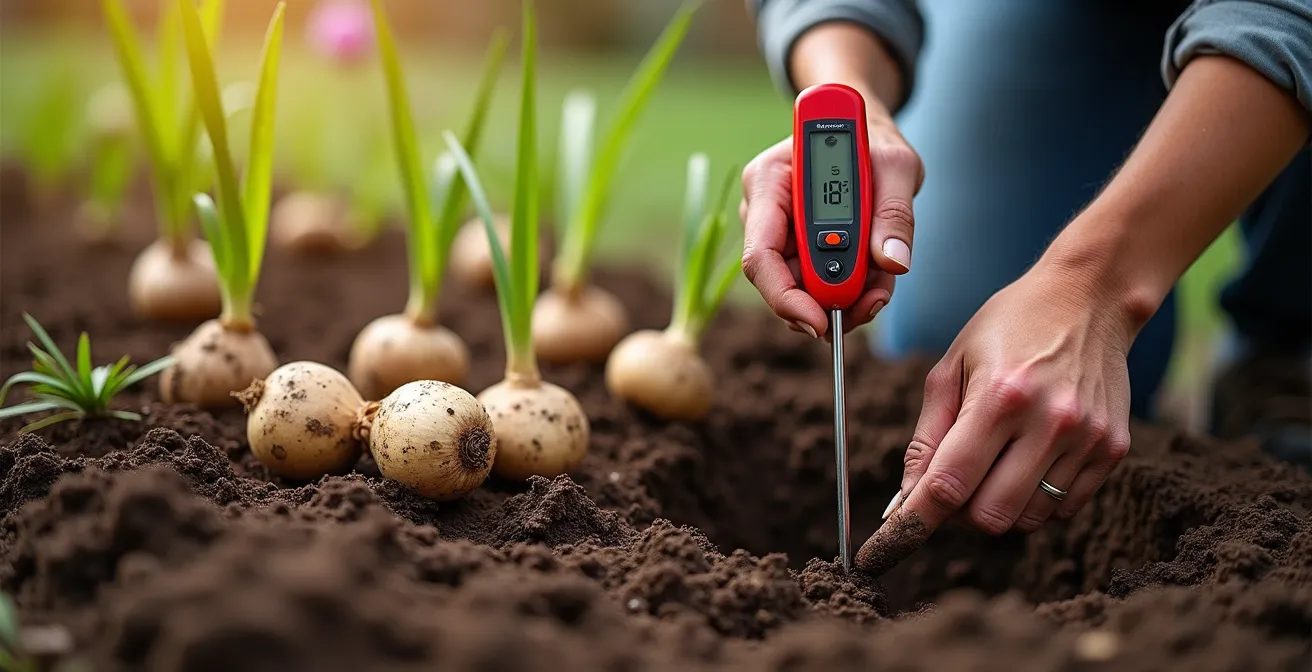
As the image suggests, the decision is tactile and precise. For gardeners in shorter-season climates, this temperature-based approach can be combined with starting bulbs indoors 4-8 weeks before the soil typically reaches its target temperature. This gives the plants a vital head start, leading to earlier and more robust blooms. The following table provides a clear guide to the specific needs of popular summer bulbs.
This comparative data, adapted from resources for serious bulb growers, is crucial for success with tender summer bulbs. An analysis from specialty growers like Longfield Gardens emphasizes these specific temperature thresholds.
| Bulb Type | Minimum Soil Temp | Frost Tolerance | Indoor Start Option |
|---|---|---|---|
| Dahlias | 55°F/13°C | None – tender | 4-6 weeks before last frost |
| Caladiums | 60°F/16°C | None – very tender | 6-8 weeks before last frost |
| Cannas | 55°F/13°C | None – tender | 4-6 weeks before last frost |
| Lilies | 45°F/7°C | Some – hardy | Not necessary |
| Crocosmia | 50°F/10°C | Moderate – semi-hardy | Optional |
Why Does Your Plant Look Dead When It Is Just Sleeping?
In late spring, the garden is filled with questions. While the crocuses and daffodils have come and gone, other plants remain stubbornly brown and lifeless. This is where many gardeners make another costly mistake: they lose patience and discard a perfectly healthy, but dormant, plant. Dormancy is a state of suspended animation, not death. Different species emerge on vastly different timelines, programmed by their unique evolutionary history. A Hibiscus, for example, may not show any signs of life until the soil is thoroughly warm in early summer, long after you’ve given up hope.
Declaring a plant dead requires a proper diagnosis, not just a visual assessment. An experienced gardener knows how to look for the subtle signs of life hidden beneath the surface. The “scratch test” is the most common method: a gentle scrape of the bark on a twig should reveal a thin, bright green layer of cambium—the living tissue that transports nutrients. If you see green, the plant is alive. If you see only dry, brown wood, that particular branch is dead, but it doesn’t mean the entire plant is lost. The life may still be in the roots.
Before you reach for the shovel, you must act as a plant detective. A series of simple tests can confirm whether your plant is merely sleeping late or has truly expired. Giving up too soon is a primary cause of unnecessary plant replacement. The following checklist provides a systematic way to diagnose dormancy versus death.
Your Diagnostic Checklist: Is It Dead or Dormant?
- The Scratch Test: Gently scrape the bark on several twigs with a fingernail. Green underneath means life.
- The Bend Test: Live twigs and stems are flexible and will bend without snapping. Dead wood is brittle and breaks cleanly.
- The Bud Check: Look closely for buds. Live buds will be plump and firm, while dead buds are dry, shriveled, and flake off easily.
- The Root Examination: Carefully excavate a small area near the base. Healthy roots are typically firm and white or light-colored, not black, mushy, or brittle.
- The Patience Calendar: Know your plant’s habits. Wait until at least late May or early June for notoriously late-waking perennials like Hibiscus or Butterfly Bush before making a final call.
Native Oak or Exotic Maple: Which Survives Better in Changing Climates?
The conversation about hardiness zones is increasingly dominated by a larger, more urgent force: climate change. The zones themselves are not static. They are shifting, generally northward, as global temperatures rise. This presents a new layer of strategic challenge for gardeners investing in long-term, high-value plants like trees. The beautiful Japanese Maple that thrives in your Zone 6 garden today may struggle in 30 years as summer heat and drought patterns intensify. Conversely, plants once considered marginal may become perfectly viable.
This uncertainty forces a critical decision: should you plant for the climate you have now, or the climate you are likely to have in the future? When selecting cornerstone trees and shrubs, resilience becomes as important as beauty. Native plants, such as a local species of Oak, are often the superior long-term investment. They have co-evolved with the region’s historical climate extremes, soil types, and pest pressures. Their deep genetic programming gives them an inherent ability to adapt to variability that an exotic species, like a Maple from a different continent, may lack.
The projections are sobering. Sophisticated climate models predict dramatic zone shifts by the end of the century, including continental humid climates (like much of the American Midwest) transitioning to semi-arid, steppe-like conditions. In this context, selecting a plant based on its ability to tolerate heat and drought becomes a more prescient strategy than focusing solely on its ability to withstand a record cold that may no longer occur. An investment in a native Oak is an investment in a genetic legacy adapted to local stress; an investment in an exotic Maple is a bet that its narrower tolerance range will remain comfortable.
Key Takeaways
- Your property is not one zone, but a collection of microclimates determined by sun, wind, and heat-absorbing structures.
- Successful “zone-pushing” relies on engineered protection (like multi-layer mulch) to keep plants consistently frozen, not warm.
- Soil temperature, not air temperature, is the most reliable trigger for plant dormancy breaks and safe planting times.
How to Manage Winter Dormancy for Potted Plants Without a Greenhouse?
Container gardening presents a unique and severe challenge for winter survival. A plant in a pot is far more vulnerable than one in the ground. Its roots are exposed on all sides to the ambient air temperature, completely lacking the vast insulating capacity of the earth. This means that a perennial rated for Zone 5, which would easily survive in the ground, will likely die in a pot left exposed on a Zone 5 patio. As a rule of thumb, a plant in a container needs to be hardy to at least two zones colder than your region to have a chance of surviving the winter unprotected.
Without a greenhouse, the goal is to find or create a microclimate that moderates the worst of the winter cold. The most common and effective method is to move the pots into an unheated garage, shed, or basement. The ideal location is one that stays consistently cold—between 30°F and 45°F (-1°C to 7°C)—but does not drop to the lethal temperatures experienced outside. The goal is to keep the plant dormant but prevent the roots from freezing solid and desiccating. The plants will still need to be checked for water once a month, as even dormant roots require a small amount of moisture to stay alive.
For gardeners without an indoor space, alternative methods must be employed. Grouping pots together against a protected wall of the house reduces wind exposure and allows them to share radiant heat. Another highly effective, though labor-intensive, method is to bury the pots directly in the ground or in a designated garden bed filled with mulch. This allows the pots to benefit from the earth’s natural insulation. The following table gives a realistic overview of survival rates based on the chosen method.
The data in this table, based on recommendations from horticulture experts at major nurseries like Proven Winners, provides a clear, cautionary guide to the real-world chances of success for overwintering container plants.
| Your Zone | Plant Hardiness Needed | Protection Method | Success Rate |
|---|---|---|---|
| Zone 5 | Zone 3 plants | Leave outside with mulch | 95% |
| Zone 5 | Zone 4 plants | Unheated garage | 85% |
| Zone 5 | Zone 5 plants | Bury pot in ground | 75% |
| Zone 6 | Zone 4 plants | Leave outside with mulch | 95% |
| Zone 6 | Zone 5 plants | Protected corner + mulch | 80% |
By moving beyond the simple number on a map and embracing these more nuanced, ground-level strategies, you can dramatically reduce winter losses and build a more resilient, long-lasting garden. Your next step is to conduct a thorough audit of your own property and planting practices to identify opportunities for improvement.