In summary:
- Swap expensive, disposable cut flowers for sustainable living plant centerpieces that double as meaningful guest favors.
- Master the “double-potting” technique using nursery pots inside decorative cachepots to prevent water damage to linens and tables.
- Choose resilient, low-light plants like ZZ Plants or Pothos that will look vibrant throughout the event and thrive in a guest’s home.
- Design a “Plant Adoption Station” with proper packaging to ensure guests can transport their new plant home easily and safely.
- Plan the full lifecycle of your plants, from propagation months before the wedding to their integration into a garden afterward.
The scene is all too familiar: at the end of a magical wedding night, hundreds or even thousands of dollars worth of exquisite floral centerpieces are swept into the trash. They were stunning for a few hours, but their journey ends there. This cycle of temporary beauty is not only expensive but feels increasingly out of step with a desire for more meaningful, sustainable celebrations. Many couples consider the popular alternative of using potted plants, like succulents, as a more eco-friendly option. It’s a great start, but it only scratches the surface.
The real challenge—and the mark of a truly thoughtful event design—isn’t just placing a plant on a table. It’s in the logistics. How do you create a living centerpiece that is genuinely beautiful, survives a dark reception hall without wilting, doesn’t leak water onto expensive rental linens, and, most importantly, is something a guest in their finest attire can actually take home without a mess? This is where the artistry of a sustainable stylist comes into play, transforming a simple favor into a lasting ‘living legacy’ of your special day.
But what if the secret to achieving this wasn’t about finding the perfect pot, but about mastering a system? It’s about understanding the entire lifecycle of your decor, from plant selection to transport-ready design. This guide moves beyond the basics to give you the professional framework for creating breathtaking living decor that is as practical as it is beautiful. We’ll explore how to choose resilient plants, implement leak-proof solutions, and package your centerpieces to ensure they become cherished mementos, not inconvenient afterthoughts.
This article provides a complete roadmap for designing sustainable living centerpieces. You will discover the professional techniques to ensure your decor is beautiful, durable, and a true gift for your guests. The following sections break down every crucial step of the process.
Summary: Living Wedding Decor on a Budget: A Stylist’s Guide to Sustainable, Take-Home Centerpieces
- Why Moss Is the Secret Weapon for Disguising Plastic Nursery Pots?
- How to Choose Plants That Won’t Wilt in a Dark Reception Hall?
- Soil or Hydroponic Glass: Which Look Is More Elegant for Centerpieces?
- The Saucer Mistake That Ruins Rental Linens and Tables
- Why the Wrong Vase Shape Destroys Your Arrangement’s Balance?
- How to Drill Drainage Holes in Ceramics Without Cracking Them?
- How to Package Living Decor so Guests Can Transport It Easily?
- How to Implement Sustainable Management in a Suburban Garden?
Why Moss Is the Secret Weapon for Disguising Plastic Nursery Pots?
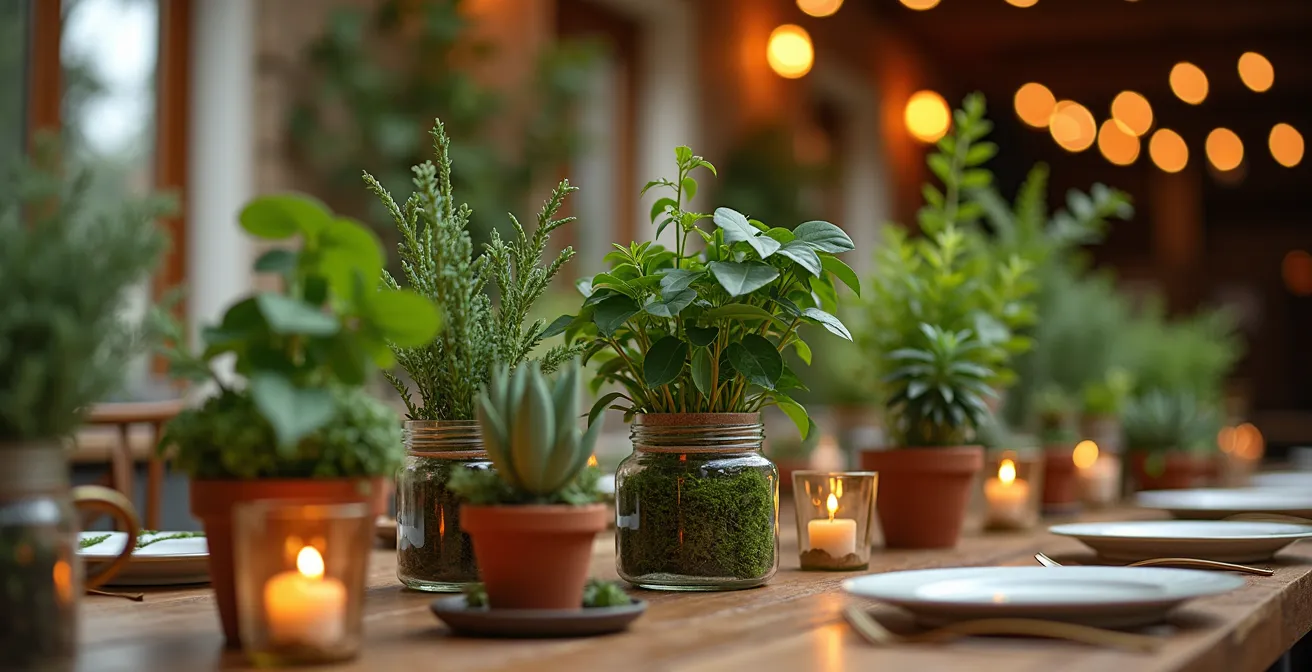
The foundation of a practical, take-home centerpiece is the humble plastic nursery pot. It’s lightweight, inexpensive, and provides proper drainage. However, its utilitarian appearance is far from wedding-worthy. The stylist’s secret to elevating it is sustainably harvested moss. Moss acts as a natural, elegant camouflage, instantly transforming a plastic pot into something that looks organic and fully integrated with the plant it holds. It adds texture, a touch of woodland charm, and a cohesive, high-end finish without the weight or expense of heavy ceramic containers.
There are several types of moss you can use, each offering a different aesthetic. Sheet moss provides a smooth, uniform wrap, perfect for a clean and modern look. Mood moss offers a more dimensional, plush texture for a lush, forest-floor feel. Even preserved moss can be used for a consistent color and no-maintenance solution. The key is to source it from specialty suppliers a few weeks before the event to ensure quality. By wrapping the pot and using moss to cover the soil surface, you create a seamless, professional look that completely hides the mechanics underneath.
This technique is not just about aesthetics; it’s about logistics. It keeps the soil contained during transport and allows you to use the most practical potting solution without compromising on style. To achieve this look, you can follow a few simple steps:
- Keep live moss in a cool, dry place until you are ready to use it; it can remain dormant for weeks.
- Lightly hydrate the moss with a mister about 24-48 hours before assembly to bring out its vibrant green color.
- Wrap sheets of moss around the plastic pot, securing them discreetly with green floral wire or a few dabs of hot glue.
- Tuck tufts of mood moss around the base of the plant to hide the pot’s rim and any visible soil.
How to Choose Plants That Won’t Wilt in a Dark Reception Hall?
One of the biggest fears for any event planner is decor that looks tired and sad by the time guests arrive. Reception halls are notoriously challenging environments for plants: they are often dark, with little to no natural light. Choosing a plant for its beauty alone, without considering its reception hall resilience, is a recipe for disaster. The key is to select species that are not just tolerant of low light but actually thrive in it. These are the workhorses of indoor plant styling, ensuring your centerpieces look as fresh at the end of the night as they did at the beginning.
Some of the most dependable choices are plants that have been staples of indoor gardening for centuries for this very reason. For instance, according to the Royal Horticultural Society, the Cast-iron plant (Aspidistra) was a Victorian favorite precisely because it could survive the low light and pollution from coal fires. Today, modern classics like the ZZ Plant (Zamioculcas zamiifolia), with its glossy, architectural leaves, and various types of Pothos, with their forgiving nature and trailing vines, are go-to options for event professionals. These plants don’t just survive; they maintain their structural integrity and vibrant color in conditions that would cause most flowering plants to wilt dramatically.
When selecting plants, consider both their durability and their visual impact. A Peace Lily can offer the elegance of a white bloom even in shady conditions, while the intricate patterns on a Calathea’s leaves can provide all the color and interest you need. The following table compares some of the best choices for a low-light wedding reception.
| Plant Type | Light Tolerance | Care Level | Visual Impact |
|---|---|---|---|
| ZZ Plant (Zamioculcas) | Extreme low light | Very easy | Glossy, architectural leaves |
| Cast Iron Plant (Aspidistra) | Full shade tolerant | Nearly indestructible | Elegant green foliage |
| Peace Lily | Low to medium light | Easy | White blooms in shade |
| Pothos | Adaptable to all light | Beginner-friendly | Trailing vines |
| Calathea varieties | Prefers shade | Moderate | Patterned, colorful leaves |
Soil or Hydroponic Glass: Which Look Is More Elegant for Centerpieces?
The aesthetic of your living centerpiece sets the tone for your table, and the choice between a traditional soil-based pot and a modern hydroponic vessel is a major design decision. Neither is inherently more elegant; instead, their elegance is defined by how well they align with your overall wedding theme. A moss-wrapped terracotta pot with a lush succulent speaks to a rustic, bohemian, or garden-inspired wedding. It feels grounded, natural, and earthy. In contrast, a clear glass vessel showcasing the intricate root system of a Pothos cutting in water offers a minimalist, clean, and almost scientific beauty, perfect for a modern, chic, or contemporary event.
The hydroponic approach, where plant cuttings are grown directly in water, has become a significant trend in event design. It offers a unique visual appeal by making the roots part of the display. This look can be surprisingly budget-friendly. You can start propagating cuttings from existing plants like Pothos or Philodendron 4-6 weeks before the wedding. Displaying them in a collection of thrifted vintage bottles or mason jars of varying heights creates a stunning and dynamic “propagation station” centerpiece that is both beautiful and a conversation starter.
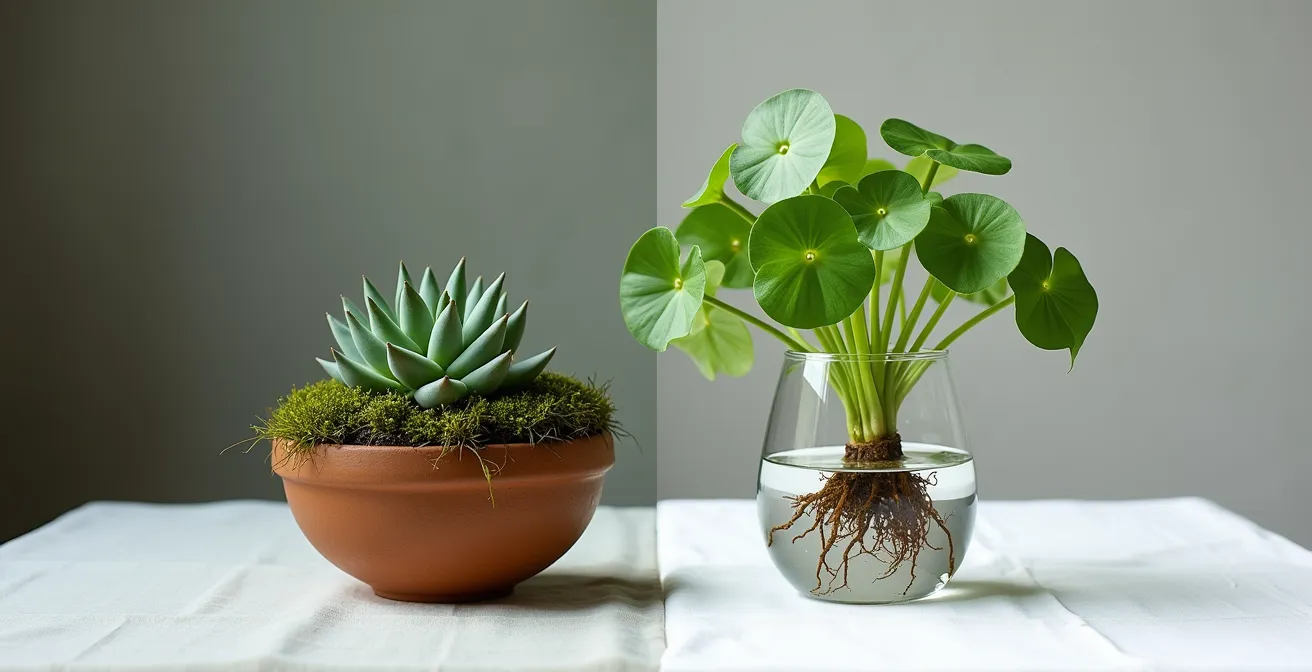
As the image above illustrates, the two styles create dramatically different moods. The soil-based option feels permanent and traditional, while the hydroponic look is light, airy, and ephemeral. For guests, the hydroponic favor can be less intimidating; it can live in its water-filled vessel for months with minimal care. The soil-based plant, while also a wonderful gift, requires a more immediate commitment to traditional plant care. Ultimately, the most elegant choice is the one that tells your story and fits seamlessly into the world you are creating for your guests.
The Saucer Mistake That Ruins Rental Linens and Tables
The single most common—and costly—mistake with living centerpieces is relying on a simple saucer for water protection. A saucer can overflow during watering, it can be tipped over by a guest, and it often leaves a condensation ring that can permanently damage wood tables or stain expensive rental linens. The professional solution is a foolproof technique known as the double-potting system. This method eliminates the risk of water damage entirely and is the non-negotiable standard for any event stylist working with living plants.
The system is simple: the plant remains in its plastic nursery pot, which has drainage holes. This nursery pot is then placed inside a slightly larger, decorative container called a cachepot. The cachepot has no drainage holes, acting as a sealed reservoir that catches any excess water. This creates an invisible, built-in saucer that is secure, stable, and completely leak-proof. Guests can water the plant without fear, and you can rest assured that the venue’s property is protected. This is especially crucial when working with venues that have strict policies about potential damages.
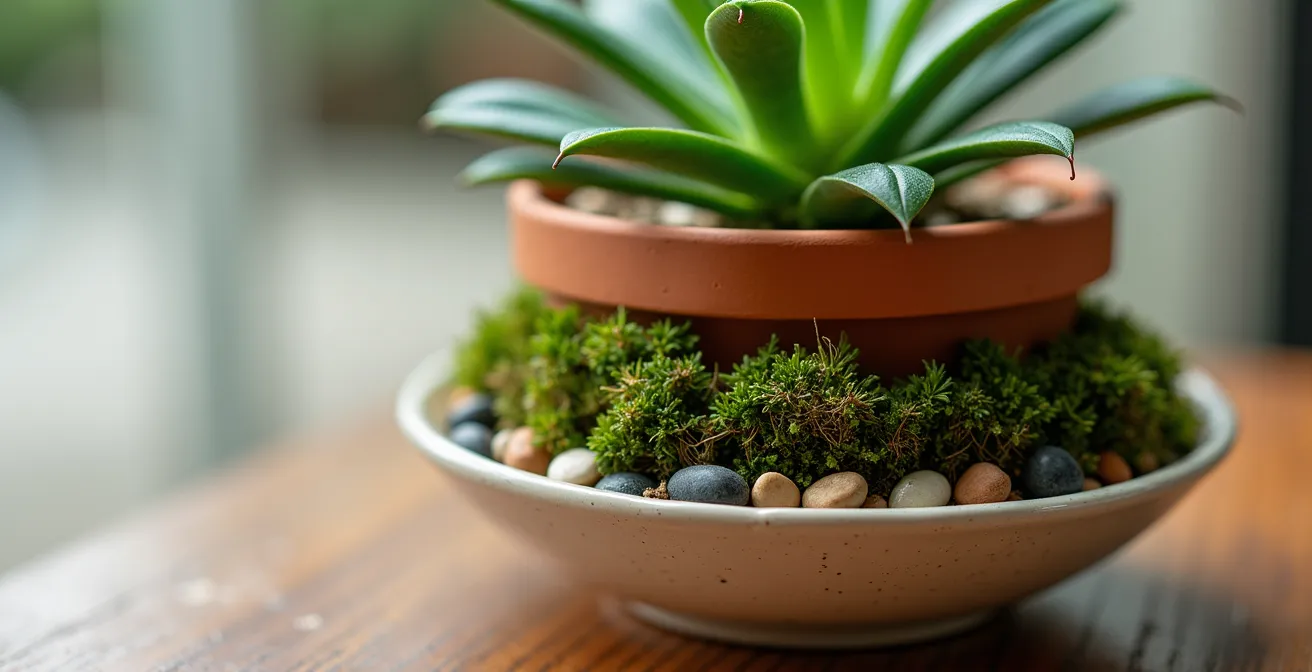
As this close-up shows, the space between the nursery pot and the cachepot can be filled with a layer of moss or small pebbles. This not only hides the plastic rim of the inner pot but also helps stabilize it. Some event stylists even use shallow trays or terrariums to create miniature succulent gardens, using decorative stones to add texture and ensure a modern, clean finish while preventing any water from escaping. This professional technique is the key to executing living decor with confidence and without liability.
Why the Wrong Vase Shape Destroys Your Arrangement’s Balance?
The success of a living centerpiece doesn’t just depend on the plant itself, but on the relationship between the plant and its container. The right vase or pot doesn’t just hold the plant; it complements its shape, elevates its form, and creates a sense of visual harmony. The wrong choice, however, can make even the most beautiful plant look awkward and unbalanced. A tall, skinny plant in a wide, low bowl can look lost, while a sprawling, trailing plant in a tall, narrow vase will feel constrained and top-heavy. Achieving visual harmony is about understanding proportion.
A widely accepted guideline in design is that the plant’s height should be significantly greater than the container’s height to create an elegant silhouette. As HGTV Design Expert Brian Patrick Flynn notes, this proportion is key to a pleasing aesthetic.
The plant’s height should ideally be 1.5-2 times the height of its container for visual harmony
– Brian Patrick Flynn, HGTV Design Expert
This rule of thumb helps create a composition that draws the eye upward and gives the plant a graceful presence. Beyond height, the shape of the container should also match the plant’s growth habit. Low pedestal bowls are perfect for trailing succulents, allowing them to spill over the sides for a romantic, cascading effect. Tall cylinder vases, on the other hand, are ideal for single-stem arrangements or upright plants like Snake Plants, emphasizing their modern, minimalist lines. A cluster of rustic mason jars enhances the charm of mixed wildflowers, creating a relaxed, “just-picked” feel.
The container itself is a major part of your decor budget, so choosing wisely impacts both your aesthetic and your bottom line. The following table provides some general guidelines for matching container styles with appropriate plants and their typical budget range.
| Container Style | Best Plant Match | Visual Effect | Budget Range |
|---|---|---|---|
| Low pedestal bowls | Trailing succulents | Elegant spread | $5-15 |
| Vintage vessels | Ferns & foliage | Romantic garden | $5-20 |
| Tall cylinder vases | Single stem arrangements | Modern minimalist | $3-10 |
| Mason jar clusters | Mixed wildflowers | Rustic charm | $2-8 |
How to Drill Drainage Holes in Ceramics Without Cracking Them?
You’ve found the perfect ceramic pot—it has the right color, shape, and size. There’s just one problem: it has no drainage hole. This is a common issue with decorative pots that aren’t designed for serious planting. Without drainage, a plant’s roots are at high risk of rot from sitting in stagnant water, a fatal flaw for a living favor meant to last. While the double-potting system is the safest method for events, you may want to prepare some pots for direct planting, especially if they are part of the take-home gift. The good news is that you can drill drainage holes yourself with the right tools and technique, without cracking the ceramic.
The process requires patience and precision, as heat and friction are the primary causes of cracking. The key is to keep the drill bit and the ceramic cool throughout the process. Using a specialized drill bit is non-negotiable; a standard bit will not work and will almost certainly break the pot. You need a diamond-tipped or carbide masonry bit designed specifically for cutting through hard materials like ceramic and glass. Applying a constant, slow drip of water directly onto the drilling spot is crucial to dissipate heat and reduce friction, making for a much cleaner and safer cut.
For those who want to create a permanent home for their plants without the risk of drilling, there is a simple drill-free alternative. You can create a “false bottom” inside the pot by adding a one to two-inch layer of LECA (lightweight expanded clay aggregate) balls or gravel. This layer creates a reservoir where excess water can collect away from the plant’s roots, providing a buffer against overwatering. To drill a hole safely, follow these steps:
- Place a piece of masking tape on the spot you want to drill. This will prevent the drill bit from slipping when you start.
- Use a diamond-tipped or carbide masonry bit.
- Begin drilling at a very low speed with minimal pressure, allowing the bit to do the work.
- Apply a constant, slow drip of water to the drilling area to reduce heat and friction.
- Gradually increase the speed as the hole begins to form, maintaining light pressure until the bit goes all the way through.
How to Package Living Decor so Guests Can Transport It Easily?
The final, and perhaps most critical, element of a successful take-home centerpiece is its packaging. A guest might love the idea of a living favor, but if it’s a heavy, dirt-spilling pot, it will likely be left behind. The goal is to create a transport-ready design that makes taking the plant home an effortless and delightful experience. This is achieved by setting up a dedicated “Plant Adoption Station” near the exit—a charming and practical display that transforms the process from a logistical challenge into a memorable part of the event.
This station should be equipped with everything a guest needs to securely package their new plant. Think simple, sustainable materials like kraft paper bags with sturdy handles and pieces of twine to secure them. A crucial element is a pre-cut cardboard collar that can be slipped around the base of the plant to hold the soil and moss in place during transit. This small detail prevents a mess and shows a high level of thoughtfulness. The cost savings of DIY living decor are significant, especially when you consider that professional centerpieces can cost between $200 and $540 per table, so investing a small amount in good packaging materials is well worth it.
The final touch is a custom care tag. This tag not only identifies the plant but also provides simple care instructions, ensuring the guest feels confident in their ability to keep their new “living legacy” alive. It’s a way to extend the hospitality of your wedding day long after it’s over. For a seamless guest experience, it’s wise to designate smaller, 4-inch plants as the take-home favors, while keeping any larger statement plants for yourself or your family.
Action Plan: Your DIY Take-Home Plant Packaging Station
- Set up a ‘Plant Adoption Station’ near the exit with kraft paper bags and twine for easy carrying.
- Create custom care instruction tags using cardstock and rubber stamps, listing the plant’s name and basic needs (light, water).
- Pre-cut cardboard collars or sleeves that fit snugly around the pot’s base to secure soil and moss during transport.
- Provide small spray bottles filled with water as an optional, charming add-on favor for plant misting.
- Designate smaller, easy-to-carry 4-inch plants as the official take-home favors, and clearly label any larger plants that are not for guests.
Key takeaways
- Double-potting is non-negotiable: Always use a plastic nursery pot inside a decorative cachepot to prevent water damage to tables and linens.
- Choose for resilience, not just looks: Select low-light tolerant plants like ZZ Plants, Pothos, or Cast Iron Plants that will thrive in a dark reception hall.
- Design for transport: A “Plant Adoption Station” with bags, soil-securing collars, and care tags turns a centerpiece into a cherished, hassle-free gift.
How to Implement Sustainable Management in a Suburban Garden?
A truly sustainable approach to wedding decor extends beyond the event itself. It involves thinking about the full lifecycle of your plants, from their origin before the wedding to their destination afterward. This concept transforms your centerpieces from single-use decor into a ‘living legacy’—a collection of plants that can be integrated into a home garden, creating a lasting and beautiful reminder of your special day. This journey can begin months before the wedding and continue long after.
The planning can start as early as six months out by propagating your own plants. Succulents, for example, are incredibly easy to propagate from cuttings or leaves taken from mother plants. This is not only extremely cost-effective but also adds a deeply personal touch to your decor. If you have a garden, you can also grow annual flowers from seed starting about 12 weeks before the event to supplement your arrangements. Partnering with local community gardens can also be a wonderful source for free cuttings and divisions, fostering a sense of community around your celebration.
After the wedding, the final step in the sustainable lifecycle is to give the plants a permanent home. Encourage guests who take plants to care for them, but also have a plan for any that are left behind. You can create a dedicated “memory border” in your own garden, planting the wedding flowers and foliage together. This creates a beautiful, evolving landscape that will bring back fond memories for years to come. To fully close the loop, set up a composting system for any organic waste from the wedding, including leftover plant materials or soil, turning it into nutrient-rich food for your new garden.
Now that you have the complete blueprint for creating beautiful, practical, and sustainable living decor, the next step is to start planning your plant selection and propagation timeline. Begin sourcing your containers, practicing the double-potting technique, and designing your care tags to bring your unique vision to life.