Cutting your water bill in half isn’t about just choosing native plants; it’s about restoring the hidden ecological systems that make your landscape a self-sufficient powerhouse.
- True water savings come from deep root systems that tap into groundwater, unlike shallow-rooted exotic plants.
- A garden designed as a micro-ecosystem, including features like log piles, creates its own moisture-retentive soil.
Recommendation: Shift your mindset from “gardening” to “small-scale ecosystem restoration” to unlock a landscape that is both beautiful and profoundly resilient.
The frustration is familiar for many homeowners: a lush, green lawn that demands a staggering amount of water, time, and chemical inputs, only to look scorched by mid-summer. The conventional wisdom suggests switching to native plants is the answer, and while true, this advice often misses the profound reason *why*. The solution isn’t merely swapping one plant for another; it’s about fundamentally rethinking your yard as a tiny, functioning ecosystem waiting to be restored.
Most landscaping advice focuses on the visible—the flowers, the leaves. But the real power of a native landscape lies in the invisible ecological infrastructure it builds. It’s in the deep-reaching roots that break up compacted soil and find deep moisture, the mycorrhizal fungi that create a water-sharing network, and the complex food webs that manage pests for free. This approach moves beyond simple horticulture and into the realm of restoration ecology, where the goal is to create a self-sustaining system that works with local climate patterns, not against them.
This guide will deconstruct the mechanisms that make native landscapes radically water-efficient. We will explore how to design them for beauty, select plants that support specific local wildlife, understand the critical role of keystone species, and implement techniques that mimic natural cycles. It’s time to stop fighting nature and start partnering with it to create a yard that not only saves you money but also becomes a vibrant patch of restored local ecology.
This article provides a comprehensive roadmap for transforming your landscape into a resilient, water-wise ecosystem. Below is a summary of the key systems and strategies we will cover to help you achieve that goal.
Summary: Why Choosing Native Species Reduces Water Bills by 50%?
- Why Native Gardens Look Messy to Some and How to Give Them Structure?
- How to Select Native Flowers That Feed Specific Local Bees?
- Native Oak or Exotic Maple: Which Survives Better in Changing Climates?
- The Nursery Mistake of Buying Invasive Species Labeled as “Wildflowers”
- When to Sow Native Seeds: The Importance of Cold Stratification
- Why a Log Pile Behind the Shed Is a Goldmine for Biodiversity?
- Why Your Urban Garden Is a Zone Warmer Than the Countryside?
- How to Restore Fragmented Natural Habitats Using the Miyawaki Method?
Why Native Gardens Look Messy to Some and How to Give Them Structure?
One of the biggest hurdles to adopting native landscapes is the perception that they look “messy” or “weedy.” This often stems from a misunderstanding of landscape aesthetics. A traditional lawn is a symbol of control, while a wilder garden can be misinterpreted as neglect. The key is to apply Structural Intent—using clear design principles that signal the space is cared for and deliberate, not abandoned. This approach bridges the gap between wild ecology and human aesthetics, creating a “gardenesque” feel that is legible and attractive.
Implementing structure can be simple yet transformative. Think in terms of layers and legibility. Clean, sharp edges created with stone or steel instantly frame a wilder planting bed, telling the viewer, “This is on purpose.” Mown paths or “cues to care” that wind through taller grasses and flowers not only provide access but also create a sense of order and invitation. Instead of scattering individual plants, group them in repeated drifts of three, five, or seven. This mimics natural plant communities and provides a stronger visual impact.
Case Study: Cherry Creek 3 Homeowners Association
The Cherry Creek 3 Homeowners Association provides a powerful real-world example. By replacing traditional landscaping with structured native plant gardens across 250 private properties, they achieved a stunning reduction in water consumption. The community’s annual water usage plummeted from 37 million gallons to under 22 million gallons over five years. This case demonstrates that by applying design principles to native plants, communities can create landscapes that are both aesthetically pleasing and achieve massive, measurable water savings, in this case saving 15 million gallons annually.
Finally, incorporate non-plant elements. A well-placed bench, a sculptural boulder, or a bird bath can act as a focal point, anchoring the wildness around it. By designing for four-season interest—from spring blooms and summer flowers to autumn seed heads and winter grasses—the garden remains a dynamic and engaging space year-round, proving that a native landscape can be a pinnacle of intentional design.
How to Select Native Flowers That Feed Specific Local Bees?
Creating a truly effective pollinator garden goes beyond planting a generic “wildflower” mix. It involves a deeper level of ecological matchmaking. Many native bees are specialists, meaning they have co-evolved to feed on a small number of specific native plants. Their life cycles are synchronized with the blooming times of these plants, and their bodies are perfectly adapted to access the pollen and nectar. For instance, the shape of a flower can determine which bee can feed from it. Long-tongued bees are needed for tubular flowers, while short-tongued bees prefer flat, open blossoms.
To support these crucial specialists, you must become a student of morphology. The goal is to provide a variety of flower shapes, sizes, and colors that bloom in succession from early spring to late fall. This ensures a continuous food supply for different bee species throughout their active seasons. A garden rich in specialist bee-plant relationships is a sign of a healthy, functioning ecosystem. It’s a system where keystone native plants support up to 60% of native bees and other pollinators, forming the foundation of the local food web.
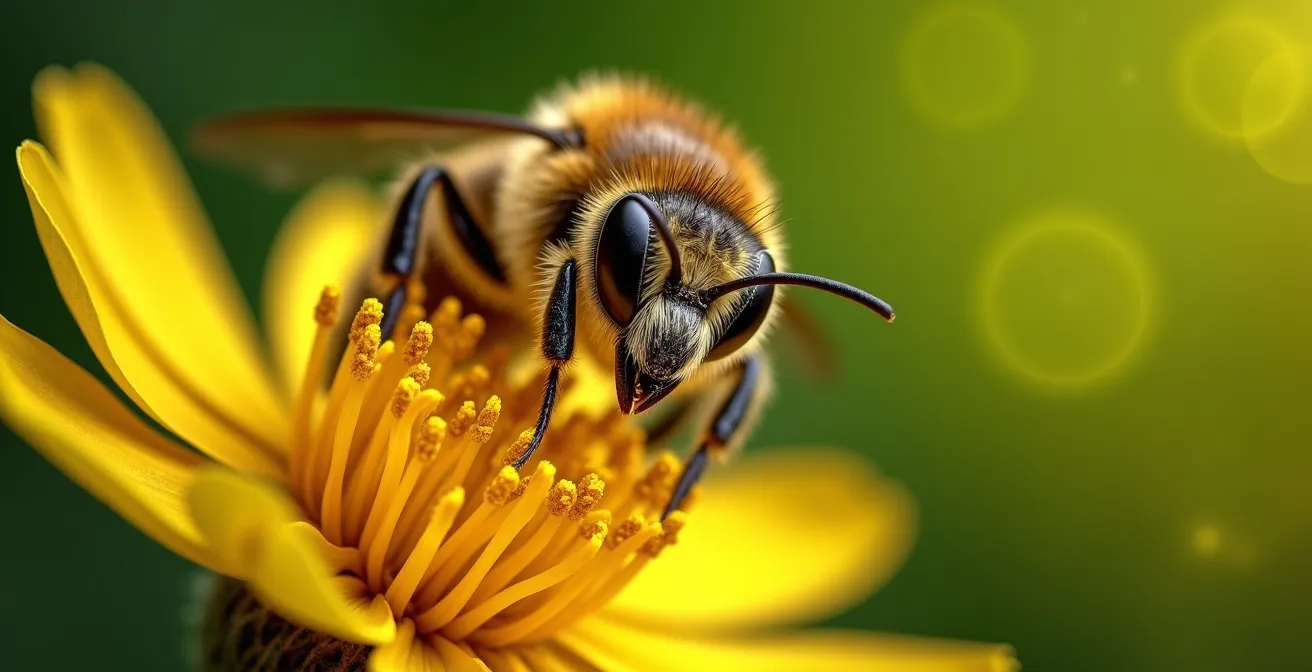
This macro photograph perfectly illustrates the intricate relationship between a bee and its preferred flower. Notice how the bee’s physical structure is uniquely suited to access the flower’s pollen, a prime example of co-evolution. This level of specialization is what makes planting true native species, rather than generic cultivars, so vital for local biodiversity.
The following guide helps illustrate how different flower structures cater to specific types of native bees, allowing you to make more targeted and effective plant choices.
| Flower Type | Shape | Bee Species Match | Tongue Length Required |
|---|---|---|---|
| Tubular Flowers | Long, narrow tube | Long-tongued bumblebees | 15-20mm |
| Composite Flowers | Flat landing platform | Short-tongued sweat bees | 3-6mm |
| Bell-shaped | Downward facing | Buzz-pollinating bees | 8-12mm |
| Squash Blossoms | Large, open | Specialist squash bees | 10-15mm |
Native Oak or Exotic Maple: Which Survives Better in Changing Climates?
When considering a landscape’s resilience, especially in the face of drought and climate instability, the choice of trees is paramount. At first glance, an exotic maple and a native oak might seem like comparable choices. However, their ability to survive and support an ecosystem are worlds apart. The difference lies in their ecological infrastructure, primarily their root systems and their role as a keystone species.
Native oaks, having evolved in local conditions for millennia, develop incredibly deep and extensive taproots. These roots can delve deep into the soil, reaching water reserves that are inaccessible to shallow-rooted trees like many ornamental maples. This is the fundamental mechanism behind their drought tolerance. While an exotic maple may wilt and require supplemental watering during a dry spell, a mature native oak is tapping into a water source far below the surface, making it self-sufficient. The Compass Plant is another powerful example, with roots that can reach up to 15 feet deep, anchoring it firmly in the “water budget” of its native ecosystem.
Beyond water, the native oak is a biodiversity engine. It serves as a host for hundreds of species, providing food and shelter that exotic species simply cannot. Groundbreaking research by Doug Tallamy shows that oak trees support an incredible 534 species of caterpillars, which in turn are the primary food source for nesting birds. An exotic maple, by contrast, might support only a handful. By choosing a native oak, you are not just planting a tree; you are restoring a critical hub of the local food web, building a landscape that is resilient from the roots up.
The Nursery Mistake of Buying Invasive Species Labeled as “Wildflowers”
One of the most frustrating pitfalls for a well-intentioned homeowner is heading to a garden center and accidentally purchasing an invasive species disguised as a “wildflower” or a sterile cultivar that offers little ecological value. The commercial nursery industry often prioritizes traits like double blooms or unusual colors, which frequently come at the expense of pollen and nectar, rendering them useless to pollinators. These modified plants are often called “nativars.”
Even more dangerous are the generic “wildflower seed packets” that can contain species that are not native to your region and may even be aggressive or invasive. To avoid these mistakes, you must become a discerning consumer. The single most important tool is learning the Latin botanical names of the plants native to your specific region. This allows you to cut through misleading common names and marketing labels. A plant labeled “Purple Coneflower” might be a native *Echinacea purpurea*, or it could be a sterile, pom-pom-like cultivar with a trademarked name that offers no value to bees.

This image clearly contrasts a “straight species” native coneflower on the left, with its open, pollen-rich center readily accessible to pollinators, against a highly-bred “double-flowered” cultivar on the right. The cultivar’s dense petals block access to the nectar and pollen, making it beautiful to some human eyes but an “ecological desert” for wildlife. Choosing the straight species is always the superior choice for ecosystem restoration.
Your Nursery Investigation Plan: 5 Questions to Ask Before You Buy
- What is the complete Latin/botanical name including variety? (Avoid cultivars ending in trademark names and seek out the straight species.)
- Is this a straight native species or a ‘nativar’/cultivar? (Straight species are genetically pure and provide the most ecological benefits.)
- Where was this plant propagated and grown? (A local ecotype grown within 100 miles is best adapted to your specific climate and soil.)
- Does this plant appear on my state’s invasive species list? (Always check your local list before purchasing any unfamiliar plant.)
- Will this self-seed aggressively beyond my property? (Some plants sold as “wildflowers” can become neighborhood pests.)
When to Sow Native Seeds: The Importance of Cold Stratification
Unlike planting annual vegetables, working with native perennial seeds requires an understanding of their natural life cycles. Many native seeds have a built-in dormancy mechanism that prevents them from germinating at the wrong time, like during a warm spell in autumn. To break this dormancy, they need to experience a period of cold, moist conditions, a process known as cold stratification. This process mimics the natural experience of a seed falling to the ground in autumn and enduring winter before sprouting in spring.
For the gardener, this means you can’t simply sow native seeds in spring and expect them to grow. You have to provide this cold period yourself. There are two main methods. The first is to replicate winter in your refrigerator by placing seeds in a moist medium (like sand or paper towel) in a sealed bag for 30 to 90 days. The second, and often easier, method is “winter sowing.” This involves planting seeds in containers like milk jugs with drainage holes and leaving them outdoors all winter. The natural freeze-thaw cycles will break dormancy, and the seeds will germinate when the conditions are perfect in spring.
The USDA Forest Service champions the winter sowing method as it produces stronger, more resilient seedlings already acclimated to local conditions. According to their findings, this technique can lead to germination rates exceeding 80% for properly stratified native seeds, a stark contrast to the less than 20% rate for seeds sown without stratification. This simple technique of working with nature’s clock, rather than against it, is fundamental to successful and low-cost native plant propagation.
The stratification needs vary by species, so a little research is required. This table provides a starting point for some common natives.
| Native Species | Stratification Period | Temperature | Method |
|---|---|---|---|
| Purple Coneflower | 30 days | 33-38°F | Moist cold in refrigerator |
| Black-eyed Susan | 60 days | 33-38°F | Winter sowing in milk jugs |
| Wild Columbine | 30-60 days | 33-38°F | Moist cold or winter sowing |
| Milkweed | 30 days | 33-38°F | Cold moist in fridge |
| Wild Lupine | Scarification + 90 days cold | 33-38°F | Nick seed coat, then cold stratify |
Why a Log Pile Behind the Shed Is a Goldmine for Biodiversity?
In our quest for tidy landscapes, we’ve been taught to remove all signs of decay: fallen leaves, dead branches, and logs. But in a functioning ecosystem, decay is not an end; it’s a beginning. A simple pile of logs or branches tucked away in a corner of the yard is not an eyesore—it is a biodiversity engine and a critical piece of water-conserving ecological infrastructure. This feature, sometimes called a “brush pile” or “loggery,” serves multiple, essential functions.
First, it’s a five-star hotel for wildlife. It provides shelter for everything from beneficial insects and salamanders to nesting birds and small mammals. As the wood slowly breaks down, it becomes food for fungi, beetles, and other decomposers, which in turn become food for birds and other predators. This is the base of a resilient food web. Second, the log pile is a moisture-retaining powerhouse. The decaying wood acts like a sponge, soaking up rainwater and releasing it slowly into the surrounding soil. This creates a cool, moist microclimate that can be a lifesaver for nearby plants during a drought.
This process is also crucial for building healthy soil. The decomposition of wood is the primary way that beneficial mycorrhizal fungi—the subterranean network that connects plants and shares water and nutrients—are cultivated. A garden rich in this organic matter is a garden that holds water effectively. In fact, studies show that gardens with high levels of organic matter from elements like decaying logs require 60-80% less water than their sterile counterparts. By simply leaving a pile of logs behind the shed, you are actively building a more drought-resistant, living landscape that can survive with significantly less supplemental watering.
Why Your Urban Garden Is a Zone Warmer Than the Countryside?
If you live in a city or dense suburb, your garden operates under a set of environmental pressures that are vastly different from those in rural areas. This phenomenon is known as the Urban Heat Island (UHI) effect. Paved surfaces like roads and parking lots, along with dark rooftops, absorb and retain solar radiation, raising ambient temperatures significantly—often by several degrees compared to the surrounding countryside. This has profound implications for your garden and its water needs.
Higher temperatures mean increased water loss from two primary sources: evaporation from the soil surface and transpiration from plant leaves. Your plants are essentially “sweating” more to stay cool, and they are drawing water from soil that is drying out faster. This creates a vicious cycle of water stress, demanding more frequent irrigation to keep non-adapted plants alive. It’s a major reason why, as seen in some urbanized regions, as much as 50% of residential water goes to landscape irrigation. The traditional suburban lawn is particularly vulnerable in these environments, acting more like a heat-baked, thirsty carpet than a cooling oasis.
This is precisely why the ecosystem restoration approach is not just beneficial but essential in urban areas. Native plants that have evolved with local heat and drought stress are already adapted to these tougher conditions. Their deep root systems can access cooler, deeper soil moisture that evaporates less quickly. Furthermore, a well-designed native plant community with multiple layers (groundcovers, perennials, shrubs, and trees) creates its own microclimate. It shades the soil, reducing evaporation, and the collective transpiration of the plants can have a measurable cooling effect on the immediate area, mitigating the UHI effect on a micro-scale.
Key takeaways
- Water savings are a result of restoring an entire ecological system, not just planting drought-tolerant species.
- The hidden infrastructure of deep roots, living soil, and fungal networks is what creates true landscape resilience.
- Designing with “Structural Intent” makes native gardens aesthetically pleasing and overcomes the “messy” stereotype.
How to Restore Fragmented Natural Habitats Using the Miyawaki Method?
While transforming a single yard is a powerful act, the principles of restoration ecology can be scaled up to heal entire communities. Our urban and suburban landscapes are highly fragmented, with small patches of “nature” isolated by vast stretches of lawn and pavement. The Miyawaki method, pioneered by Japanese botanist Akira Miyawaki, offers a potent strategy for rapidly restoring dense, multi-layered native forests on small, degraded plots of land. It’s a method that turbocharges the creation of the very ecosystems this article has described.
The core of the method involves planting a high density of native saplings—as many as three to five per square meter—from dozens of different species appropriate to the area’s climax forest. This intense competition for sunlight forces the trees to grow upwards at an accelerated rate, often 10 times faster than conventional tree planting. The multi-layered structure, including canopy trees, sub-trees, shrubs, and groundcover, is planted all at once. This dense planting immediately creates a canopy that shades out weeds and dramatically reduces soil evaporation, by some estimates up to 70%.
The water conservation benefits are immense. A Miyawaki-style “tiny forest” becomes a super-efficient rainwater harvesting system. Its complex, multi-layered structure and the thick layer of mulch on the forest floor can capture and absorb up to 30% more rainfall than an equivalent area of lawn, reducing runoff and promoting groundwater recharge. After an initial establishment period of about two to three years, these forests become self-sustaining, requiring no further irrigation or maintenance. As the California Native Plant Society notes, “Native plants generally require 60 to 80 percent less water than traditional landscaping plants,” and a Miyawaki forest is the ultimate expression of this principle in action.
The Miyawaki method proves that even on a small scale, we can create powerful biodiversity hotspots that build soil, conserve water, and restore a piece of our natural heritage. It is the logical and inspiring culmination of a journey from a single native plant to a fully restored, functioning ecosystem.
By adopting an ecosystem-first approach, you can create a landscape that not only drastically reduces your water bill but also becomes a source of beauty, biodiversity, and ecological function. Begin today by assessing one area of your yard to start your own small-scale restoration project.